background image

Specific information regarding appliances with R 290 

refrigerant gas.

•  Thoroughly read all of the warnings.

•  When defrosting and cleaning the aplliance , do 

not use any tools other than those recommended 

by the manufacturing company.

•  The appliance must be placed in an area without 

any continuously sources of ignition (for example: 

open flames , gas or electrical appliances in opera-

tion).

•  Do not puncture and do not burn.

•  This appliance contains Y g (see rating label back 

of unit ) of R290 refrigerant gas.

•  R290 is a refrigerant gas that complies with the 

European directives on the environment. Do not 

puncture any part of the refrigerant circuit. Be 

aware the refrigerants may not contain an odour.

•  If the appliance is installed, operated or stored in 

a nonventilated area, the room must be designed 

to prevent to the accumulation of refrigerant leaks 

resulting in a risk of fire or explosion due to igni-

tion of the refrigerant caused by electric heaters, 

stoves, or other sources of ignition.

•  The appliance must be stored in such a way as to 

prevent mechanical failure.

•  Individuals who operate or work on the refriger-

ant circuit must have the appropriate certification 

issued by an accredited organization that ensures 

competence in handling refrigerants according to 

a specific evaluation recognized by associations in 

the industry.

•  Repairs must be performed based on the recom-

mendation from the manufacturing company. 

Maintenance and repairs that require the assis-

tance of other qualified personnel must be per-

formed under the supervision of an individual 

specified in the use of flammable refrigerants.

4

49

Summary of Contents for D 225

Page 1: ...D 225 2 5 3 4 1 9 y 2 16 30 44 58 74 88 104 GEBRAUCHSANWEISUNG INSTRUCCIONES DE USO MANUEL D UTILISATION OPERATING MANUAL ISTRUZIONI D USO GEBRUIKSAANWIJZING MANUAL DE INSTRU ES PRIRO NIK ZA UPORABO...

Page 2: ...jahrelang Freude machen wird vorausgesetzt Sie benutzen das Ger t vorschriftsm ig Lesen Sie daher zun chst diese Gebrauchsanweisung so dass Sie wissen wie Sie Ihren Entfeuchter seiner optimalen Leben...

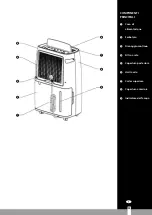
Page 3: ...HAUPTBAUTEILE Netzkabel Wasserbeh lter Durchgehender Ablauf Filtergitter Hintere Verkleidung Luftauslass Obere Abdeckung Vordere Verkleidung Wasseranzeige A B C 4 E F G H 9 2 3 1 5 6 7 8...

Page 4: ...teckdosen mit einer Netzspannung von 220 240 Volt 50 Herz ALLGEMEIN F r ein optimales Resultat sollten Sie das Ger t nicht zu nahe an einen Heizk rper oder eine ande re W rmequelle stellen Achten Sie...

Page 5: ...ose passt das Ger t auf einer stabilen und flachen Grundfl che steht Lassen Sie die elektrische Anlage von einem Fachmann berpr fen wenn Sie sich nicht sicher sind dass alles in Ordnung ist Dieses Ger...

Page 6: ...ntuelle Reparaturen ausschlie lich von einem gepr ften Installateur oder von Ihrem Lieferanten ausf hren Befolgen Sie die Anweisungen zur Pflege des Ger tes Ziehen Sie immer den Stecker aus der Steckd...

Page 7: ...ltemittelgas R290 Lesen Sie aufmerksam alle Warnhinweise Wenn Sie das Ger t abtauen und reinigen verwen den Sie keine Werkzeuge die nicht vom Hersteller empfohlen wurden Das Ger t muss in einem Berei...

Page 8: ...len die von Industrieverb nden aner kannt wird Reparaturen m ssen basierend auf den Empfehlungen des Herstellers durchgef hrt werden Wartungs und Reparaturarbeiten welche die Unterst tzung einer weite...

Page 9: ...kunden lang gedr ckt um die Kindersicherung einzuschalten Nachdem die Kindersicherung eingeschaltet wurde k nnen alle Tasten mit Ausnahme der Kindersicherung nicht bet tigt werden 7 Dual 8 Bildschirm...

Page 10: ...ltet Der L fter wird durch hohe Luftgeschwindigkeit abgetaut und die DEF Anzeige leuchtet B Wenn die Raumtemperatur weniger als oder gleich 16 C betr gt wird die Spulentemperatur nicht erkannt Der Bet...

Page 11: ...nk verschmutzt sein verwenden Sie kaltes oder warmes Wasser zur Reinigung Verwenden Sie keine Reinigungsmittel Scheuerpads chemisch behan delte Staubt cher Waschbenzin Verd nnungsmittel oder andere L...

Page 12: ...ef hrt wird und aus der Seite des Tanks verl uft Wenn der Wassertank eingesetzt und der Ablaufschlauch ausgezogen ist kann das Wasser ber die Ablauf ffnung aus dem Ger t entleert werden WARTUNG Reinig...

Page 13: ...ation des Filters Setzen Sie den Filter in das Ger t und dr cken Sie die beiden Haken am Filter bis sie einrasten LAGERUNG Wenn Sie das Ger t lange Zeit nicht benutzen tun Sie am besten Folgendes 1 Zi...

Page 14: ...eine ebene stabile Oberfl che Ist der Filter verstopft Reinigen Sie das Filtergitter gem den Anweisungen zur Reinigung des Luftentfeuchters Code E1 Kurzschluss oder offener Schaltkreis des Spulensens...

Page 15: ...251 x 595 Gewicht netto kg 16 0 Gewicht brutto kg 17 3 Schalldruckpegel dB A 39 Schutzklasse IP X0 Dient als Richtwert Der Hersteller beh lt sich das Recht vor nderungen ohne vorherige Bekanntgabe vor...

Page 16: ...cionar pleno confort durante muchos a os siempre que lo utilice debidamente Por lo tanto le recomendamos que lea primero este manual de instrucciones para prolongar la vida til de su deshumidificador...

Page 17: ...ONENTES PRINCIPALES 5 17 Cable de alimentaci n Dep sito Drenaje continuo Pantalla de filtro Carcasa posterior Salida de aire Cubierta superior Carcasa frontal Indicador de agua A B C 4 E F G H 9 1 5 6...

Page 18: ...sultado ptimo no coloque el aparato cerca de un radiador o otra fuente calor fi ca Mantenga cerradas todas las ventanas para una mayor eficacia La capacidad de deshumidificaci n depende de la temperat...

Page 19: ...la clavija del cable el ctrico es a la medida del enchufe el aparato est colocado en posici n vertical y sobre una superficie plana Haga controlar la instalaci n el ctrica por un profe sional autoriz...

Page 20: ...uen con el aparato Las eventuales reparaciones deben ser siempre lle vadas a cabo por un t cnico de servicio cualificado o por su distribuidor Observe las instrucciones de mantenimiento Desenchufe sie...

Page 21: ...aci n espec fica sobre aparatos con gas refriger ante R 290 Lea con atenci n todas las advertencias Cuando descongele y limpie el aparato no use her ramientas distintas de las recomendadas por el fab...

Page 22: ...personal cualificado debe realizarse bajo la super visi n de una persona especificada en el uso de refrigerantes inflamables DISTANCIA NECESARIA Respete la distancia necesaria entre el aparato y las...

Page 23: ...que la operaci n haya completado 10S todas las luces incluyendo el doble 8 se atenuar n INSTRUCCIONES DE FUNCIONAMIENTO 1 Funci n de control autom tico de humedad A Cuando el uso CO continuo ha sido a...

Page 24: ...inferior o igual a 16 C la temperatura del dispositivo no se detecta Seg n la acci n de la temperatura ambiente ser as Temperatura ambiente 5 C el controlador se para Cuando 5 C temperatura ambiente...

Page 25: ...agua fr a o templada para limpiarlo No es posible usar detergente esponjas de fregar pa os para el polvo tratados qu micamente gasolina benceno acetona u otros disolventes ya que pueden rayar y da ar...

Page 26: ...el tubo de drenaje colocado hacia fuera el agua puede salir de la m quina a trav s del dep sito de drenaje MANTENIMIENTO Limpieza del deshumificador A Limpieza de la carcasa Pasar un trapo h medo y s...

Page 27: ...ar ALMACENAMIENTO Cuando el aparato no se use durante un largo per odo de tiempo proceda como sigue 1 Desenchufe el aparato y vac e el dep sito Deje secar el dep sito y el aparato 2 Limpie el filtro d...

Page 28: ...instrucciones de limp ieza del deshumidificador C digo E1 Cortocircuito del sensor del dis positivo o circuito abierto Compreube si la l nea est suelta o sustituya el sensor del disposi tivo GARANT A...

Page 29: ...ci n El fabricante se reserva el derecho de introducir modificaciones sin previo aviso No deseche ning n dispositivo electr nico junto a los residuos habituales Utilice los contenedores e instalacione...

Page 30: ...a satisfaction pendant de longues ann es si vous l utilisez de fa on ad quate Pour assurer une dur e de vie optimale de votre d shumidificateur lisez d abord ces instructions d utilisation Les produit...

Page 31: ...CES PRINCIPALES C ble d alimentation R servoir Drainage en continu Filtre protecteur Coque arri re Sortie d air Panneau sup rieur Coque avant Indicateur de niveau d eau A B C 4 E F G H 9 3 31 1 5 6 7...

Page 32: ...uni quement pour une prise de courant avec mise la terre avec une tension de raccordement de 220 240 V 50 Hz G N RAL Pour obtenir un r sultat optimal de votre appareil ne pas le placer pr s d un radia...

Page 33: ...fiche lectrique rentre bien dans la prise de contact l appareil est bien pos sur une surface plane et stable Si vous n tes pas certain que tout est en ordre faites v rifier l installation lectrique pa...

Page 34: ...agr ou par votre distributeur Suivez les instructions d entretien de l appareil D branchez toujours l appareil lorsque vous ne l utilisez pas Si le cordon lectrique de l appareil est endomma g faites...

Page 35: ...290 Lire attentivement toutes les mises en garde Lors du d givrage et du nettoyage de l appareil n utilisez pas d autres outils l exception de ceux recommand s par le fabricant L appareildoit treplac...

Page 36: ...oivent tre effectu s sous la supervision d une personne sp cialis e dans l utilisation de r frig rants inflamma bles DISTANCE REQUISE Observez la distance requise entre l appareil et des murs ou autre...

Page 37: ...ynchrone Remarque une fois que le fonctionnement 10S est termin les lumi res y compris le double 8 sont toutes tamis es MODE D EMPLOI 1 Fonction de contr le automatique de l humidit A Lorsque le mode...

Page 38: ...des courants d air forts le voyant de d givrage s allume DEF B Lorsque la temp rature ambiante est inf rieure ou gale 16 C la temp rature de la sonde n est pas d tect e En fonction de la temp rature...

Page 39: ...est sale utilisez de l eau froide ou de l eau chaude pour le nettoyer Il est interdit d utiliser des d tergents de la paille de fer des chiffons trait s chi miquement de l essence du benz ne du diluan...

Page 40: ...la cloison puis sortant du c t du r servoir Lorsque le r servoir d eau doit tre install en place et que le tuyau de drainage est redress l eau peut tre vacu e de la machine par le trou de drainage EN...

Page 41: ...filtre ins rez le filtre dans la machine et poussez les deux crochets du filtre en place LE STOCKAGE Si vous n utilisez plus l appareil pendant une longue p riode appliquez les consignes suivantes 1...

Page 42: ...selon les instructions de nettoy age du d shumidificateur Code E1 Court circuit du capteur du ser pentin ou circuit ouvert V rifiez si la conduite est desser r e ou remplacez le capteur du serpentin...

Page 43: ...ion Le fabricant se r serve le droit d apporter des modifications sans pr avis Ne pas jeter des appareils lectriques avec les d chets managers municipaux non tri s Utiliser des quipements de collecte...

Page 44: ...d a high quality product which will give you many years of pleasure if you use it responsibly Please read the user s manual first in order to ensure the optimum life span of your dehumidifier On behal...

Page 45: ...IMPORTANT COMPONENTS Supply cord Tank Continuous drainage Filter screen Back shell Air outlet Top cover Front shell Water indicator A B C 4 E F G H 4 45 1 5 6 7 8...

Page 46: ...a radiator or any other heat source Ensure that all windows are closed in order to achieve maximum efficiency The capacity of the dehumidifier depends on the temperature and the humidity in the room...

Page 47: ...and knowledge unless they have been given supervi sion or instruction concerning use of the appliance by a person responsible for their safety This device is manufactured according to CE safe ty stan...

Page 48: ...owledge if they have been given supervision or instruction concerning use of the appliance in a safe way and understand the haz ards involved Children shall not play with the appliance Cleaning and us...

Page 49: ...ance is installed operated or stored in a nonventilated area the room must be designed to prevent to the accumulation of refrigerant leaks resulting in a risk of fire or explosion due to igni tion of...

Page 50: ...he scheduled shutdown In the off state press the TIMER key to set the timer and when to start the dehumidifier B Regular time range 01 24 hours timing setting 00 01 02 23 24 00 cycle C When the timing...

Page 51: ...5 Full water protection A When the full water lasts for 3 seconds the controller stops working and all outputs are turned off The full water indicator is on FULL the buzzer sounds 15 rings Press any k...

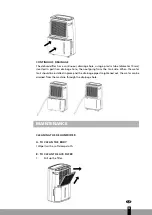
Page 52: ...emove the floater in the water tank otherwise the water sensor will not be able to sense the water level so that it can not operate normally 2 If the tank is dirty use cold water or warm water cleanin...

Page 53: ...e hole then outgoing from the tank side When the water tank should be installed in place and the drainage pipe straightened out the water can be drained from the machine through the drainage hole MAIN...

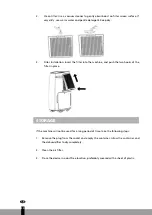
Page 54: ...r into the machine and push the two hooks of the filter in place STORAGE If the machine will not be used for a long period of time take the following steps 1 Remove the plug from the socket and empty...

Page 55: ...tions of dehumidifier E1 Code Coil sensor short circuit or open circuit Check whether the line is loose or replace the coil sensor CONDITIONS OF WARRANTY There is a two year warranty on your dehumidif...

Page 56: ...ight kg 16 0 Gross weight kg 17 3 Sound pressure level dB A 39 Unit protection IP X0 To be used as indication Subject to change without prior notice Do not dispose of electrical appliances as unsorted...

Page 57: ...57 4...

Page 58: ...siede un prodotto di alta qualit che le offrir molti anni di comfort a condizione che venga utilizzato in modo responsabile Per una durata ottimale del suo Qlima La invitiamo a leggere le presenti ist...

Page 59: ...NENTI PRINCIPALI Cavo di alimentazione Serbatoio Drenaggio continuo Filtro a rete Copertura posteriore Uscita aria Carter superiore Copertura anteriore Indicatore dell acqua A B C 4 E F G H 9 59 1 5 6...

Page 60: ...er ottenere un funzionamento ottimale prefe ribile evitare di posizionare l apparecchio in prossi mit di un termosifone o di un altra fonte di calo re Assicurarsi che tutte le finestre siano chiuse in...

Page 61: ...cata nella targhetta dell apparecchio la presa di corrente e la rete elettrica sono idonee all utilizzo dell apparecchio la spina del cordone elettrico adatta alla presa di corrente L apparecchio coll...

Page 62: ...recchio o delle sue componenti sempre necessario staccare la spina elettrica dalla presa di corrente L allacciamento dell apparecchio all impianto elet trico NON deve essere effettuato in nessun caso...

Page 63: ...rischio provvedere alla sua sostituzione rivolgendosi ad un centro di assi stenza autorizzato Qlima o ad un riparatore quali ficato G ATTENZIONE Non usare mai l apparecchio se il cordone elettrico o l...

Page 64: ...ante che potrebbe causare incendio o esplosione dovuti alla combustione del refriger ante provocata da stufe elettriche fornelli o altre sorgenti di accensione L apparecchiatura deve essere conservata...

Page 65: ...idit 4 TIMER Impostazione del timer A In stato di accensione premere il tasto TIMER per impostare il timer per lo spegnimento programmato In stato di spegnimento premere il tasto TIMER per impostare i...

Page 66: ...ne a 55 di umidit D Temperatura ambiente 27 C selezione automatica impostata a 50 di umidit 3 Funzione di asciugatura Spia CLOTH BIANCHERIA A Quando questa funzione attivata il deumidificatore continu...

Page 67: ...arrestato per 10 minuti 7 Protezione del ritardo del compressore A Ogni volta l avvio del compressore consentito per l avvio immediato B Dopo che il compressore spento avviarlo nuovamente con almeno u...

Page 68: ...saldamente con entrambe le mani Se il serbatoio dell acqua non posizionato il sensore di pieno d acqua sar ancora attivato e il deumidificatore non funziona DRENAGGIO CONTINUO Il deumidificatore prese...

Page 69: ...rare verso l alto il filtro 2 Pulizia del filtro Utilizzare un aspirapolvere per rimuovere delicatamente la polvere dalla superficie del filtro Se molto sporco utilizzare acqua calda e detergente deli...

Page 70: ...non pu funzionare La funzione di deumidi ficazione non pu essere avviata Il filtro bloccato Pulire il filtro secondo le istruzi oni per la pulizia del deumidifi catore L ingresso o l uscita dell aria...

Page 71: ...ono sempre a carico dell acquirente Per prevenire costi inutili si consiglia di leggere sempre attentamente le istruzioni prima dell uso Qualora nelle istruzioni non vi sia alcun suggerimento in merit...

Page 72: ...le un sistema di raccolta adeguato Se le apparecchiature elettriche vengono disperse in discariche o depositi di ri uti potrebbe veri carsi una perdita di sostanze pericolose nelle acque sotterranee e...

Page 73: ...73...

Page 74: ...ngeschaft waar u nog vele jaren plezier van zult hebben mits u het apparaat verantwoord gebruikt Lees daarom eerst deze gebruiksaanwijzing voor een optimale levensduur van uw ontvochtiger Wij geven u...

Page 75: ...BELANGRIJKE ONDERDELEN Netvoeding Tank Permanente waterafvoer Filterscherm Achterbehuizing Luchtuitblaasrooster Deksel Voorplaat Waterpeilindicator A B C 4 E F G H 9 1 75 1 5 6 7 8...

Page 76: ...een geaard stopcontact aan sluitspanning 220 240 V 50 Hz ALGEMEEN Om een optimaal resultaat te krijgen het apparaat niet dicht bij een radiator of een andere warmte bron plaatsen Zorg ervoor dat alle...

Page 77: ...paraat op een stabiele en vlakke onder grond staat Laat de elektrische installatie controleren door een erkend vakman als u er niet zeker van bent dat alles in orde is Dit apparaat is niet bedoeld voo...

Page 78: ...ventuele reparaties altijd uitvoeren door een erkend servicemonteur of uw leverancier Volg de onderhoudsinstructies Haal altijd de stekker van het apparaat uit het stopcontact als het niet wordt gebru...

Page 79: ...llen met R 290 koelgas Lees alle waarschuwingen aandachtig Gebruik tijdens het ontdooien en reinigen van het toestel geen andere hulpmiddelen dan deze die aanbevolen worden door de fabrikant Het toest...

Page 80: ...Reparaties moeten uitgevoerd worden gebaseerd op de aanbevelingen van de fabrikant Onderhoud en reparaties die de hulp van ander gekwalificeerd personeel vereisen moeten uitgevoerd worden onder toezi...

Page 81: ...kunnen er geen toetsen behalve de toetsen voor het kinderslot gebruikt worden 7 Tweevoudig display met 8 schermen als displaypaneel voor synchrone bediening Opmerking Na bediening zullen na 10 second...

Page 82: ...eschakeld en wordt de ventilator ontdooid door een snelle windstroom Het indicatielampje voor ontdooien is aan DEF B Als de kamertemperatuur lager dan of gelijk is aan 16 C wordt de temperatuur van de...

Page 83: ...het toestel niet normaal werken 2 Reinig de tank met koud of warm water als deze vuil is Gebruik geen wasmiddel schuursponsjes chemisch behandelde doeken benzine wasbenzine terpentijn of ander oplosm...

Page 84: ...oor de waterafvoer aan de zijkant van de tank bevestigd wordt Als de watertank geplaatst is en de afvoerleiding recht is kan het water via het afvoergat uit de machine lopen ONDERHOUD De ontvochtiger...

Page 85: ...Filter installeren Plaats het filter in de machine en druk de twee haken van het filter op hun plaats OPSLAG Wanneer u het apparaat lange tijd niet gebruikt kunt u het beste als volgt te werk te gaan...

Page 86: ...chtiger Code E1 Kortsluiting of open circuit van de spoelsensor Controleer of de draad los is of vervang de spoelsensor GARANTIEVOORWAARDEN U krijgt op uw ontvochtiger twee jaar garantie vanaf de aank...

Page 87: ...rbehouden veranderingen door te voeren zonder voorafgaand bericht Werp elektrische apparatuur niet weg bij het huisvuil lever het in op de daarvoor aangewezen plaats Neem contact op met de plaatselijk...

Page 88: ...lta qualidade que lhe proporcionar muitos anos de prazer caso seja utilizado de forma respons vel Leia o manual do utilizador primeiro para garantir a vida til m xima do seu desumidificador Em nome do...

Page 89: ...89 COMPONENTES IMPORTANTES Cabo de alimenta o Dep sito Drenagem cont nua Filtro de rede Inv lucro traseiro Sa da do ar Cobertura superior Capa dianteira Indicador de gua A B C 4 E F G H 9 89 1 5 6 7...

Page 90: ...xclusivamente a tomadas com liga o terra tens o de liga o de 220 240 V 50 Hz GERAL Para obter o melhor desempenho do desumidi ficador n o o coloque perto de um radiador ou outras fontes de calor Certi...

Page 91: ...cada na placa de classifica o A ficha no cabo do dispositivo deve encaixar na tomada de parede O dispositivo deve ser colocado numa superf cie plana e est vel O fornecimento de eletricidade ao disposi...

Page 92: ...ricista reconhecido instale uma As crian as devem ser supervisionadas para garantir que n o brincam com o aparelho Quaisquer repara es devem apenas ser real izadas apenas por um engenheiro de servi o...

Page 93: ...com extremidades afiadas O incumprimento das instru es pode causar a anula o da garantia deste dispositivo N o coloque o desumidificador em casas de banho ou outros locais onde haja possibilidade de...

Page 94: ...l tricos fog es ou outras fontes de igni o O aparelho deve ser armazenado de modo a evitar falhas mec nicas As pessoas que operam ou trabalham no circui to de fluido refrigerante devem ter a certifica...

Page 95: ...epresenta temperatura e humidade 4 TIMER TEMPORIZADOR Ajuste do temporizador A Com o equipamento ligado prima a tecla TIMER para ajustar o temporizador para o desligamento agendado Com o equipamento d...

Page 96: ...m luz CLOTH ROUPA A Quando esta fun o est ativada o desumidificador continua a operar compressor opera o da ventoinha independentemente do n vel de humidade quando a opera o CO cont nua desumidifica B...

Page 97: ...A Sempre que o compressor arranca pode iniciar imediatamente B Depois do compressor ser desligado volte a lig lo com pelo menos 3 minutos de intervalo DRENAGEM DE GUA Quando o dep sito de drenagem es...

Page 98: ...sito com ambas as m os Se o dep sito de gua n o for colocado o sensor de dep sito de gua cheio continua ativado e o desumidificador n o funciona DRENAGEM CONT NUA O desumidificador tem um orif cio de...

Page 99: ...MPAR O FILTRO DE AR 1 Levante o filtro 2 Limpeza do filtro Utilize um aspirador para absorver o p na superf cie do filtro de rede Se estiver muito sujo utilize gua morna e um detergente neutro Deixe s...

Page 100: ...ado e a m quina n o fun ciona N o poss vel iniciar a fun o de desumidifica o O filtro est bloqueado Limpe o filtro de rede de acordo com as instru es de limpeza do desumidificador A entrada ou sa da d...

Page 101: ...do comprador Para evitar despesas desnecess rias recomendamos que primeiro leia atentamente o manual do utilizador Se este n o fornecer uma solu o leve o desumidificador ao distribuidor para repara o...

Page 102: ...haver fuga de subst ncias perigosas para as guas subterr neas e a entrada destas na cadeia alimentar prejudicando a sua sa de e bem estar Ao substituir aparelhos antigos por novos o distribuidor legal...

Page 103: ...103 9...

Page 104: ...kovosten izdelek ki vam bo dolga leta zagotavljal udobje e ga boste uporabljali odgovorno Prosimo da si najprej preberete navodila za uporabo da zagotovite optimalno ivljenjsko dobo svojega razvla eva...

Page 105: ...105 POMEMBNO KOMPONENTE Napajalni kabel Rezervoar Neprestano odvajanje vode Filtrirna mre a Zadnja maska Odvod zraka Vrhnji pokrov Sprednji del ohi ja Kazalnik vode A B C 4 E F G H y 105 1 5 6 7 8...

Page 106: ...radiatorja ali drugega vira toplote Poskrbite da bodo zaprta vsa okna da dose ete najve jo u inkovitost Kapaciteta razvla evalnika je odvisna od tem perature in vla nosti prostora Pri ni jih temper at...

Page 107: ...osebe vklju no z otroci z zmanj animi fizi nimi utnimi ali du evnimi sposobnostmi ali osebe s pomanjkanjem izku enj in znanja razen e se jih nadzira ali so prejele navodila glede uporabe naprave od os...

Page 108: ...ecite vti enote iz stenske vti nice Po kodovani elektri ni kabel ali vti mora vedno zamenjati usposobljeni elektri ar ali va dobavi telj To napravo lahko uporabljajo otroci ki so stari 8 let ali ve in...

Page 109: ...h priporo a dru ba proizvajalca Aparatjetrebanamestitivobmo jebrezkakr nega koli neprestanega vira v iga na primer odprti pla meni plin ali delujo i elektri ni aparati Ne prebadajte in ne se igajte Ta...

Page 110: ...agonu se prika e trenutna vla nost s privzetim ali neprekinjenim na inom CO kompresor pa se nato za ene nemudoma za izvajanje razvla evanja pri emer sveti kazalna lu ka POWER NAPAJANJE ko se kompresor...

Page 111: ...e e eleno vla nost D e razvla evalnik preneha eazvla evati in se vla nost prostora pove a na 3 ali ve od nastavljene vrednsoti za ne kompresor razvla evati e so potekle tri minute stanja za ite E V sk...

Page 112: ...je temperatura prostora vi ja od 16 C se temperaturo spirale zaznava operacijo pa se izvede v skladu s temepraturo spirale kot sledi e kompresor deluje 30 minut se spremlja temperaturo spirale e je t...

Page 113: ...jejo rezer voar ter povzro ijo pu anje vode 3 Pri name anju v rezervoar dobro pritisnite na rezervoar z obema rokama e vodni rezervoar ni name en senzor polnega stanja za vodo ostane aktiven razvla ev...

Page 114: ...ENJE ZRA NIH FILTROV 1 Filter povlecite gor 2 ist filter S sesalnikom ne no posesajte prah na povr ini filtrirne mre e e je ta zelo umazana ko o istite z vodo in ne nim detergentom Ohranite jo suho 3...

Page 115: ...e vodo in namestite rezervoar na svoje mesto Ali je temperatura prostora nad 35 stopinj ali pod 5 stopinj Za itna naprava se za ene stro ja pa ni mogo e zagnati Funkcija razvla evanja se ne more zagna...

Page 116: ...vijo garancijo Sestavni deli ki so izpostavljeni obi ajni obrabi kot je zra ni filter niso vklju eni v garancijo Garancija velja samo s predlo itvijo izvirnega nespremenjenega in datiranega potrdila o...

Page 117: ...ga tlaka dB A 39 Za ita enote IP X0 Uporabiti kot indikacijo Predmet sprememb brez predhodnega obvestila Elektri nih naprav ne odstranite med gospodinjske odpadke ki niso lo eni temve za to uporabite...

Page 118: ...as popravila za napake ki nastanejo zaradi zunanjih uplivov mehanske po kodbe ali izguba hladilnega sredstva po krivdi kupca ali tretje osebe poseg v aparate brez na ega pooblastila nepravilna uporab...

Page 119: ...119 y...

Page 120: ...attate il Centro Assistenza Clienti per conoscere il numero di telefono consultate www qlima com N Hvis du trenger informasjon eller hvis du har et problem med produktet kan du g til nettsidene www ql...

Reviews: