LEVEL 3
*
(PRESS)
(PRESS)
Temperature Tracking Monitor
ON / OFF
Control Calibration Adjust
Set Temperature Lock
OFF/ON
(oFF)
(-10 to +10)
)
Select Display Resolution
1 / 0.1
Select
o
C /
o
F
NONE
,
o
C,
o
F, Bar, PSi,
Ph
Read Tracking Monitor Results
VAR / HI / LOW
*
(PRESS)
(PRESS)
(PRESS)
LEVEL 2
LEVEL 1
MENU ENTRY
POINT
(C)
Functions Menu
Guide
IMPORTANT NOTE: The grey-shaded control functions within the menu levels are factory
tuned and set for the optimum performance and the safe operation for your model
incubator. Care should be taken when navigating or changing
user applicable
settings
so as not to alter these factory settings. Factory settings for each function are listed within
the parentheses "( )" on each function tab above. Use as a trouble-shooting reference.
PAGE 3
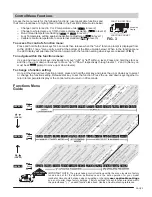
Access the menu levels for the following functions: (user applicable functions and
their menu locations are high-lighted in white in the Functions Menu Guide below).
~ Change control to read in C or F temperature units.( in level 2)
~ Change to whole degree or 1/10th degree display resolution.( in level 2)
~ Run or Read temperature tracking.( or in level 3)
~ Lock Temperature setting against inadvertent adjustment.( in level 1)
~ Calibrate control temperature to an external standard.( in level 3)
To access the control's function menu:
Press and hold both arrow keys for 3 seconds then release when the "tune" function prompt is displayed from
within LEVEL 1 (see "menu entry point" at the bottom of the Menu Guide below). When in the function menu
the LED display will alternate the function prompt with the function setting when keys are released.
(FIG 3)
To navigate within the functions menu:
Use up and down arrow keys individually to move "right" or "left" within a level. Press and hold the star key
and then the up or down arrow keys to move "up" or "down" respectively through levels 1, 2 and 3 (Note: you
must be at prompt to move up or down levels).
To change a function setting:
Once at the desired level function prompt, press and hold the star key and press the up or down key to select
or change the function setting. Release star key to set the function. Press the up and down keys together to
return to temperature display or the control will auto-return in 60 seconds.
FIG. 3
FUNCTION PROMPT
FUNCTION SETTING
Alternating
Display
Control Menu Functions


