


19
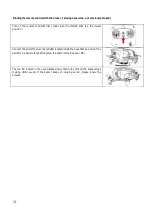
Mode 1 : stabilized /horizon
Mode 2 : intermediate / stunts
Mode 3 : advanced / full acro
1
Flight mode switch
6
Power indicator
2
Right stick
7
Frequency Hole
3
Hanger
8
Power switch
4
Left stick
9
Handle
5
Disarm / Arm button
4) Specifications
Model
QIF Gemini
Weight
225g battery included
Dimensions
144*122*78mm
Classification Base
150mm
Propellers
3545
ESC
20A
Battery
7,4V 850Mah 25C 2S lipo
Brushless motor
1308 KV4500
Flight controller
SPRacing F3
Image transmission
5.8Ghz – 40 channels
Transmitter output power
25mW – 200mW
Working temperature
-10°C - +50°C
Receiver specs
6 channels PPM – 96dBm
Frequency range
2408 to 2475 Mhz
Remote Controller
6 channels 2.4 Ghz < 20 dbM 80mA, 4 AA batteries, 600 meters ( no interferences)
Camera
600 TVL PAL/NTSC format 4/3 FOV H :120° V :100° - CMOS 1/4"
Note: Low voltage alarm. The low voltage alarm is used to alert you that the voltage is too low and that it can not provide
the power needed for your Drone, so you must land the drone quickly; It is necessary to take this alarm seriously to avoid a
crash that can be very serious for the drone.
When the voltage is less than 7 V, the front and rear lights will flash, the alarm will sound, and you will have a
maximum of one minute to land the drone.
Precautions for lithium-polymer batteries:
When charging, place the drone on a dry surface away from any source of heat and explosive materials. Do not charge the
battery immediately near the flight if the surface temperature is not cooled. Otherwise, the battery may inflate or even
cause a fire. Be sure to use the original adapter supplied with the drone and replace the battery after a long period of use
or when it becomes swollen. A battery not used for a long period of time will automatically lose its charge and frequent
discharges can shorten its life.
5) Preparation of the drone before the flight
REMOTE CONTROL
Installing remote control batteries
Remove the battery compartment cover on the back of the remote control or insert 4 AA batteries into the battery
compartment with the correct polarity / replace the battery compartment cover.
Summary of Contents for Gimini
Page 2: ......
Page 26: ...25 Table for channel up Frequency in Mhz middle and code switch diagram below...
Page 39: ...38 Tabla de canal arriba frecuencia en Mhz centro y diagrama de interruptor de c digo abajo...
Page 64: ...63 Tabella dei canali alto frequenza in Mhz centro e schema codice basso...
Page 76: ...75 Tabel voor kanaal boven frequentie in Mhz midden en codeschakelaardiagram onder...
Page 78: ...77...