7
EN
4. REMOTE CONTROL
■
Before first use, pull out the insulating strip from the battery compartment of the remote
control. Battery is included inside.
1.
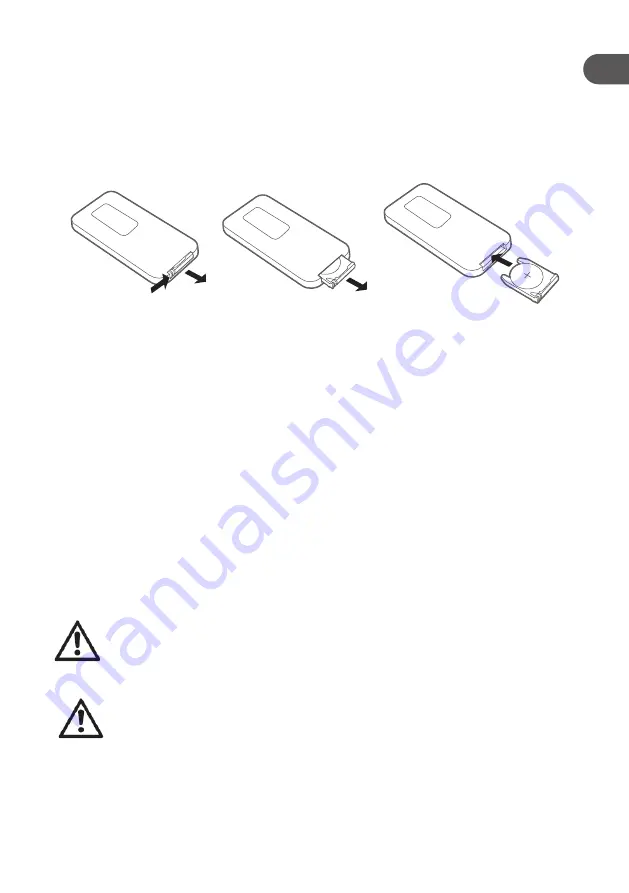
To install a new battery, hold the remote control with the back facing up.
2.
Push and hold the locking clip towards the right
(Fig. A)
, and slide out the battery compartment
(Fig. B)
.
3.
Install the new battery (1 x CR2025) with the + side facing up
(Fig. C)
.
4.
Firmly close the battery compartment.
Fig. A
Fig. B
Fig. C
5. OPERATION
To operate the bladeless fan, use the remote control or the touch buttons on the control panel of the
fan. The LED indicator lights illuminated on the control panel will indicate the current fan settings.
1.
Place the fan upright on a solid surface that is dry, level, and stable. Do not place the unit near
a window where it can be exposed to rain or moisture.
2.
Plug the power cord firmly into the mains outlet. The fan will enter Standby Mode.
3.
Press the On/Off button (4, 9a) to start or stop the fan.
4.
Press the Speed button (5, 9b) to select the desired wind speed: Low/ Medium/ High.
5.
Press the Mode button (7, 9c) to set the fan to the desired mode:
■
Normal Mode
– The wind flow will remain constant at the speed level selected.
■
Natural Mode
– The wind flow will fluctuate at different speeds in preset patterns to mimic
outdoor breezes, with the speed selected as the highest speed.
■
Sleep Mode
– The wind flow will follow Natural Mode and, if Medium or High speed is
selected, the speed will automatically decrease by one level every 30 minutes until it
reaches the lowest speed (Low) to mimic soft night breezes.
6.
Press the Timer button (6, 9d) to set the fan to automatically turn off when the timer ends. The
timer can be set from 0.5 to 7.5 hours. Each press increases the timer by 0.5 hours.
7.
Press the Swing button (8, 9e) to start or stop the oscillation function. When the function is
activated, the bladeless fan will rotate from left to right on its base to circulate air.
WARNING:
Always turn off and disconnect the appliance from the mains socket when it
is not in use or unattended to disconnect it completely from the power supply.
6. CLEANING AND CARE
WARNING
■
Before cleaning, always unplug the appliance from the electrical outlet.
■
Never immerse the appliance, power cord or plug in water or any liquid. Never rinse or
spray the appliance with any liquid.
IMPORTANT:
Never use solvents, chemical or abrasive cleaning agents, wire brushes, sharp
objects or scouring pads to clean the appliance. Make sure no water enters the control panel or
fan motor.
Summary of Contents for Q.6870
Page 3: ...EN FR ES PT PL HU RU RO UA e 9 d c b a 8 7 6 5 4 1 2 3...
Page 52: ...52 RU 1 C 52 2 C 55 3 C 55 4 C 56 5 C 56 6 C 57 7 C 57 8 C 58 1 1 2 8 3 4 5 6...
Page 53: ...53 RU 7 8 9 10 11 12 13 14 50 15 16 17 18 19...
Page 54: ...54 RU 20 21 22 23 24 25 26 27...
Page 57: ...57 RU 6 7...
Page 58: ...58 RU 8 36 24 36 24 12 IMEI...
Page 59: ...59 RU 6 SIM SD...
Page 60: ...60 UA 1 C 60 2 C 62 3 C 63 4 C 63 5 C 64 6 C 64 7 C 65 8 C 65 1 1 2 8 3 4 5 6 7 8...
Page 61: ...61 UA 9 10 11 12 13 14 50 15 16 17 18 19 20 21 22...
Page 62: ...62 UA 23 24 25 26 27 2 220 240 50 60 50 1 5 23 5 23 5 90 II 1 CR2025...
Page 64: ...64 UA 5 1 2 3 4 9a 4 Speed 5 9b 5 Mode 7 9c 30 6 Timer 6 9d 0 5 7 5 0 5 7 Swing 8 9e 6...
Page 65: ...65 UA 7 8 36 24 36 24 12...
Page 66: ...66 UA IMEI 6 SIM SD...
Page 67: ......


