


9
9
EN
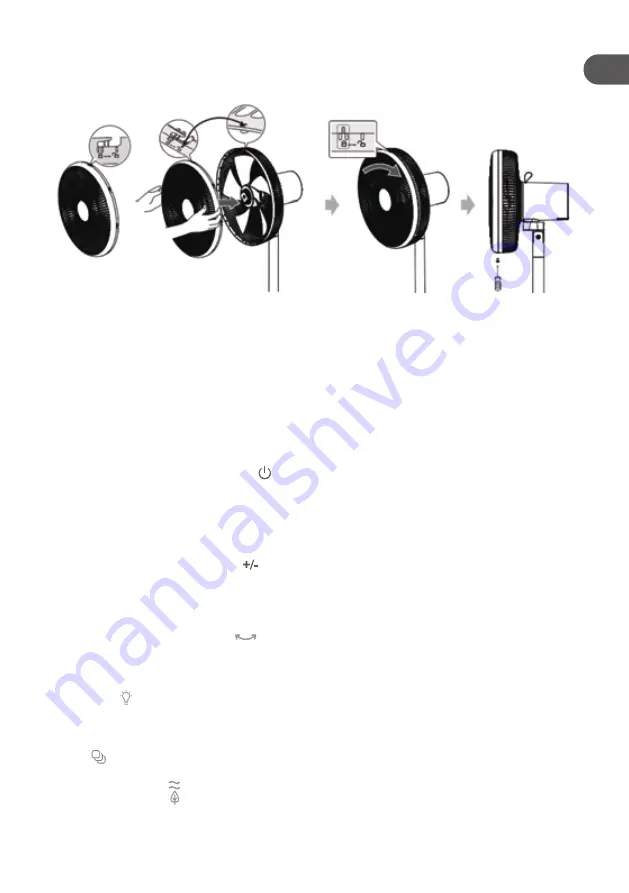
• Then turn the front guard (1) clockwise until the mark “I” on the rear guard (5) is
located in the center of the mark “II” on the front guard (1).
• Finally tighten the front guard (1) with the safety screw (14).
5. USE
Caution:
• Make sure that the product is placed on a flat and stable floor.
• The power socket must be in the vicinity of the fan and easily accessible.
• Always position the power cord so that nobody can trip over or become entangled
in it.
5.1 Turn on/off
• Connect the supplied power cable (10) to the mains socket on the fan base (11) and
to the wall socket.
• To turn the fan on or off, press on the control panel (13) (or on the remote control).
Note:
When using the remote control, point the remote control at the IR sensor (12) on the fan
base, and make sure there is no obstacle between the remote control and the IR sensor.
5.2 Set speed
• When the fan is on, press on the control panel (13) (or on the remote control)
to select a speed level (totally 12 speed levels). The corresponding speed level
indicator is displayed on the control panel (13).
5.3 Set oscillation
• When the fan is on, press
on the control panel (13) (or on the remote control) to
activate or deactivate oscillation.
5.4 Set LED display brightness
• Press on the control panel (13) (or on the remote control) to toggle the LED
display on the control panel (13) through high brightness, low brightness and off.
5.5 Set operating modes
Press on the control panel (13) (or on the remote control) to select one of the following
three fan speed mode. The corresponding icon illuminates on the control panel (13).
• Normal mode ( ): The fan runs at the set speed.
• Natural mode ( ): The fan automatically changes the speed at intervals according
to the initially set fan speed, so that natural and pleasant air circulation can be
generated.
Summary of Contents for Q.6257
Page 3: ...15 16 17 18 20 19 21 22 1 2 3 4 5 8 6 7 10 9 11 14 13 12 EN FR ES PT PL HU RO RU UA...
Page 69: ...69 69 RU 1 1 2 3 8 4 5 1 C 69 2 C 72 3 C 73 4 C 73 5 C 75 6 C 76 7 C 77...
Page 70: ...70 RU 6 7 8 9 10 11 12 13 14 15 16 17...
Page 71: ...71 71 RU 18 19 20 21 22 23...
Page 74: ...74 RU 3 3 3 6 3 2 4 1 1 5 I II 1 I 1 I 5 1 I 5 II 1 14 1...
Page 75: ...75 75 RU 5 5 1 10 11 13 12 5 2 13 12 13 5 3 13 5 4 13 13 5 5 13 13 30 5 6 13 8 h 13 13...
Page 76: ...76 RU 5 7 13 8 13 h 5 8 24 C 24 C 1 13 C 5 9 5 10 CR2025 A CR2025 A 1 2 6...
Page 77: ...77 77 RU 8 8 7 36 12 24 6 SIM SD...
Page 78: ...78 RU IMEI 6...
Page 79: ...79 79 UA 1 1 2 3 8 4 5 1 C 79 2 C 82 3 C 83 4 C 83 5 C 85 6 C 86 7 C 87...
Page 80: ...80 UA 6 7 8 9 10 11 12 13 14 15 16...
Page 81: ...81 81 UA 17 18 19 20 21 22 23...
Page 84: ...84 UA 3 3 3 6 3 2 4 1 1 5 I II 1 I 1 I 5 1 I 5 II 1 1 14...
Page 85: ...85 85 UA 5 5 1 10 11 13 12 5 2 13 12 13 5 3 13 5 4 13 13 5 5 13 13 30 5 6 13 8 h 13 13...
Page 86: ...86 UA 5 7 13 8 h 13 5 8 24 C 24 C 1 13 C 5 9 5 10 CR2025 A CR2025 A 1 2 6...
Page 87: ...87 87 UA 8 8 7 3 2 12 6 SIM SD IMEI...
Page 88: ...88 UA 6...
Page 89: ......
Page 90: ......
Page 91: ......


