background image

7

EN

3. 

Wait until the LCD display shows "0". 

4. 

Press the

button for 3 seconds to convert to Water volume mode (  water (ml)).

5. 

Put a liquid container onto the scale platform. The LCD shows the weight of the container.

6. 

Press once the

button to tare weight.

7. 

Pour the liquid into the container. LCD shows the volume of the liquid.

8. 

Press the

button to choose the weighting mode (  weight (g) and view the weight of the 

liquid, if needed.

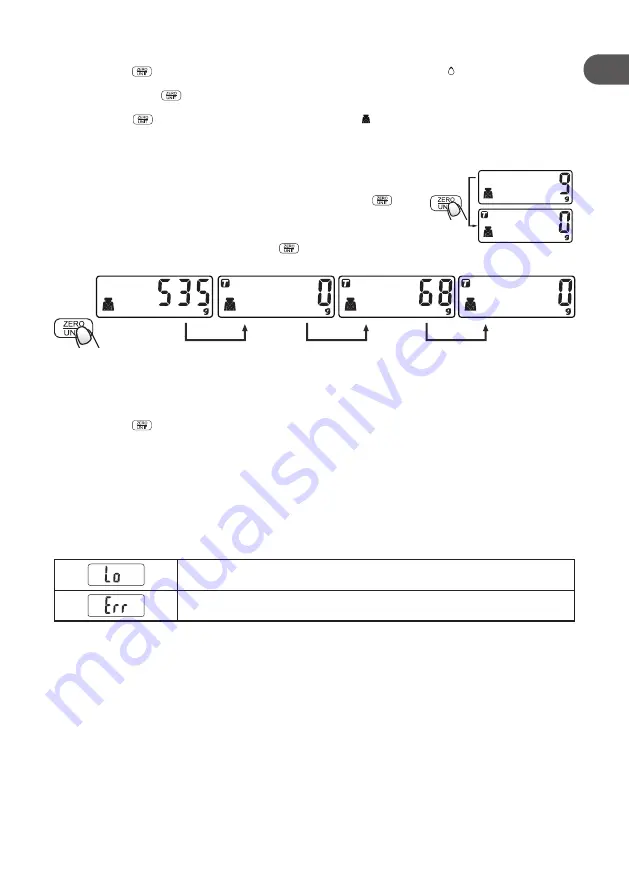
5.4  TARE function

Using the TARE function, measure items as they are added without 

removing loads from the scale. 

Put the first load on the scale, and read the weight. Press the

button 

to reset the LCD reading to “0.0” before adding the next load. You can 

repeat this operation as many times as you need.

Note:

 "----" means the load is not stable. Wait a moment.

If you want to weigh more loads, press the

 button to reset the LCD 

reading to "0" again.Note: Total maximum load should not exceed 5 kg.

5.5  Minus function

If you add multiple items to the scale at one time to get a total weight, you can identify the value of 

a single item or ingredient by using the minus function:

1. 

Load the scale.

2. 

Press the

 button to reset the display to 0.0.

3. 

Remove the load.

4. 

The display shows the weight of the removed load with the minus function indicator (a negative 

value is shown on display).

5. 

Repeat steps as needed.

5.6  Auto shut off

The scale will turn off automatically if not used for 1 min.

5.7  Warning indicators

This symbol indicates that the battery power is running low. Please replace 

the new batteries.
The “Err” symbol on display indicates that the scale is overloaded. Stop 

using to avoid possible damage to the product. Remove items.

6.  MAINTENANCE AND CLEANING

• 

IMPORTANT:

 All parts should be wiped clean immediately after direct contact with food.

• 

Use a soft, damp cloth to clean the scale platform. Do not allow water to get inside.

• 

Treat the scale with care as it is an exact electronic instrument.

• 

Do not immerse this product in water or any other liquid. Keep the surface dry.

• 

Do not use chemicals or harsh abrasives to clean the scale.

• 

Store your scale in a clean, dry location. Dust, dirt, and moisture can accumulate on the 

weighing sensors and electronics, causing inaccuracy or malfunction.

• 

If the scale is not to be used for long periods, removing the battery is recommended to avoid 

damage to the scale due to possible battery leakage.

Summary of Contents for Q.5569

Page 1: ...Q 5569 FR Balance electronique de cuisine ES Balanza electr nica de cocina PT Balan a de cozinha electr nica PL Elektroniczna waga kuchenna HU Elektronikus konyhai m rleg RO C ntar electronic de buc...

Page 2: ...4 Manuel d utilisation P 9 Manual del usuario P 15 Manual do utilizador P 21 Instrukcja u ytkownika S 27 Haszn lati tmutat 33 o Manual de utilizare P 38 C 44 C 50 FR EN ES IT PT PL HU RU RO UA FR ES P...

Page 3: ...F R EN E S I T P T P L H U R U R O U A FR ES PT PL HU RU RO UA 1 2 3 4 5 6 7 8...

Page 4: ...5 The kitchen scale is a precision device Do not strike shake or drop the scale 6 Do not put the kitchen scale in direct sunlight close to heaters or near direct draughts from air conditioners 7 This...

Page 5: ...2 WARNING Do not ingest the battery Chemical burn hazard If the battery is swallowed it can cause severe internal burns in just 2 hours and lead to death If you think the battery might have been swall...

Page 6: ...Press the button for 3 seconds to toggle between the unit system Weighing mode g Water volume mode ml 5 2 Weighing 1 Place the scale on a solid and flat surface 2 Gently press your hand on the scale...

Page 7: ...nus function 1 Load the scale 2 Press the button to reset the display to 0 0 3 Remove the load 4 The display shows the weight of the removed load with the minus function indicator a negative value is...

Page 8: ...pliance oxidation corrosion use of energy use or installation non compliant with the manufacturer s instructions or negligence or use of peripherals software or consumables which are unsuitable Profes...

Page 9: ...la balance de cuisine La surcharge de votre balance peut l endommager de fa on permanente La charge maximale est de 5 kg 4 Placez la balance de cuisine sur une surface plane stable et s che l abri de...

Page 10: ...it rester inutilis pendant une longue p riode 17 Les bornes d alimentation ne doivent pas tre court circuit es 18 Utilisez uniquement les piles de la taille et du type sp cifi s dans les instructions...

Page 11: ...T 1 Orifice 2 Plate forme de la balance 3 Affichage LCD 4 Z ro Interrupteur de mode 5 Fonction de tarage active 6 Mode de fonctionnement poids eau 7 Valeur n gative 8 Poids unit s de volume 4 INSTALLA...

Page 12: ...s du liquide si n cessaire 5 4 Fonction TARE La fonction TARE permet de mesurer les articles au fur et mesure qu ils sont ajout s sans retirer les poids de la balance Mettez la premi re charge sur la...

Page 13: ...36 mois de garantie l gale de conformit Pour les pays qui ne b n ficieraient que de 24 mois de garantie l gale de conformit une garantie commerciale de 12 mois entre en vigueur l expiration de la prem...

Page 14: ...r troprojecteur aubes de lave linge etc Les mises jour de logiciel dues un changement de param tres r seau Les dommages provenant d l ments ext rieurs l appareil corps trangers insectes etc Le contenu...

Page 15: ...le y seca libre de vibraciones y corrientes para conseguir unos resultados precisos 5 La b scula de cocina es un dispositivo de precisi n No la golpee sacuda ni deje caer 6 No exponga la b scula de co...

Page 16: ...pila gastada de su dispositivo y des chela correctamente 21 No desarme aplaste perfore ni da e las pilas 22 ADVERTENCIA No ingiera la bater a Riesgo de quemaduras qu micas Si se ingiere la bater a se...

Page 17: ...islamiento antes del primer uso 5 USO 5 1 Uso de los modos 1 Presione suavemente la plataforma de la b scula con la mano para encender la b scula de cocina 2 Pulse el bot n durante 3 segundos para cam...

Page 18: ...de la b scula Coloque la primera carga sobre la b scula y lea el peso Pulse el bot n para restablecer la lectura del LCD en 0 0 antes de a adir la siguiente carga Puede repetir la operaci n tantas vec...

Page 19: ...ci n a su distribuidor y o a consultar sus CGV Condiciones Generales de Venta Para la garant a comercial Para todos los pa ses excepto Francia le invitamos a devolver el producto a la recepci n del lu...

Page 20: ...deban al uso de softwares de terceros para cambiar adaptar o modificar el existente Los fallos del producto que se deban a su uso sin los accesorios incluidos con el producto o autorizados por el fab...

Page 21: ...ecarregar a balan a pode danific la permanentemente A capacidade m xima de 5 kg 4 Coloque a balan a de cozinha numa superf cie plana est vel e seca sem vibra es nem correntes de ar para resultados exa...

Page 22: ...icados nas instru es 19 Insira a pilha corretamente Siga os s mbolos que mostram a maneira correta de posicionar as extremidades positiva e negativa da pilha 20 Retire imediatamente a pilha gasta do a...

Page 23: ...da primeira utiliza o 5 UTILIZA O 5 1 Modos de funcionamento 1 Ligue a balan a de cozinha pressionando suavemente a m o na plataforma da balan a 2 Prima o bot o durante 3 segundos para alternar entre...

Page 24: ...irar pesos de cima da balan a Coloque a primeira carga na balan a e leia o peso Prima o bot o para repor o LCD para 0 0 antes de adicionar a carga seguinte Pode repetir esta opera o as vezes que desej...

Page 25: ...e Convidamo lo a a informar se junto do seu distribuidor e ou a consultar as CGV Condi es Gerais de Venda Para a garantia comercial Convidamo lo a a devolver o seu produto na rece o do seu local de co...

Page 26: ...ar alimentos vestu rio Falhas no produto devido utiliza o de programas de terceiros para modificar alterar adaptar ou modificar o j existente Falhas no produto devido utiliza o sem os acess rios forne...

Page 27: ...o e j trwale uszkodzi Maksymalna zdolno wa enia wynosi 5 kg 4 Aby uzyskiwa dok adne wyniki nale y umie ci wag kuchenn na p askiej stabilnej i suchej powierzchni wolnej od wibracji i przeci g w 5 Waga...

Page 28: ...y przechowywane nieu ywane przez d u szy czas nale y wymontowa baterie 17 Nie wolno zwiera zacisk w zasilaj cych 18 Stosowa wy cznie baterie typu i rozmiaru podanego w instrukcji 19 Bateri nale y zamo...

Page 29: ...SPECYFIKACJA TECHNICZNA Typ baterii 1 x 3 V CR2032 Czujniki wysokiej precyzji podzia ka Dok adno do 1 g Maksymalny wsad 5 kg Konwersja jednostek g ml 3 OPIS PRODUKTU 1 Otw r 2 Powierzchnia wagi 3 Wy...

Page 30: ...n raz nacisn przycisk 7 Wla p yn do pojemnika Wy wietlacz LCD pokazuje obj to cieczy 8 Nacisn przycisk aby wybra tryb wa enia masa g i w razie potrzeby sprawdzi mas cieczy 5 4 Funkcja tarowania TARE U...

Page 31: ...niczenia odpowiedzialno ci Produkty s obj te gwarancj przez okres 36 miesi cy od daty zakupu lub daty dostawy do domu klienta W zale no ci od kraju gwarancja ta obejmuje od 24 do 36 miesi cy prawnej g...

Page 32: ...szkodzenia spowodowane normalnym zu yciem lub starzeniem si produktu uszczelki filtry akcesoria szczotka i w do odkurzacza lampy lampy do rzutnik w opatki do pralek itp W przypadku aktualizacji oprogr...

Page 33: ...elyen 3 Ne l pje t l a konyhai m rleg maxim lis kapacit s t Ha t lterhelik a m rleget az tart s k rosod st okozhat benne A maxim lis kapacit sa 5 kg 4 A pontos eredm nyek rdek ben helyezze a konyhai m...

Page 34: ...t s t pus akkumul tort haszn lja 19 Az elemet megfelel en helyezze be K vesse az elemek pozit v s negat v p lusainak helyes elhelyezked s t mutat szimb lumokat 20 Azonnal vegye ki a kimer lt elemet a...

Page 35: ...zn lat el tt t vol tsa el az elv laszt lapot 5 HASZN LAT 5 1 zemm dok 1 Kapcsolja be a konyhai m rleget gy hogy vatosan r nyomja a kez t a m rlegplatformra 2 Tartsa nyomva a gombot 3 m sodpercig a m r...

Page 36: ...a m rlegre s olvassa le a s lyt A k vetkez teher hozz ad sa el tt nyomja meg a gombot az LCD n kijelzett rt k vissza ll t s hoz 0 0 ra Annyiszor ism telheti meg ezt a m veletet ah nyszor sz ks ges Me...

Page 37: ...orm tiszt t s hoz puha nedves ruh t haszn ljon Ne engedje hogy v z ker lj n a belsej be A m rleggel b njon vatosan mivel az egy pontos elektronikus m szer Ne mer tse ezt a term ket v zbe vagy m s foly...

Page 38: ...rea c ntarului l poate deteriora permanent Capacitatea maxim este de 5 kg 4 A eza i c ntarul de buc t rie pe o suprafa plan stabil i uscat f r vibra ii i denivel ri pentru a avea rezultate precise 5 C...

Page 39: ...mp n care nu inten iona i s l utiliza i 17 Bornele de alimentare nu trebuie scurtcircuitate 18 Utiliza i numai dimensiunea i tipul de baterie specificate n instruc iuni 19 Introduce i corect bateria R...

Page 40: ...d de operare greutate ap 7 Valoare negativ 8 Greutate unit i volum 4 INSTALARE 4 1 Instalarea sau nlocuirea bateriei C nd achizi iona i c ntarul de buc t rie bateria este instalat n acesta Scoate i fo...

Page 41: ...sur ce sunt ad ugate f r a ndep rta nc rc tura de pe c ntar Pune i primul articol pe c ntar i citi i greutatea Ap sa i pe butonul pentru a reseta citirea ecranului LCD la 0 0 nainte de a ad uga urm t...

Page 42: ...ui dvs pentru mai multe informa ii i sau s consulta i condi iile generale de v nzare CGV ale acestuia Pentru garan ia comercial V invit m s returna i produsul la recep ia magazinului de achizi ie mpre...

Page 43: ...ea unor alte programe informatice pentru a modifica a schimba a adapta sau a modifica programul informatic existent Avarierea produsului cauzat de utilizarea acestuia f r accesoriile furnizate mpreun...

Page 44: ...44 RU 1 1 8 2 3 5 4 5 6 7 8 9 1 C 44 2 C 46 3 C 46 4 C 46 5 C 46 6 C 48 7 C 48...

Page 45: ...45 RU 10 11 12 13 14 1 1 15 16 17 18 19 20 21 22 2 23...

Page 46: ...46 RU 24 25 26 27 2 CR2032 3 1 1 5 3 1 2 3 4 5 6 7 8 4 4 1 5 5 1 1 2 3...

Page 47: ...47 RU 5 2 1 2 3 0 4 3 5 5 5 3 1 2 3 0 4 3 5 6 7 8 5 4 0 0 0 5...

Page 48: ...48 RU 5 5 1 2 0 0 3 4 5 5 6 1 5 7 Err 6 7 36 24 36 24 12 IMEI...

Page 49: ...49 RU 6 SIM SD...

Page 50: ...50 UA 1 1 8 2 3 5 4 5 6 7 8 9 10 1 C 50 2 C 52 3 C 52 4 C 52 5 C 52 6 C 54 7 C 54...

Page 51: ...51 UA 11 12 13 14 1 1 15 16 17 18 19 20 21 22 2 23 24...

Page 52: ...52 UA 25 26 27 2 1 x 3 V CR2032 1 5 3 1 2 3 4 5 6 7 8 4 4 1 5 5 1 1 2 3...

Page 53: ...53 UA 5 2 1 2 3 0 4 3 5 5 5 3 1 2 3 0 4 3 5 6 7 8 5 4 0 0 0 5 5 5 1 2 0 0 3...

Page 54: ...54 UA 4 5 5 6 1 5 7 Err 6 7 36 24 36 24 12 IMEI...

Page 55: ...55 UA 6 SIM SD...

Page 56: ...ampo es PT Servi o Auchan Auchan Portugal Hipermercados S A Travessa Teixeira J nior n 1 1300 553 Lisboa E mail info MarcaAuchan auchan pt PL Dystrybutor Auchan Polska Sp z o o ul Pu awska 46 05 500 P...

Reviews: