6
EN
– farm houses;
– by clients in hotels, motels and other residential type
environments;
– bed and breakfast type environments.
20.
Switch off the appliance and disconnect from supply
before changing accessories or approaching parts that move
in use.
2. TECHNICAL DATA
Rated voltage
220-240 V~, 50-60 Hz
Rated power
300 W
Protection class
Classe II
3. DESCRIPTION
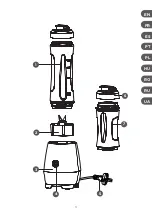
1- Bottle mixer
2- Blade housing
3- Motor unit
4- ON/OFF switch
5- Power cord
6- Bowl lid
7- 300 ml cup
4. SETTING UP
1- Unpack all components.
2- Check the device to ensure that it has not been damaged during transportation. Should you
notice any damage, please contact our customer service department.
3- Wipe the body using a soft, slightly damp cloth.
5. USING THE APPLIANCE
1-
Place the motor unit on a dry, even and firm surface.
2-
Select the blending jar and add the required ingredients. Do not overfill mixing container.
3- Attach the blade attachment tightly to the blending jar. NOTE: the plastic housing of the blade
attachment contains a sealing ring. Make sure that this is correctly inserted in the groove!
4- Turn the blending jar upside down and insert the blade attachment into the motor unit. Rotate
the blending jar slightly back- wards and forwards until the blade attachment is firmly inserted
within the motor unit.
5-
Rotate the blending jar clockwise to fix it into the motor unit.
6- Connect the mains plug into a properly installed socket that is easily accessible.
7- To switch the appliance on you hold the motor unit with one hand and press the ON / OFF
switch. The motor will run for as long as the ON / OFF switch is depressed. As soon as the
switch is released the motor stops.
8- As soon as the food has reached the desired consistency release the ON / OFF switch and wait
until the blades have come to a complete stop.
9- Rotate the blending jar anti-clockwise to remove it.
10- Turn the blending jar upside down and remove the blade attachment.
11-
Serve the prepared foodstuffs immediately or fit the to-go lid on the blending jar.
12- Clean the accessories immediately after each use.
Summary of Contents for Q.5262
Page 3: ...3 EN FR ES PT PL HU RU RO UA 1 2 3 4 5 6 7 ...
Page 50: ......

