background image


15 

PICTURE MODE   

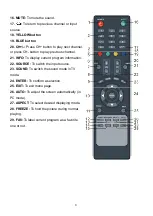
- When watching an available program, press PICTURE button on remote control 
repeatedly to select desired PICTURE mode directly. 
Available options: Standard, Dynamic, Mild, User. 
 

SOUND MODE 

- When watching an available program, press SOUND button on remote control repeatedly 
to select SOUND mode directly. 
Available options: Standard, Music, Movie, User. 
 

SLEEP TIMER SETTING 

- Press SLEEP button on remote control repeatedly to select SLEEP TIMER directly. 
Available options: Off, 5 min, 10 min, 15 min, 30 min, 45 min, 60 min, 90 min, 120 min, 180 
min, 240 min. 
 

VIDEO SIZE SETTING 

- When watching an available program, press ASPECT button on remote control repeatedly 
to select VIDEO SIZE directly. 
Available options: Normal, Wide, Zoom, Cinema. 

NOTE: 

The available video size may be different in different input source. 


MTS/AUDIO SETTING 

- When watching an available program, press MTS/AUDIO button on remote control to 
enter Sound menu page, then use UP or DOWN navigation button to select desired option. 
Options: Mono, Stereo, SAP. 
(Not available for all channels) 
- Or press MTS/AUDIO button on remote control to display Digital Sound language. 
(Not available in for channels) 
 

INFORMATION DISPLAY 

- When watching an available program, press INFO button on remote control to display 
information of current program. 
 

TV GUIDE (FOR TV MODE ONLY) 

- When watching an available program, press EPG button on remote control to enter below 
menu page: 


Summary of Contents for TV-LED1611

Page 1: ...15 4 Full Color LED TV MODEL NO TV LED1611 INSTRUCTION MANUAL BEFORE USING THIS PRODUCT READ UNDERSTAND AND FOLLOW THESE INSTRUCTIONS Save this booklet for future reference...

Page 2: ...adapter Route power cords so they are not likely to be walked on or pinched by items placed upon or against them paying particular attention to plugs convenience receptacles and the point where they e...

Page 3: ...res or lengthy periods or direct sunlight Keep the product away from magnetic objects motors and transformers Do not use outdoors in inclement weather Do not use the TV while driving this is dangerous...

Page 4: ...the pictures in this instruction manual are just for your reference specification should refer to actual accessories ACCESSORIES Instruction manual 1 Remote control with battery 1 AC adaptor 1 Car co...

Page 5: ...EATURES 5 GENERAL PARTS 6 REMOTE CONTROL 7 8 REMOTE CONTROL PREPARATION 9 BASIC CONNECTION 10 13 OPERATIONS BASIC OPERATIONS 14 18 MAIN MENU 19 27 TV MODE 19 26 AV COMPONENT HDMI1 HDMI2 USB MODE 26 PC...

Page 6: ...PPORT ELECTRONIC PROGRAM GUIDE SUPPORT USB MULTIMEDIA PLAYBACK SUPPORT MULTI LANGUAGES ON SCREEN DISPLAY SUPPORT FULL FUNCTION REMOTE CONTROL SUPPORT PC AUDIO ANT VGA VIDEO AUDIO R L HDMI1 HDMI2 AND Y...

Page 7: ...g page 7 CH CH button To select next previous channel or move up down 8 VOL VOL button To increase decrease the volume level or move left right 9 POWER button To switch ON OFF the TV 10 COAX OUT termi...

Page 8: ...ncrease the volume or press VOL button to decrease the volume 7 EPG To display electronic program guide information 8 PICTURE To switch the picture mode 9 CC To set CC function On or Off in TV mode 10...

Page 9: ...21 INFO To display current program information 22 SOURCE To switch the input source 23 SOUND To switch the sound mode in TV mode 24 ENTER To confirm a selection 25 EXIT To exit menu page 26 AUTO To a...

Page 10: ...impact the remote control This may damage the parts or lead to malfunction If the remote control is not going to be used for a long time remove the batteries REMOTE CONTROL OPERATION Point the remote...

Page 11: ...ions before connecting other equipments CONNECTING TO AC POWER SOURCE CONNECT EXTERNAL ANTENNA TO UNIT Install external antenna into antenna jack for best picture BASIC CONNECTION Main unit To DC 12V...

Page 12: ...ONNECTION YPbPr CONNECTION Back of DVD VCR YPbPr cable Optional Back of DVD VCR AV cable Optional For basic connection use the composite Audio L R white red and CVBS yellow cable to connect the unit w...

Page 13: ...ct the unit with other devices to receive high definition multimedia signal HDMI cable Optional Back of DVD VCR Audio cable Optional VGA cable Optional Back of PC Use VGA cable and Audio cable to conn...

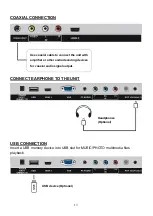
Page 14: ...B CONNECTION Insert a USB memory device into USB slot for MUSIC PHOTO multimedia files playback Headphones Optional Use coaxial cable to connect the unit with amplifier or other audio decoding devices...

Page 15: ...m Example Track 9 press 9 three seconds later it will turn to track 9 automatically or press ENTER button to confirm directly Track 12 press 1 and 2 three seconds later it will turn to track 12 automa...

Page 16: ...ram press ASPECT button on remote control repeatedly to select VIDEO SIZE directly Available options Normal Wide Zoom Cinema NOTE The available video size may be different in different input source MT...

Page 17: ...lect desired channel Press ENTER button to confirm selection NOTE During normal playing press FAV button on remote control to label current program as a favorite one or not CHANNEL LIST When watching...

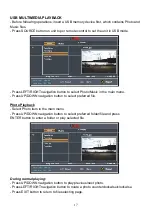
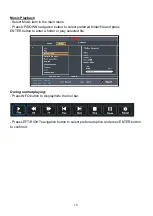
Page 18: ...the main menu Press UP DOWN navigation button to select preferred file Photo Playback Select Photo item in the main menu Press UP DOWN navigation button to select preferred folder file and press ENTE...

Page 19: ...ion button to select preferred folder file and press ENTER button to enter a folder or play selected file During normal playing Press INFO button to display hide the tool bar Press LEFT RIGHT navigati...

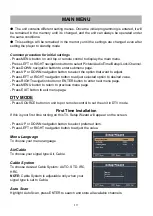
Page 20: ...RIGHT navigation button to adjust selected option to desired value Press RIGHT navigation button or ENTER button to enter next menu page Press MENU button to return to previous menu page Press EXIT b...

Page 21: ...he value of Color can be adjusted from 0 100 1 5 Tint The value of Tint can be adjusted from 50 to 50 NOTE Tint is adjustable only in certain TV system 1 6 Sharpness The value of Sharpness can be adju...

Page 22: ...the value of Bass Treble or Balance has been changed the sound mode will turn to User automatically 2 5 Surround This item is used to turn on off Sound Surround function 2 6 AVL Auto Volume Level Ava...

Page 23: ...cific Alaska Hawaii Atlantic 3 3 Daylight Saving Time Available options On Off NOTE This item is adjustable only for digital programs 3 4 Clock When an available digital program is present this unit w...

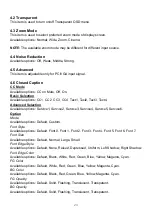
Page 24: ...ailable options Service1 Service2 Service3 Service4 Service5 Service6 Option Mode Available options Default Custom Font Style Available options Default Font 0 Font 1 Font 2 Font 3 Font 4 Font 5 Font 6...

Page 25: ...t password is 0000 5 1 Change Password Press RIGHT navigation button or ENTER button to enter it Press number buttons to input the new password and input it again to finish password changing 5 2 Syste...

Page 26: ...ly when System Lock is On 5 5 RRT Rating This item is available only when viewing programs which contain related Advance Rating information 5 6 Reset RRT This item is used to reset RRT Rating 6 CHANNE...

Page 27: ...enter it Press UP or DOWN navigation button to select preferred channel Press ENTER button to show or hide the selected channel 6 5 Channel No Press LEFT or RIGHT navigation button to select preferre...

Page 28: ...button to enter Setup menu page Press UP or DOWN navigation button to select Advanced and press RIGHT navigation button or ENTER button to enter it 1 H POS Horizontal Position Available range 0 100 2...

Page 29: ...use compressed air to remove dust Display Device 15 4 inch LED TV Resolution 1440 900 Pixel Pitch 0 2301 H 0 2301 V mm Luminance 330 cd m2 Contrast Ratio 800 1 Aspect Ratio 16 10 Response Time 16 ms V...

Page 30: ...n or the signal is too weak Poor reception TV antenna is not correctly adjusted or TV channel is not right Dark or blurred picture The bright contrast is too low Unclear or unstable Picture TV antenna...

Page 31: ...elevisi n LED Completamente a Color Modelo TV LED1611 Manual de instrucciones ANTES DE UTILIZAR ESTE PRODUCTO LEA COMPRENDA Y SIGA LAS INTRUCCIONES EN ESTE MANUAL Guarde este manual para futuras refer...

Page 32: ...de limpiarlo Desconectar el adaptador ca cc del tomacorriente y del producto cuando este no va ser usado por un periodo largo de tiempo No introducir o dejar caer objetos de cualquier tipo dentro de e...

Page 33: ...magn ticos motores y transformadores No utilice en exteriores en temperaturas o tiempos inclementes No use la TV mientras maneja esto es peligro e ilegal en algunas localidades Manejo y Uso de la Bat...

Page 34: ...de instrucciones son nicamente para referencia las especificaciones se refieren a los accesorios ACCESORIOS Manual de Instrucciones 1 Control Remoto con Bater a 1 Adaptador AC de escritorio y cable d...

Page 35: ...Partes generales 6 Control Remoto 7 8 Preparaci n del Control Remoto 9 Conexi n B sica 10 13 OPERACIONES Operaci n B sica 14 18 Men Principal 19 27 Modo TV 19 26 Modo AV COMPONENT HDMI1 HDMI2 USB 26...

Page 36: ...u a electr nica de programas Soporta reproducci n multimedia de USB Soporta m ltiples idiomas en pantalla Soporta completamente las funciones del control remoto Soporta entradas de Audio PC ANT VGA Vi...

Page 37: ...nar el siguiente o anterior canal o para moverse hacia arriba o abajo 8 VOL VOL para aumentar o disminuir el volumen o para moverse hacia la 9 Interruptor de encender apagar para encender o apagar la...

Page 38: ...nformaci n electr nica 8 Imagen para mostrar al modo de imagen 9 Subt tulos para encender o apagar la funci n de subt tulos en el modo de televisi n 10 Botones de Navegaci n Presione los botones para...

Page 39: ...para cambiar la fuente de entrada 23 Sonido para cambiar el modo del sonido en el modo de televisi n 24 Entrar para confirmar una selecci n 25 Salir para salir de la p gina de men 26 Auto para ajustar...

Page 40: ...OTA No pise ni deje caer el control remoto tampoco permita que sufra ning n otro impacto Esto podr a da ar partes del control y causar mal funcionamiento del mismo Si el control remoto no se utilizar...

Page 41: ...equipo Conexi n a la fuente de poder AC Conecte la unidad a una antena externa Instale una antena externa en la entrada de antena para una mejor imagen Conexi n B sica Unidad Principal A la entrada D...

Page 42: ...Pr Cable YPbPr Opcional Parte trasera del DVD VCR Cable AV Opcional Para conexiones b sicas utilice los components de audio L R blanco rojo y el cable CVBS Amarillo para conectar la unidad con otros d...

Page 43: ...s para recibir se al multimedia de alta definici n Cable HDMI Opcional Cable de Audio Opcional Cable VGA Opcional Parte trasera de la PC Utilice el cable VGA y el cable de Audio para conectar la unida...

Page 44: ...ara reproducir archivos de m sica o fotos Aud fonos Opcional Este puerto se utiliza para mandar se ales de audio digital a receptores de sonido envolvente digital El cable naranja COAX sirve para envi...

Page 45: ...9 presione 9 tres segundos despu s se cambiar autom ticamente al canal 9 o presione el bot n Entrar para confirmar directamente Canal 12 presione 1 y luego 2 tres segundos despu s se cambiar autom tic...

Page 46: ...n CONFIGURACI N DE TAMA O DE VIDEO Mientras vea un canal disponible presione el bot n ASPECTO en el control remoto repetidamente para seleccionar el TAMA O DEL VIDEO Opciones disponibles Normal Amplio...

Page 47: ...le presione el bot n LISTA F en el control remoto para entrar a su lista de canales favoritos Presione los botones de navegaci n para seleccionar el canal deseado Presione Entrar para confirmar su sel...

Page 48: ...e fotos o m sica Presione el bot n SOURCE en l aparte superior de la unidad o en su control remoto para establecer la unidad al modo USB Presione los botones Izquierda Derecha para seleccionar Fotos o...

Page 49: ...a la p gina de selecci n de imagen Reproducci n de M sica Seleccione una canci n en el men principal Presione Arriba Abajo para seleccionar la carpeta o archivo deseado y presione el bot n Entrar para...

Page 50: ...tones IZQUIERDA DERECHA para ajustar la opci n hasta el valor deseado Presione el bot n DERECHA o el bot n ENTRAR para entrar a la siguiente p gina del men Presione el bot n MENU para volver a la p gi...

Page 51: ...Brillo El valor del brillo puede ajustarse de 0 a 100 1 4 Color El valor del color puede ajustarse de 0 a 100 1 5 Tinte El valor del tinte puede ajustarse de 50 a 50 NOTA Es ajustable en ciertos siste...

Page 52: ...se cambian el modo de sonido cambiar autom ticamente a Usuario 2 5 Sonido Envolvente Este elemento sirve para encender o apagar la funci n de sonido envolvente 2 6 AVL Nivel de Volumen Autom tico Opc...

Page 53: ...aska Hawai Atl ntico 3 3 Modo de Ahorro de energ a Opciones disponibles Encendido Apagado NOTA Este elemento es ajustable nicamente en canales digitales 3 4 Reloj Cuando se presente un canal digital l...

Page 54: ...to2 Texto3 Texto4 Selecci n Avanzada Opciones disponibles Servicio1 Servicio2 Servicio3 Servicio4 Servicio5 Servicio6 Opci n Modo Opciones Disponibles Predeterminada Personalizada Estilo de Fuente Opc...

Page 55: ...minada de f brica 5 BLOQUEAR Introduzca una contrase a presionando los botones num ricos en el control remoto NOTA La contrase a de f brica es 0000 5 1 Cambiar Contrase a Presione el bot n DERECHA o E...

Page 56: ...te cuando el bloqueo de sistema est encendido 5 5 Clasificaci n RRT Este elemento est disponible nicamente al ver programas que contengan informaci n de clasificaci n 5 6 Restablecer Este elemento se...

Page 57: ...R para entrar Presione ARRIBA o ABAJO para seleccionar el canal deseado Presione ENTRAR para mostrar o esconder el canal seleccionado 6 5 N mero de Canal Presione DERECHA o IZQUIERDA para seleccionar...

Page 58: ...raci n Luego presione ABAJO para entrar al men de configuraci n Presione ARRIBA o ABAJO para seleccionar Avanzado presione DERECHA o ENTRAR para entrar 1 H POS Posici n Horizontal Rango disponible 0 1...

Page 59: ...remover el polvo Dispositivo de Visualizaci n Televisi n a color de 15 4 pulgadas Resoluci n 1440 900 Pixeles 0 2301 H 0 2301 V mm Iluminaci n 330 cd m2 Proporci n de Contraste 800 1 Proporci n de As...

Page 60: ...de TV no son los correctos Imagen obscura o con manchas El brillo y contraste est n ajustados a un nivel bajo Imagen poco clara o inestable La antena de TV no esta ajustada correctamente o esta cerca...

Reviews: