


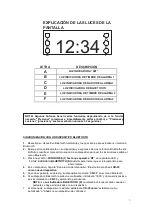


SETTING THE SECOND ALARM
NOTE
: This Alarm Clock can be set for two separate Alarm times.
NOTE:
Before setting the TIME make sure all of the non-clock functions (BLUETOOTH, FM,
AM) are turned OFF. If any of the non-clock functions are playing, turn the function OFF by
simply pressing & holding the
FUNCTION
button
(1).
1. Press & hold the
VOLUME UP / ALARM-2
button
(5)
until the time flashes on the LED
display and the
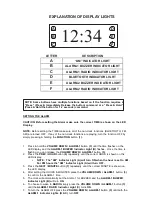
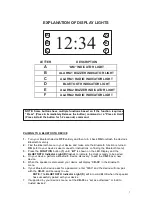
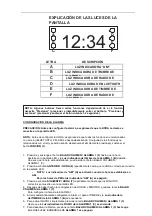
ALARM-2 BUZZER Indicator Light (E)
flashes. Once the time is
flashing you can release the
VOLUME UP / ALARM-2
button
(5)
.
2. Press the
PREV / HOUR
button
(6)
repeatedly until the correct HOUR is shown on the
LED display.
•
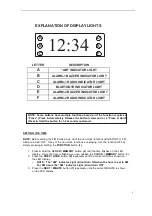
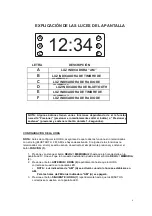
NOTE: The “AM” Indicator Light (A) will turn ON when the hour is set to AM.
For PM hours the “AM” Indicator Light (A) will turn OFF.
3. Press the
NEXT / MINUTE
button
(7)
repeatedly until the correct MINUTE is shown on
the LED display.
4. After setting the HOURS & MINUTES press the
VOLUME UP / ALARM-2
button
(5)
to
confirm the ALARM-2 time.
5. The clock will automatically set the Alarm-2 for BUZZER and the
ALARM-2 BUZZER
Indicator Light (E)
will turn
ON
.
6. To choose to wake to
RADIO
simply press the
VOLUME UP / ALARM-2
button
(5)
until
the
ALARM-2 RADIO Indicator Light (F)
turns
ON
.
7. To turn the ALARM OFF press the
VOLUME UP / ALARM-2
button
(5)
until both the
ALARM-1 Indicator Lights (E & F)
turn
OFF
.
SNOOZE
Once the alarm sounds you can press the
SNOOZE
button
(4)
and the alarm will temporarily
be silenced. After Nine Minutes have passed the Alarm will sound again.
STOPPING THE ALARM
To permanently stop the alarm from sounding simply press the
FUNCTION
button
(1)
and the
alarm will automatically stop.
•
NOTE
: The Alarm-1 and/or Alarm-2 setting will still be
ON
and set for the same
time for the next day.
FUNCTION
The
FUNCTION
button
(1)
will turn the non-clock functions
ON
& cycle through the different
function options (BLUETOOTH, FM, AM).
•
To turn the non-clock functions
ON
, simply press the
FUNCTION
button
(1)
repeatedly until you arrive at the desired function (BLUETOOTH, FM, AM)
•
To turn the non-clock functions
OFF
, press & hold the
FUNCTION
button
(1)
until the
LED display shows only the current time.
VOLUME
•
To Increase Volume - Press the
VOLUME UP / ALARM-2
button
(5)
•
To Decrease Volume - Press the
VOLUME DOWN / ALARM-1
button
(3)
6