background image


Figure 4:

 Diagonal cutting with the miter 

gauge. 
 

Bevel cutting 

The work table can be tilted up to 45

0

 to 

accommodate bevel cutting. Loosen the knob 
on the front of the tile cutter as shown in 
Figure 5. Use the scale on the front of the tile 
cutter to set the desired table tilt angle. 
Retighten the knob to secure the table. 


Figure 5:

 Tilting the table for bevel cutting 


Blade installation and changes 


WARNING!

 This tile cutter is only designed for 

wet cutting, and only the continuous rim 
diamond blade can be used. 
 

1.  Unplug the machine from the power 

source! 

2.  Remove the water tank from underneath 

the machine. 

3.  Remove the lower blade guard by 

removing the screws on each side of the 
lower blade guard (Figure 6). 


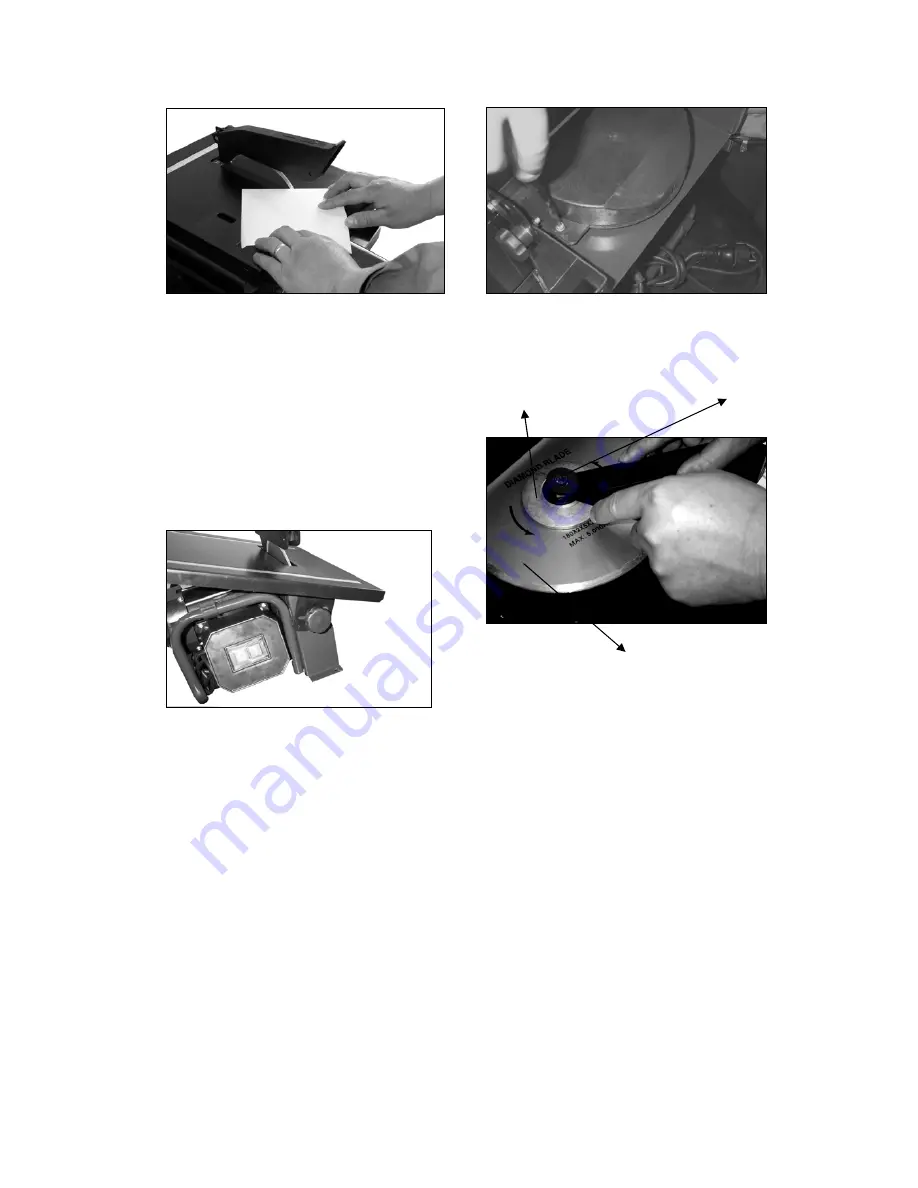
4.  Use spanner A and spanner B to loosen 

and remove the arbor nut from the motor 
spindle as shown in Figure 7. 


Outer flange 

Arbor nut 


5.  Slide the outer flange (Figure 7) and the 

diamond blade off the end of the motor 
spindle. 

180mm continuous 
rim diamond blade 

6.  Slide the new diamond blade and the 

outer flange over the end of the motor 
spindle. Note-Make sure the directional 
arrow printed on the diamond blade is 
pointing in a counter-clockwise direction 
when viewing the machine facing the 
arbor nut. 

7.  Thread and tighten the arbor nut onto the 

motor spindle to secure the diamond 
blade. 

8.  Re-install the lower blade guard.


- 11 - 

Summary of Contents for TILE SAW 60707

Page 1: ...MASTER CUT PORTABLE TILE SAW INSTRUCTION MANUAL MODEL NO 60707 Carefully read the instruction manual before you use this machine and save this instruction manual for future reference 1...

Page 2: ...hnical specifications Electrical safety UNPACKING LOOSE PARTS LIST FEATURES ASSEMBLY AND OPERATION Assembly of the tile cutter Fitting the Tile Cutter on a Work Bench Cut preparation Rip cutting 450 M...

Page 3: ...chine is designed for wet cutting only Only use a Q E P continuous Rim Diamond Blade Carefully read the instruction manual before operating this Tile Saw Keep your hands away from the running blade wh...

Page 4: ...perly Do not wear loose clothing or jewelry They can be caught in moving parts Rubber gloves and non skid footwear are recommended when working outdoors Wear protection hair covering to contain long h...

Page 5: ...g The use of any other accessory or attachment other than recommended in the instruction manual may present a risk of personal injury 22 Have your tool replaced by an expert This electric appliance is...

Page 6: ...tional tool during the operation TECHNICAL SPECIFICATIONS Technical specifications Model Voltage Frequency Power input No load speed Saw Blade dimensions Continuous rim diamond blade only Insulation c...

Page 7: ...upply Tile cutter should never be connected to power supply when you are assembling parts making adjustments installing or removing blades or when not in use Carefully remove all parts from the carton...

Page 8: ...attempting to use familiarize yourself with all the operating features and safety requirements of your tile cutter Figure 1 Front view of tile cutter Blade Blade guard Miter gauge Parallel guide Tabl...

Page 9: ...its intended use is a case of misuse The user operator and not the manufacturer shall be liable for any damage or injury resulting from case of misuse Only those cutting wheels suitable for the machin...

Page 10: ...lasses a dust mask and hearing protection while cutting with the machine Rip cutting 1 Using a marking pencil mark the cut line on a piece of tile 2 Unlock the parallel Figure 3 guide and slide it to...

Page 11: ...water tank from underneath the machine 3 Remove the lower blade guard by removing the screws on each side of the lower blade guard Figure 6 4 Use spanner A and spanner B to loosen and remove the arbo...

Page 12: ...EXPLODED VIEW 12...

Page 13: ...2 6 Bolt 1 28 Screw 2 7 Washer 2 29 Knob 2 8 Screw 2 30 Nut 2 9 Pin 1 31 Nut 4 10 Table 1 32 Washer 4 11 Knob 2 33 Screw 4 12 Washer 4 34 Water Tank 1 13 Clamping Plate 2 14 Parallel Guide 1 15 Screw...

Page 14: ...14 26 3 Switch 1 26 4 Terminal Block 1...

Reviews: