background image

- 4 -

18. STAY ALERT.

Inattention on the part of the operator may lead to serious

injury.

19. CHECK DAMAGED PARTS.

Before further use of the tool, a guard or

other part that is damaged should be carefully checked to determine that it
will operate properly and perform its intended function – check for
alignment of moving parts, binding of moving parts, breakage of parts,
mounting and any other conditions that may affect it's operation.  A guard 
or other part that is damaged should be properly repaired or replaced.

GENERAL SAFETY INSTRUCTIONS
CONTINUED

PRODUCT SPECIFIC SAFETY
INSTRUCTIONS

1.

Do not lock trigger into the ON position unless drill is properly secured.
This drill is a powerful, high-torque tool.

2.

Always keep auxiliary pipe handle in place to maintain control of drill.

3.

Do not use heavy-duty drills while standing on ladders or other unstable
places.

4.

CAUTION:

DO NOT touch the chuck or gear case housing while drilling

into walls. A chuck or other metal part on the drill may be made “live” if
drilled into wiring concealed in the wall.

5.

Use recommended accessories. The use of improper accessories may
cause risk of injury.

PRODUCT INTRODUCTION

• Designed for mixing thinset, grout and mortar

• Variable-speed dial

• Heavy-duty, professional quality

• Powerful 6-amp motor

• Precision 5/8" chuck

• Die-cast aluminum gear housing

• Ball-bearings

• High-torque, double-reduction gears

• Chuck keyholder in case

• Trigger lock

• Auxiliary handle

• Use with QEP mixing paddles

Summary of Contents for 21650

Page 1: ... or serious bodily injury SAVE THESE INSTRUCTIONS FOR FUTURE REFERENCE AVERTISSEMENT Lire et comprendre toutes les directives Le non respect des directives décrites ci dessous peut causer des chocs électriques un incendie ou des blessures graves VEUILLEZ CONSERVER CES DIRECTIVES POUR RÉFÉRENCE ULTÉRIEURE ADVERTENCIA Lea y comprenda todas las instrucciones Si no se cumplen todas las instrucciones e...

Page 2: ... Seguridad Específicas para el Producto 16 Introducción del Producto 16 17 Instalación 17 Instrucciones de Operación 17 19 Mantenimiento y Localización de Averías 19 20 Especificaciones 20 Servicio al Cliente y Servicio Técnico 20 Lista de Piezas y Diagrama 21 TABLE OF CONTENTS General Safety Instructions 3 4 Specific Safety Instructions 4 Introduction 4 Set Up 5 Operating Instructions 5 6 Mainten...

Page 3: ... 2 ...

Page 4: ... Also use a face or dust mask for commercial cutting operations Everyday eyeglasses only have impact resistant lenses they NOT safety glasses 10 DO NOT ABUSE POWER CORD Never carry tool by the cord or yank it to disconnect from the power receptacle Keep cord away from heat oil and sharp edges 11 SECURE WORK Use clamps or a vise to hold work when practical They are safer than using your hand and fr...

Page 5: ...unless drill is properly secured This drill is a powerful high torque tool 2 Always keep auxiliary pipe handle in place to maintain control of drill 3 Do not use heavy duty drills while standing on ladders or other unstable places 4 CAUTION DO NOT touch the chuck or gear case housing while drilling into walls A chuck or other metal part on the drill may be made live if drilled into wiring conceale...

Page 6: ...along the length of the jaws To close the chuck use the chuck key in each of the chuck holes in succession Ensure that the gears mesh then turn the key firmly Remove the key before turning on the drill Do not overload the drill e g never use an accessory larger than the rated chuck capacity of the drill MIXING To use for mixing thin set grout mortar paint CAUTION Use extreme caution to avoid getti...

Page 7: ... trigger into the on position unless drill is properly secured 1 Squeeze the trigger to turn on the drill Release the trigger to turn off drill Drill can be locked into the ON position by squeezing the trigger pressing and holding down the trigger lock button and then releasing the trigger 2 Securely clamp your work while drilling to keep work from turning with the bit and to free both hands to op...

Page 8: ...icant for most metals Use paraffin to lubricate the drill bit when working in brass 4 DRILLING MASONRY Use carbide tipped bits for drilling masonry such as cement block tile stone plaster and brick When drilling masonry apply constant pressure on the drill Use carbide tipped bits carefully because they are very brittle and easily broken APPLICATION RECOMMENDED DRILL BIT Hard Metals Steel etc High ...

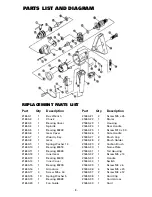
Page 9: ...rmature 21650 17 4 Screw M5 x 40 21650 18 10 Spring Washer 5 21650 19 1 Bearing 80028 21650 20 1 Fan Guide PARTS LIST AND DIAGRAM Part Qty Description 21650 21 2 Screw M5 x 45 21650 22 1 Stator 21650 23 1 Housing 21650 24 1 Rear Handle 21650 25 1 Screw M10 x 30 21650 26 1 Side Handle 21650 27 2 Brush Cap 21650 28 2 Brush Holder 21650 29 2 Carbon Brush 21650 30 1 Name Plate 21650 31 1 Tail Housing ...

Page 10: ...érapantes Si vous avez des cheveux longs couvrez les pour les protéger 9 TOUJOURS PORTER DES LUNETTES DE SÉCURITÉ Lorsque le travail est poussiéreux portez un masque Les lunettes normales sans verres anti choc elles ne sont pas protectrices 10 NE PAS ABUSER LE CORDON ÉLECTRIQUE Ne jamais porter l outil par le cordon électrique ou tirer d un coup sec afin de débrancher de la prise Ne laissez pas s ...

Page 11: ... mélanger l adhésif léger le coulis et le mortier Échelle de vitesse Robuste de qualité professionnelle Moteur puissant de 6 ampères Mandrin de précision de 5 8 d un pouce Carter en aluminum moulé Roulement à billes Engrenages à double réduction et couple moteur élevé Porte clé de mandrin dans le boîtier Verrou de déclic Poignée auxiliaire Utiliser avec les palettes à mélanger de QEP 1 Ne pas mett...

Page 12: ...hoires Fermer le mandrin par engager de suite le clé de mandrin dans tous les trous de mandrin Assurer que les engrenages s engrenent et ensuite tourner fermement la clé Enlever le clé avant de brancher la perceuse Ne pas surcharger la perceuse e g ne pas utiliser un accessoire d une capacité plus grande que cela du mandrin de perceuse MÉLANGE Pour mélanger l adhésif léger le coulis et le mortier ...

Page 13: ... la position de ON le déclic à moins que la perceuse soit bien bloquée 1 Appuyer sur le déclic afin de faire démarrer la perceuse Relâcher le déclic afin de éteindre la perceuse La perceuse peut être mise à la position d ON par appyuyer le bouton de verrou de déclic et ensuite relâcher le déclic 2 Utiliser des pinces pour serrer vos matériaux de travail lorsque vous travaillez afin que des matéria...

Page 14: ...s Utiliser la paraffine comme lubricant lorsque vous travaillez avec des matériaux en cuivre 4 PERCER LA MAÇONNERIE Utiliser les mèches à bout de carbure afin de percer maçonnerie comme ciment carreaux pierre plâtre et bricolage Lorsque vous percez la maçonnerie appuyer sur la perceuse sans interruption Utiliser avec précaution les mèches à bout de carbure parce qu elles sont très cassantes et peu...

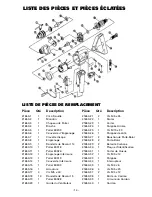
Page 15: ...21650 17 4 Vis M5 x 40 21650 18 10 Rondelle de Ressort 5 21650 19 1 Palier 80028 21650 20 1 Guide du Ventilateur LISTE DES PIÈCES ET PIÈCES ÉCLATÉES Pièce Qté Description 21650 21 2 Vis M5 x 45 21650 22 1 Stator 21650 23 1 Carter 21650 24 1 Poignée Arrière 21650 25 1 Vis M10 x 30 21650 26 1 Poignée de côté 21650 27 2 Bouchon de Porte Balai 21650 28 2 Porte Balai 21650 29 2 Balai de Carbone 21650 3...

Page 16: ...atas anillos pulseras ni otras joyas que puedan engancharse en las partes en movimiento Se recomienda usar calzado antiderrapante Proteja su cabello si lo tiene largo 9 USE SIEMPRE GAFAS DE SEGURIDAD Use también una máscara facial o tapabocas en operaciones de corte de tipo comercial Las gafas de uso diario solamente tienen lentes resistentes a los impactos NO son gafas de seguridad 10 NO MALTRATE...

Page 17: ...partes móviles trabadas o partes rotas el armado y cualquier otra condición que pueda afectar su funcionamiento Un protector u otra pieza dañada debe repararse o reemplazarse cuando corresponda INSTRUCCIONES GENERALES DE SEGURIDAD CONTINUACIÓN INSTRUCCIONES DE SEGURIDAD ESPECÍFICAS PARA EL PRODUCTO 1 No trabe el disparador en la posición ON encendido a menos que el taladro esté correctamente sujet...

Page 18: ...ajustarlo Este taladro viene equipado con un mandril de precisión de 3 mordazas Para usarlo introduzca las brocas y accesorios en el mandril lo suficiente para asegurar que tengan contacto con las mordazas en toda su extensión Para cerrar el mandril use la llave de éste en cada uno de los agujeros del mismo en forma sucesiva Asegúrese de que los engranajes encastren y luego gire la llave firmement...

Page 19: ...ocidad o funciona con dificultad Si el taladro comienza a calentarse deje que se enfríe y luego hágalo funcionar a una velocidad más baja e Al terminar de mezclar retire la paleta mezcladora del taladro Limpie el agua lodo o residuos del taladro con un paño seco y limpio Lave la paleta mezcladora con agua limpia No deje que la lechada el mortero ni la pintura se sequen en la paleta mezcladora PERF...

Page 20: ...ALADRO RECOMENDADA Metales duros acero etc Acero de alta velocidad Metales blandos latón etc Acero de alto carbono Madera Acero de alto carbono Raspador Barrena eléctrica Avellanador Sierra perforadora Mampostería Con punta de carburo Mampostería Vidrio Vidrio especial Plásticos Compuestos Acero de alto carbono 4 Coloque la punta de la broca suavemente en el centro del agujero que desee hacer ante...

Page 21: ...de carburo para perforar mampostería como bloques de cemento losetas piedra revoque y ladrillo Al perforar mampostería use una presión constante en el taladro Use las brocas con punta de carburo con cuidado porque son muy frágiles y se rompen fácilmente Unidad del motor Corriente 110 voltios 60 Hz Intensidad de corriente 6 amperios Velocidad sin carga 0 600 rpm 650 vatios Peso 12 8 lb ESPECIFICACI...

Page 22: ...5 x 40 21650 18 10 Arandela elástica 5 21650 19 1 Cojinete 80028 21650 20 1 Guía del ventilador LISTA DE PIEZAS Y DIAGRAMA Pieza Cantidad Descripción 21650 21 2 Tornillo M5 x 45 21650 22 1 Estator 21650 23 1 Carcasa 21650 24 1 Mango posterior 21650 25 1 Tornillo M10 x 30 21650 26 1 Mango lateral 21650 27 2 Tapa de escobilla 21650 28 2 Sujetador de escobilla 21650 29 2 Escobilla de carbón 21650 30 ...

Page 23: ...Made in Taiwan Fabriqué au Taiwan Hecho en Taiwan Boca Raton FL 33487 www qep com H216 ...

Reviews: