QED LEP-150-P Maintenance And Troubleshooting Manual Download Page 6

Page 6 

PNEUMATIC BACKPLATE ASSEMBLY 

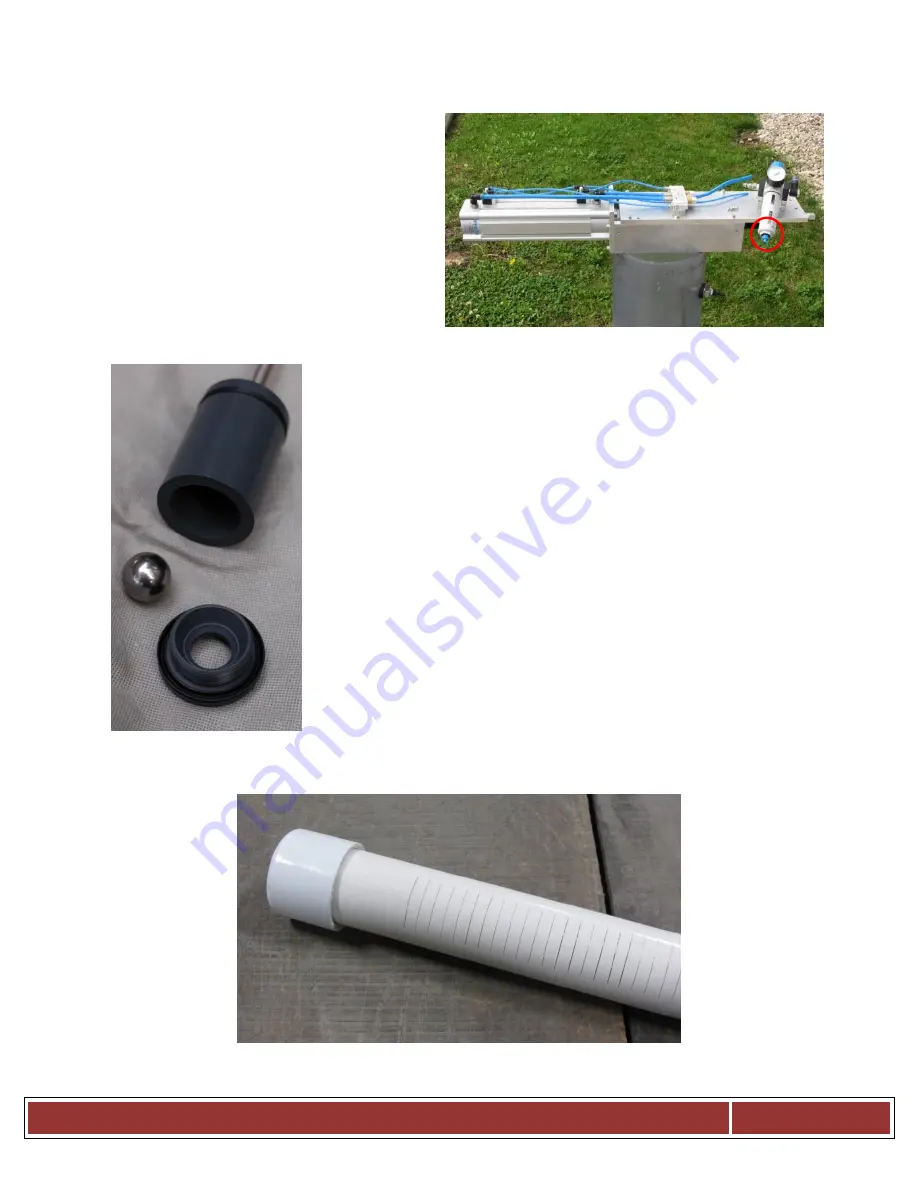
The operational lifespan of the pneumatic 
backplate assembly depends greatly on the 
dryness and cleanliness of the air supply. Drain 
water from the filter/regulator housing 
regularly by loosening then retightening the 
blue vent screw circled at right. 

In the event of difficulty with the pneumatic 
assembly function, refer to the troubleshooting 
steps in Section III.


LOWER PUMP ASSEMBLY 

The lower pump assembly includes the PVC Piston and 2 x 316 series 
stainless steel balls, which may experience wear over time, especially with 
highly abrasive content in the leachate. The PVC piston and one ball are 
shown at left. 

One of the best methods to reduce wear on the lower pump assembly 
and seals is through the use of our optional Intake Screen Filter, shown 
below. This simple slotted PVC pipe extends from the lower seat of the 
pump and provides an initial filtration of larger particles so as to reduce 
the abrasive elements entering the pump.  

Should there be high temperatures (>130 degrees F), or a high percentage 
of abrasive content in the leachate, such as sand or silica, we recommend 
the use of our upgraded high temperature version of our piston, 
Part # LP-150-11. 

     Portion of Intake Screen Filter, typically 24 inches in length 

Summary of Contents for LEP-150-P

Page 1: ...Maintenance and Troubleshooting Guide V1 5 LEP 150 P LEP 225 P Pump QED Environmental Systems www QEDENV com ...

Page 2: ...ed with your purchase It is our hope that this guide will prove useful for any maintenance and troubleshooting issues that may arise in the field If however any questions remain or are not answered in this guide please do not hesitate to contact us directly at info qedenv com This guide has three sections Section I Pump Components and Required Tools Section II Maintenance Tasks Section III Trouble...

Page 3: ...lock pliers 2 Vise Grips or 2 pipe wrenches 3 Set of imperial combination wrenches 4 Set of imperial Allen keys 5 2mm Allen Key 6 Short blade screwdriver 7 WD 40 Jig a loo or equivalent 8 Loctite 242 or equivalent thread sealant 9 All required Personal Protective Equipment including Gas Monitors SECTION II MAINTENANCE The maintenance requirements for our pumps fall under three main areas seals and...

Page 4: ...from the drop assembly the piston can then be pulled out the top end of the pump Upon removal of the old seals the new piston U cup seals MUST be installed with the open end of U facing UPWARD The piston assembly can be re inserted into the cylinder body from the TOP end and plunged downward into position Do not forget the SS ball before re screwing the cylinder seat into place PUMP HEAD SEALS The...

Page 5: ...the old seals the new seals MUST be installed following the diagram above BEARINGS Bearings are found both in the backplate and linkage assembly The length of time between bearing replacement can vary greatly with amount of use and the nature of the leachate being pumped Most clients only perform maintenance on the bearings upon indication of a problem and usually only the bottom linear bearing an...

Page 6: ...ence wear over time especially with highly abrasive content in the leachate The PVC piston and one ball are shown at left One of the best methods to reduce wear on the lower pump assembly and seals is through the use of our optional Intake Screen Filter shown below This simple slotted PVC pipe extends from the lower seat of the pump and provides an initial filtration of larger particles so as to r...

Page 7: ... in discharge line Remove discharge line and confirm pump operation with no line attached To remedy locate blockage in discharge line and remove Discharge line is frozen Heat tracing and insulation is recommended in colder climates as well as keeping the pump operational 24 7 to keep lines from freezing Exhaust regulator settings may be too restricted Unscrew the adjustment screw in both the lifti...

Page 8: ...isconnections cracks Piston has disconnected from piston rod Pull pump dry piston and piston rod threads apply crazy glue and reassemble Intake filter or lower pump assembly clogged Pull pump Remove build up clog Replace intake filter if necessary ABNORMALLY RAPID SEAL FAILURE OR WEAR ON BEARINGS Alignment is not linear Drop assembly may be crooked cross threaded at couplings Pull pump inspect dro...

Page 9: ... Intake filter or lower pump assembly clogged Pull pump Remove build up clog Replace intake filter if necessary Lower the overload status adjustment for the motor DROP ASSEMBLY DIFFICULT IMPOSSIBLE TO REMOVE FROM WELL Well may be pinched or crooked drop assembly may be caught on in well debris Move drop assembly back and forth to dislodge If not successful remove as much of the drop assembly as po...

Reviews: