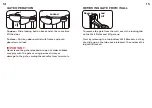
background image

6

7

IMPORTANT

When installing the gate in front of stairs, place it at least 

24" (61 cm) from the top or bottom step. When installed 

in front of a fireplace place it at least 30" (76.2 cm) away 

from the fire.

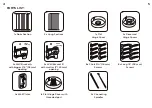
EXTRA SECTIONS AND DOORS AVAILABLE

Two sizes of additional sections and a door section are 

available as needed, each sold separately. 

Construct-A-SafeGate Short Section– 7.9" (20 cm)

Construct-A-SafeGate Long Section– 23.6" (60 cm)

Construct-A-SafeGate Door Section- 31.5" (80 cm)
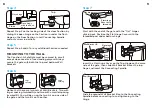
ASSEMBLY

General 

The following assembly instructions work for all sections 

of the Construct-A-SafeGate.  They can all be assembled 

and reassembled in any order to fit the location.

Step 1 

Determine the width of the area you need to protect, and 

whether or not the “Starter Kit” is enough, or if you need 

to purchase additional sections.
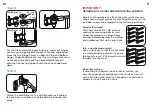
Step 2


Decide where you want the Door Section located in the 

gate. Normally it’s most convenient to have the door in 

the center or near the center of the gate span.

Step 3

On the hinge side of the Door Section, position a Section 

with the flush hinge to nest with the open hinge on the 

door section. Position at the desired angle. 

Insert the Connecting Spindle with the silver end toward 

the top. The bottom of the Connecting Spindle is 

threaded and will fit onto the threaded post in the lower 

hinge. Only screw the Connecting Spindle in partially by 

hand to allow for possible angle adjustments of the gate 

later without having to unscrew the Connecting Spindle.

Examples:

Section

Door Section

Wall Mount
Purchased Additional 

Extension

Flush hinge

Open hinge

Floor

Top

Summary of Contents for Construct-A-SafeGate

Page 1: ...ditional sections to fit any opening IMPORTANT Qdos wants to keep your children safe and for that we need you to do your part by carefully reading and following the instructions below Please read thro...

Page 2: ...l your gate quickly and easily please go to qdossafety com for installation videos and FAQ s to help you succeed You may also contact our customer service at support qdos zendesk com or by phone at 80...

Page 3: ...38 mm opening 8x Short 3 4 19 mm Screws 8x Long 1 5 38 mm Screws 2x Connecting Spindles 4x Wall Plates 2 x Long Sections 2x Recessed Hinge Covers 2x Wall Bracket B with smaller 1 25 mm opening 1x Flat...

Page 4: ...area you need to protect and whether or not the Starter Kit is enough or if you need to purchase additional sections Step 2 Decide where you want the Door Section located in the gate Normally it s mos...

Page 5: ...ush hinge on the Door Section Insert Connecting Spindle and only screw in partially Step 5 Repeat Step 3 and 4 for any additional Sections needed MOUNTING TO THE WALL The Construct A SafeGate must be...

Page 6: ...make sure you have chosen a solid surface for mounting the gate to The included screws are intended for the following locations Directly into wood The Short Screws 3 4 19 mm are used when mounting dir...

Page 7: ...the markings on the wall with the locking tab at the top and mark the screw holes they are all identical After this you can erase the markings for the positioning of the Wall Plates from the wall Ste...

Page 8: ...open as older children may play with the gate causing personal injury or damage to the gate voiding the manufacturer s warranty REMOVING GATE FROM WALL To remove the gate from the wall press the lock...

Page 9: ...istributed by Regal Lager Inc Kennesaw GA 30144 USA 1 800 593 5522 www QdosSafety com support qdos zendesk com 2020 Qdos All rights reserved Qdos is a trademark of Regal Lager Inc Made in China 04 202...

Reviews: