background image

電源オン

 / 

オフ

電源をオンにするには、充電ケースから両方のイヤホンを取り出します。

充電ケースに両方のイヤホンを戻してケースを閉じると、イヤホンの電源は

自動的にオフになります。

• 

手動で電源をオンにするには、いずれかのイヤホンの多機能ボタンを

 1.5 

間押し続けます。

• 

手動で電源をオフにするには、いずれかのイヤホンの多機能ボタンを

 4.5 

間長押してください。

EN     7

Summary of Contents for QCY-T11

Page 1: ...QCY T11 True Wireless Earbuds Be Creative Go Beyond...

Page 2: ...Contents English 1 German 10 Spanish 20 Italian 30 French 40 Portugal 50 Japanese 60 Korean 70...

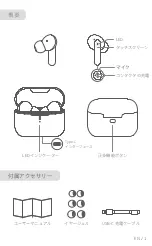
Page 3: ...Overview What s in the box Microphone Touch panel Charging Contactor LED Indicator Multifunction Button Eartips Type C Cable EN 1 LED Type C Port User Manual...

Page 4: ...it your ears best Step 1 Ensure sounds hole downward then place earbuds Into ear Step 2 Rotate earbud back to auricle side to fit snugly Your earbuds come with multiple pairs of EarTips among which Me...

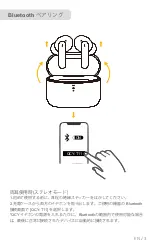
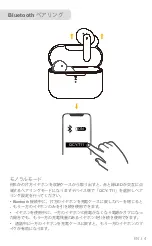
Page 5: ...charging case 2 Find QCY T11 in the Bluetooth list on your device and confirm the pairing Each time you power on your earphones it will automatically connect to your last successfully connected device...

Page 6: ...ne into the charging case and closing it When powered on and connected if either one of the earbuds is out of battery and powered off you can keep using the other one When you are on a call place eith...

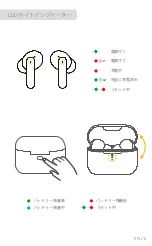
Page 7: ...Earbuds Status EN 6 Power on Charging 60 Full charging 2 Power off High battery Medium battery Low battery Resetting Resetting...

Page 8: ...charge both the earbuds and the charging case before the first use To preserve battery lifespan fully charge at least once every 45 days To prevent damage use the provided USB C cable You can charge...

Page 9: ...power off place the earbuds in the charging case and close it To manually power on press and hold the multi function button on either one of earbuds for 1 5 second To manually power off press and hold...

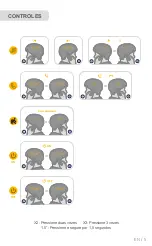
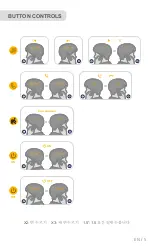
Page 10: ...BUTTON CONTROLS X2 Tap Twice X3 Tap Triple 1 5 Press and hold for 1 5 seconds 1 5 1 5 1 5 1 5 or 2 2 or 2 2 or 3 3 or EN 5 1 5 4 5 or 4 5 1 5 1 5 or 1 5 ON ON OFF OFF...

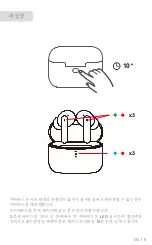
Page 11: ...re being charged Keep the charging case open 2 Press and hold the button on the charging case for 10 seconds until the LED indicators of charging case flash red blue 3 times and the LED indicators on...

Page 12: ...onths please charge and maintain it regularly for safe operation Do not put it under extreme temperatures such as below 10 degrees Celsius or above 60 degrees Celsius Do not expose the product to stro...

Page 13: ...berblick Ladeetui f r Ohrh rer Mikrofon Touchpanel Ladesch tz LED Anzeige Multifunktionstaste Ohrst psel in 3 Gr en USB C Ladekabel DE 1 LED Typ C Anschluss Kurzanleitung...

Page 14: ...Sie die Ohrh rer jeweils in den inneren Geh rgang ein und drehen Sie sie vorsichtig bis Sie die bequemste und sicherste Position gefunden haben Im Lieferumfang Ihrer Ohrh rer sind zahlreiche Ohrst ps...

Page 15: ...Ihrem Smartphone und w hlen Sie die QCY T11 aus der Liste der verf gbaren Ger te aus um das Pairing abzuschlie en Ihre Ohrh rer werden sich nach jedem Einschalten automatisch mit dem zuletzt erfolgrei...

Page 16: ...Verbinden Bei einer Verbindung ber Bluetooth k nnen Sie einen Ohrh rer nur dann verwenden wenn Sie den anderen Ohrh rer in die Ladeschale legen Nach dem Einschalten und Verbinden k nnen Sie einen Ohrh...

Page 17: ...KOPFH RER STATUS EN 6 Akkuladestand hoch Eingeschaltet Aufladen 60 Vollst ndig geladen 2 Ausschalten Akkuladestand hoch Akkuladestand mittel Akkuladestand niedrig Zur cksetzen Zur cksetzen...

Page 18: ...st ndig ab Laden Sie beide Ohrh rer und die Ladeh lle vor der ersten Verwendung vollst ndig auf Um die Lebensdauer der Batterie zu erhalten laden Sie sie mindestens einmal alle 45 Tage vollst ndig auf...

Page 19: ...e Ohrh rer zum Ausschalten in die Ladeh lle Um das Ger t manuell einzuschalten dr cken und halten Sie die Multifunktion staste an einem der Ohrh rer f r 1 5 Sekunde Halten Sie zum manuellen Ausschalte...

Page 20: ...BEDIENELEMENTE X2 Zweimal tippen X3 Dreimal tippen 1 5 1 5 Sekunde gedr ckt halten 1 5 1 5 1 5 1 5 or 2 2 or 2 2 or 3 3 or EN 5 1 5 4 5 or 4 5 1 5 1 5 or 1 5 ON ON OFF OFF...

Page 21: ...nden k nnen 1 Legen Sie die Ohrh rer in die Ladeh lle und stellen Sie sicher dass sie aufgeladen werden 2 Halten Sie das Ladeetui offen und halten Sie dann die Taste am Ladeetui 10 Sekunden lang gedr...

Page 22: ...eug im Sommer oder Winter aufbewahren Es wird empfohlen die Bluetooth Kopfh rer bei Temperaturen zwischen 20 C und 45 C aufzubewahren Bewahren Sie die Bluetooth Kopfh rer nicht ber einen l ngeren Zeit...

Page 23: ...Panoramica Accessori in dotazione Microfoni Pannello touch Contattore di carica Indicatore LED multifunzione EarGel Cavo di ricarica USB C EN 1 LED Porta per la ricarica Manuale d uso...

Page 24: ...no la tenuta migliore 2 Inserire gli auricolari nel canale uditivo e ruotarli delicatamente fino a individuare la posizione pi comoda e sicura Gli auricolari sono dotati di pi paia di EarTips tra cui...

Page 25: ...i alle impostazioni Bluetooth dello smartphone e seleziona QCY T11 dall elenco dei dispositivi disponibili Ogni volta che si accendono gli auricolari QCY questi ultimi si collegheranno automaticamente...

Page 26: ...re clic su Connetti dopo la corretta connessione al Bluetooth possibile utilizzare uno dei due auricolari solo riponendo l altro nella custodia di ricarica Quando accesi e collegati se uno degli auric...

Page 27: ...Che cosa indicano i LED EN 6 Accensione Ricarica 60 carica completa 2 Spegnimento Completamente carica Batteria carica a met Batteria quasi scarica Ripristino Ripristino...

Page 28: ...lla ricarica Il primo utilizzo deve essere preceduto da una ricarica completa di auricolari e custodia di ricarica Per preservare la durata della batteria effettuare una ricarica completa almeno una v...

Page 29: ...la custodia di ricarica e chiudere la custodia gli auricolari si spegneranno automaticamente Per accendere manualmente tenere premuto il pulsante multifunzione su uno degli auricolari per 1 5 secondo...

Page 30: ...CONTROLLI X2 Premere due volte X3 Premi tre volte 1 5 Tenere premuto per 1 5 secondo 1 5 1 5 1 5 1 5 or 2 2 or 2 2 or 3 3 or EN 5 1 5 4 5 or 4 5 1 5 1 5 or 1 5 ON ON OFF OFF...

Page 31: ...orre gli auricolari nella custodia di ricarica e assicurarsi che siano carichi 2 Tieni la custodia di ricarica aperta quindi tieni premuto il pulsante sulla custodia di ricarica per 10 secondi finch l...

Page 32: ...gli auricolari a una temperatura compresa tra 20 C e 45 C Non conservare gli auricolari per periodi di tempo prolungati senza ricaricarli massimo tre mesi Se gli auricolari o la custodia di ricarica s...

Page 33: ...Aper u Accessoires fournis Microphone cran tactile Contacteur de charge indicateur LED Bouton multifonction EarGels C ble de charge USB C EN 1 LED Port de recharge Manuel de l Utilisateur...

Page 34: ...vos oreilles 2 Ins rez les couteurs dans le conduit auditif de vos oreilles et faites les tourner d licatement jusqu ce qu ils tiennent confortablement et fermement Faites pivoter l couteur vers le c...

Page 35: ...ans le menu Bluetooth de votre t l phone intelligent et s lectionnez QCY T11 dans la liste des p riph riques disponibles Chaque fois que vous allumez vos couteurs QCY ils se connectent automatiquement...

Page 36: ...sque Bluetooth est connect vous pouvez utiliser un seul des couteurs en pla ant simplement l autre dans le bo tier de charge Si la batterie d un des couteurs est faible et qu il est teint lorsque l au...

Page 37: ...Signification des DEL EN 6 Allum mise en charge 60 charge compl te 2 teint Pile pleine Pile moyenne Pile faible R initialisation R initialisation...

Page 38: ...ement Chargez enti rement les deux couteurs et l tui de chargement avant la premi re utilisation Pour pr server la dur e de vie de la batterie proc dez une recharge compl te au moins une fois tous les...

Page 39: ...e les couteurs placez les dans le bo tier de charge et fermez cedernier Pour les allumer manuellement maintenez le bouton multifonction d un des couteurs appuy pendant 1 5 seconde Pour les teindre man...

Page 40: ...COMMANDES X2 Appuyez deux fois X3 Appuyez trois fois 1 5 Maintenir appuy pendant 1 5 secondes 1 5 1 5 1 5 1 5 or 2 2 or 2 2 or 3 3 or EN 5 1 5 4 5 or 4 5 1 5 1 5 or 1 5 ON ON OFF OFF...

Page 41: ...ez les couteurs dans l tui de chargement et assurez vous qu ils sont en charge 2 Gardez le bo tier de charge ouvert puis appuyez sur le bouton du bo tier de charge et maintenez le enfonc pendant 10 se...

Page 42: ...5 C Ne rangez pas vos couteurs boutons pendant des p riodes prolong es sans les recharger max trois mois Si les couteurs boutons ou l tui chargeur se salissent il est recommand de les nettoyer l aide...

Page 43: ...Visi n general Accesorios incluidos Micr fono Panel t ctil Contactor de carga indicador LED Bot n multifunci n EarGels Cable de carga USB C EN 1 LED Tapa del Manual de usuario...

Page 44: ...o do que mejor se ajusten a sus o dos Paso 1 aseg rese de que el orificio de sonido est hacia abajo luego coloque los auriculares en el o do Paso 2 Gire el auricular hacia atr s hacia el lado de la au...

Page 45: ...justes de Bluetooth de su smartphone y seleccione QCY T11 de la lista de dispositivos disponibles para completar el emparejamiento Cada vez que encienda los auriculares autom ticamente se conectar n a...

Page 46: ...a establecer la conexi n cuando el Bluetooth est conectado puede utilizar solamente uno de los auriculares dejando el otro dentro del estuche de carga Cuando est n encendidos y conectados si uno de lo...

Page 47: ...Qu indican los LED EN 6 Ligado Carregando 60 Totalmente cargada 2 Apagar Bater a baja Bater a media Bater a alta Redefinindo Redefinindo...

Page 48: ...to USB antes de la carga Cargue ambos auriculares completamente y el estuche de carga antes del primer uso Para conservar la vida til de la bater a c rguela por completo al menos una vez cada 45 d as...

Page 49: ...auriculares col quelos en el estuche de carga y ci rrelo Para encender de forma manual mantenga pulsado el bot n multifunci n en uno de los auriculares durante 1 5 segundo Para apagarlos manualmente m...

Page 50: ...CONTROLES DE BOTONES X2 Pulsar dos veces X3 Pulsar tres veces Mantener pulsado durante 1 5 segundo 1 5 1 5 1 5 1 5 or 2 2 or 2 2 or 3 3 or EN 5 1 5 4 5 or 4 5 1 5 1 5 or 1 5 ON ON OFF OFF...

Page 51: ...n el dispositivo Coloque los auriculares en el estuche de carga y aseg rese de que est n cargando Mantenga abierto el estuche de carga luego mantenga pulsado el bot n del estuche de carga durate 10 se...

Page 52: ...auriculares entre 20 C y 45 C 4 F y 113 F No guarde los auriculares durante per odos prolongados sin recargarlos tres meses como m ximo Si los auriculares o la carcasa de carga se ensucian recomendam...

Page 53: ...Vis o geral Acess rios inclu dos Microfone Painel de toque Contator de carga indicador LED Bot o multifuncional EarGels USB C EN 1 LED Doca de carga Estojo de carregamento...

Page 54: ...a seu ouvido 2 Insira os fones de ouvido no canal interno do ouvido e gire os com cuidado at encontrar a posi o mais confort vel e segura Seus fones de ouvido s o fornecidos com 3 pares de EarTips sen...

Page 55: ...tooth do seu smartphone e selecione o QCY T11 na lista de dispositivos dispon veis para concluir o emparelhamento Sempre que ligar os seus auriculares QCY ir o ligar se automaticamente ao dispositivo...

Page 56: ...ooth est ligado s pode utilizar qualquer um dos auriculares ao colocar o outro na caixa de carregamento Quando os auriculares est o ligados e a funcionar se um dos auriculares ficar sem bateria e se d...

Page 57: ...ado dos LEDs EN 6 N vel de bateria alto Carregamento 60 Totalmente carregado 2 Desligar N vel de bateria elevado N vel de bateria baixo N vel de bateria m dio Totalmente carregado A repor a atualizar...

Page 58: ...antes do carregamento Carregue totalmente os dois auriculares e a caixa de carregamento antes da primeira utiliza o Para preservar a dura o da bateria carregue totalmente pelo menos uma vez a cada 45...

Page 59: ...esligar coloque os fones de ouvido no estojo carregador Para ligar manualmente prima continuamente durante 1 5 segundo o bot o multifun o num dos auriculares Para desligar manualmente prima continuame...

Page 60: ...CONTROLES X2 Pressione duas vezes X3 Pressione 3 vezes 1 5 Pressione e segure por 1 5 segundos 1 5 1 5 1 5 1 5 or 2 2 or 2 2 or 3 3 or EN 5 1 5 4 5 or 4 5 1 5 1 5 or 1 5 ON ON OFF OFF...

Page 61: ...dentro da caixa de carregamento e certifique se de que est o a ser carregados 2 Mantenha a caixa de carregamento aberta e em seguida pressione e segure o bot o na caixa de carregamento por 10 segundos...

Page 62: ...culares entre os 20 C e os 45 C N o guarde os auriculares durante longos per odos de tempo sem os recarregar m x de tr s meses Se os auriculares ou o estojo de carregamento se sujarem ecomendamos que...

Page 63: ...LED USB C EN 1 LED Type C...

Page 64: ...1 2 M EN 2...

Page 65: ...Bluetooth 1 2 Bluetooth QCY T11 QCY Bluetooth ON QCY T11 EN 3...

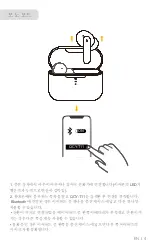
Page 66: ...Bluetooth LED QCY T11 Bluetooth ON QCY T11 EN 4...

Page 67: ...LED EN 6 60 2...

Page 68: ...USB 45 USB C EN 5...

Page 69: ...1 5 4 5 EN 7...

Page 70: ...X2 2 X3 3 1 5 1 5 1 5 1 5 1 5 1 5 or 2 2 or 2 2 or 3 3 or EN 5 1 5 4 5 or 4 5 1 5 1 5 or 1 5 ON ON OFF OFF...

Page 71: ...10 LED 3 10 EN 8 x3 x3...

Page 72: ...12 1 FAQ QCY T11 2 20 C 45 C 3 5V 0 25V 2A 325 QCY hello qcy com tech qcy com EN 9...

Page 73: ...S M L USB C EN 1 LED...

Page 74: ...1 2 3 EN 2...

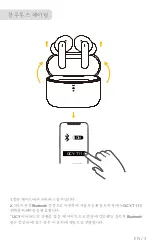
Page 75: ...1 2 Bluetooth QCY T11 QCY Bluetooth ON QCY T11 EN 3...

Page 76: ...1 LED 2 QCY T11 Bluetooth ON QCY T11 EN 4...

Page 77: ...LED EN 6 60 2...

Page 78: ...USB LED 45 USB C EN 5...

Page 79: ...1 1 5 4 5 EN 7...

Page 80: ...BUTTON CONTROLS X2 X3 1 5 1 5 1 5 1 5 1 5 1 5 or 2 2 or 2 2 or 3 3 or EN 5 1 5 4 5 or 4 5 1 5 1 5 or 1 5 ON ON OFF OFF...

Page 81: ...1 2 LED 3 10 10 EN 8 x3 x3...

Page 82: ...12 1 QCY T11 FAQ 2 20 C 45 C 4 F 113 F 3 5V 2A Hele Electronics Co Ltd 325 QCY hello qcy com tech qcy com EN 9...

Reviews: