Q-See QT528-435 Quick Installation Manual Download Page 6

Q-SEE QUICK INSTALLATION GUIDE 

M

M

O

O

D

D

E

E

L

L


N

N

U

U

M

M

B

B

E

E

R

R


Q

Q

T

T

5

5

2

2

8

8

-

-

4

4

3

3

5

5 


6 | P a g e  

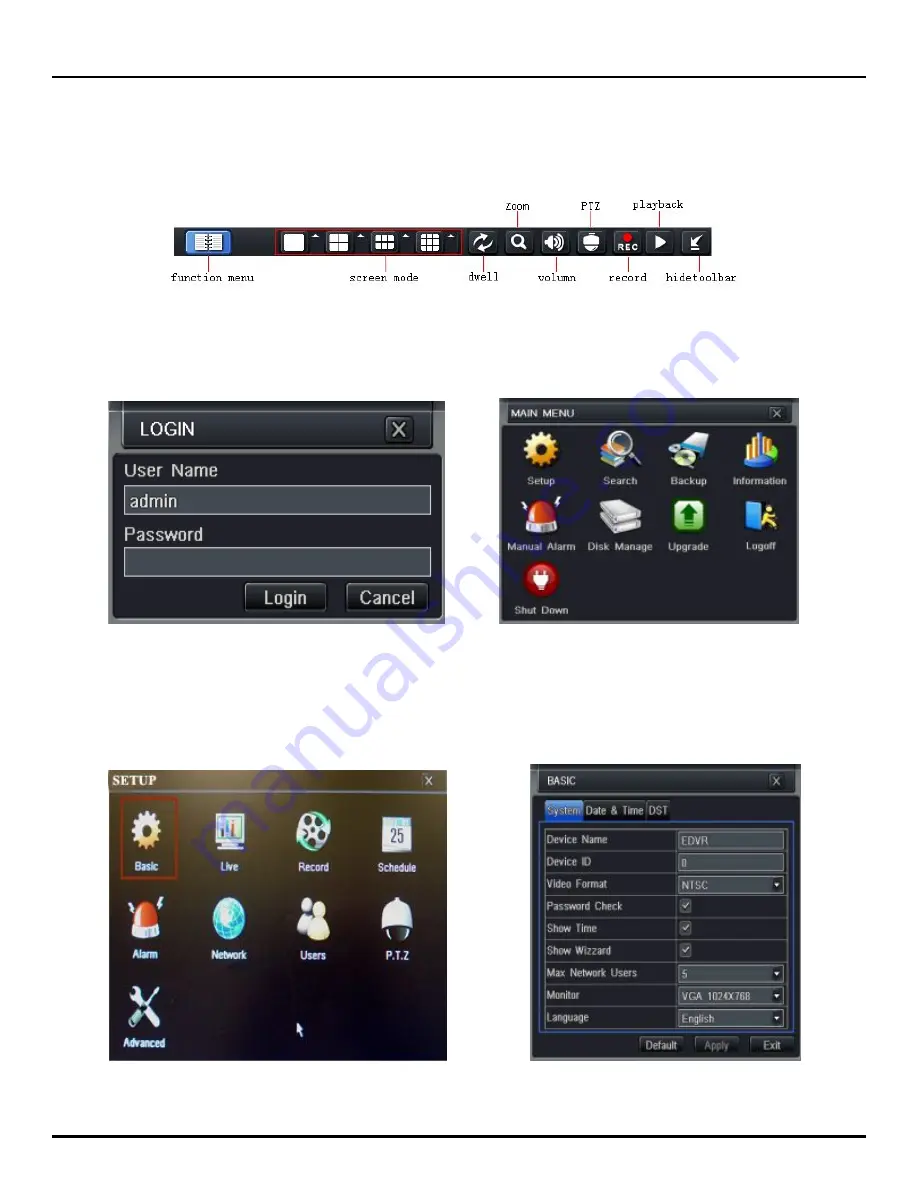
PART 5 - ACCESSING THE DVR MENUS 
 

Right click on the screen with the mouse or push the ESC button on the front panel of the DVR to bring up the 
Menu Bar shown as Pic 5.1.   


Pic 5.1 


Click on the function menu icon to bring up the Login screen shown as Pic 5.2. Enter the user name and password 
which is admin and 123456 by default. This will bring up the Main Menu screen in Pic 5.3. Click on the Setup icon 
(Red box in Pic 5.3) to access the Setup Menu shown as Pic 5.4. 


Pic 5.2  

Pic 5.3


This is the section of the menu where you go to setup the main functions of the DVR. If you click on the Basic icon it 
will display the screen in Pic 5.5 where you set time and date as well as Language, video format, VGA resolution, and 
password check. You will also come to the Setup menu to adjust the display settings, enable and setup cameras for 
recording, set up Pan-Tilt-Zoom cameras, set up users on the system, and setup the unit for remote access. See 
Chapter 4 in the user’s manual for instructions on how to setup these features. 


Pic 5.4 

Pic 5.5 


Summary of Contents for QT528-435

Page 1: ...Quick Installation Guide 8 Channel H 264 Compression DVR with D1 and CIF Real Time Recording and 4 Color CCD Camera Kits M MO OD DE EL L Q QT T5 52 28 8 4 43 35 5...

Page 2: ...8 4 43 35 5 2 P a g e 4 Color CCD Cameras with Stands QSDS1352 3 6mm Remote Control USB 2 0 Mouse Ethernet Cable BNC M RCA F Adapter RG59 Camera Cables 4 Included Power Panel Pre Installed Hard Drive...

Page 3: ...28 8 4 43 35 5 3 P a g e PART 2 DVR CAMERA AND POWER CONNECTIONS Please note that it is STRONGLY recommended to use a surge protector that is UL 1449 rated Look for a clamping voltage of 330 or lower...

Page 4: ...tor 3 Attach the RCA cable from the DVR to the RCA video in port on the TV 4 Attach the other end of the RCA cable to the video in port on the DVR using a RCA to BNC Adapter 5 Go to the login screen o...

Page 5: ...up 3 P T Z Enter PTZ mode in live 4 Audio Live or Mute Audio 5 BACKUP 1 Decrease the value in setup 2 Enter backup mode in live 6 Info System Information 7 SEARCH ZOOM 1 Enter search mode 2 ZOOM funct...

Page 6: ...en in Pic 5 3 Click on the Setup icon Red box in Pic 5 3 to access the Setup Menu shown as Pic 5 4 Pic 5 2 Pic 5 3 This is the section of the menu where you go to setup the main functions of the DVR I...

Page 7: ...to sections 4 4 3 through 4 5 1 of the user s manual for information on how to set these up To setup any type of recording you need to select Record in the Setup menu RED square in Pic 6 1 which will...

Page 8: ...ing 2 Time Schedule Recording Follow instructions in Part 5 to go to Setup menu Click on the Schedule icon Green box in Pic 6 4 This will display the screen in Pic 6 5 Go to the Schedule Tab highlight...

Page 9: ...n the camera and the level of sensitivity you want for the camera When you select the setting option it will open the screen shown in Pic 6 9 If you click on the star icon Green box in Pic 6 9 the ent...

Page 10: ...as Pic 7 2 There are 3 search tabs in this dialog box Time Search Event Search and File Manager Pic 7 1 TO SEARCH BY TIME Go to the Time Search tab Blue tab in Pic 7 2 Select a channel and display mod...

Page 11: ...mark the motion alarm or all option Double click on the file you would like to playback the file will play and the control panel shown in Pic 7 3 will be displayed Pic 7 4 FILE MANAGER You can also go...

Page 12: ...f the channel number for the file or files you want to backup or put a checkmark in the All box on the bottom of the window to select the files that you want to backup Green checkmarks in Pic 8 2 Clic...

Page 13: ...omments Contact Us Mailing Address Customer Service DPS Inc Phone 877 998 3440 x 538 8015 E Crystal Dr Email cs dpsi usa com Anaheim CA 92807 Live Chat from our Website Website Tech Support http www q...

Reviews: