3. Motion Detection Recording:
Follow instructions in
2. Time Schedule Recording
to go to the SCHEDULE options setup the times for each day that you want to record on
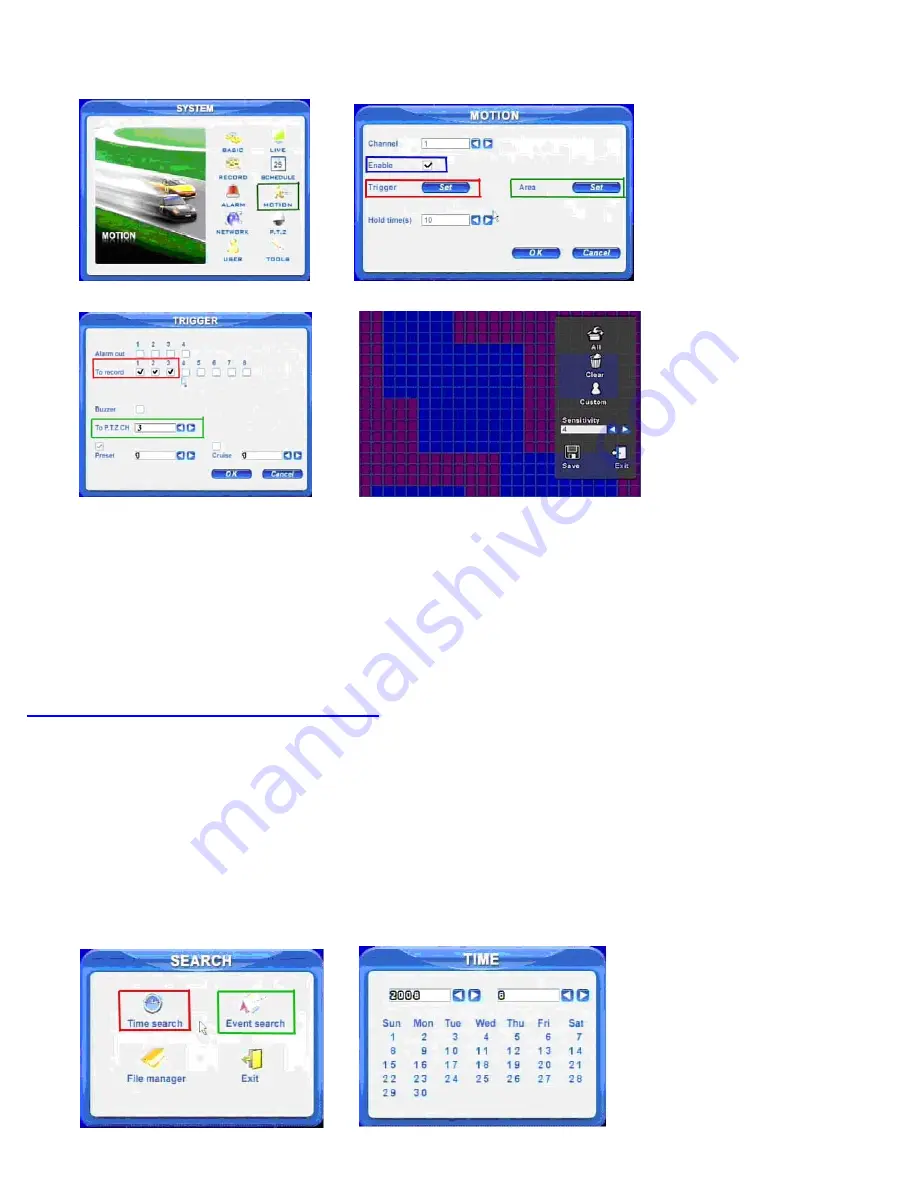
motion detection. Use the Direction Keys (number 5 on Front Panel in Part 2) to go to the Motion option (GREEN box in Pic 6.4) and use the
ENTER key (number 6 on Front Panel in Part 2) to put a check mark in this box instead of the Schedule option box.
Pic 6.5 Pic 6.6
Pic 6.7 Pic 6.8
Next go to the SYSTEM option and use the Direction Keys to select the MOTION option (GREEN square in Pic 6.5) and hit the ENTER key to
open the MOTION options (Pic 6.6). Use the ENTER key to put a checkmark in the Enable option (BLUE box) and then select the SET button in
the Trigger options which brings up the option box in Pic 6.4. Here you can select the camera, and any other cameras you want to record when
motion is detected on this camera. You also have the option for any PTZ cameras on the system to scan and record. In Pic 6.7 cameras 1, 2,
and 3 are set to record if motion is detected on camera 1, which includes the PTZ camera which is on channel 3. Select OK to save the settings
and then select the Area Set option (GREEN box in Pic 6.6) which will display the screen in Pic 6.8. Use the Direction keys and ENTER key to
select the areas of the camera screen that you want to be sensitive to motion. Blue means the area is sensitive to motion and Red means the
area is not sensitive to motion and will not trigger recording if motion happens in this area. You can also select option in the upper right hand
corner to make the entire screen motion sensitive. Next select how sensitive you want the area to be by selecting a number in the Sensitivity
box, 1 is the least sensitive and 8 is the most sensitive. Select the Save option to save the settings. Repeat the procedure for the other cameras.
Part 7 – Setting up DVR to Playback Files
Press the SEARCH key on the DVR (number 17 on the Front Panel in Part 2), if the system is password protected it will ask you to enter a user
name and password. This will bring up the SEARCH options shown as Pic 7.1. Use the Direction Keys (number 5 on Front Panel in Part 2) to
select Time search (RED box in Pic 7.1) and hit the ENTER key (number 6 on Front Panel in Part 2). This will display the TIME calendar shown
as Pic 7.2. If there are files on a day the day will be highlighted. Use the Direction Keys to select the date you want, hit the ENTER key to displa
the Time Search menu shown as Pic 7.3. Select the channels you want to search and the display mode you want and select the play option.
This will display the file player shown in Pic 7.5.
TO SEARCH BY EVENT:
Press the SEARCH key on the DVR (number 17 on the Front Panel in Part 2), if the system is password protected it
will ask you to enter a user name and password. This will bring up the SEARCH options shown as Pic 7.1. Use the Direction Keys (number 5 o
Front Panel in Part 2) to select Event search (GREEN box in Pic 7.1) and hit the ENTER key (number 6 on Front Panel in Part 2). Use the Da
icon to select the date you want and the available files will be displayed in the box on the bottom of the screen. Select a file and push ENTER
d the File Player in Pic 7.5 will open and play the selected recording.
y
n
te
Playback mode.
an
NOTE: Recording will not be interrupted while you are in
Pic 7.1 Pic 7.2


