
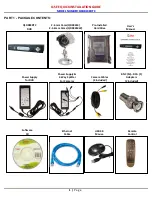

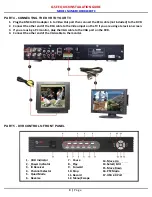


Q-SEE QUICK INSTALLATION GUIDE
M
M
O
O
D
D
E
E
L
L
N
N
U
U
M
M
B
B
E
E
R
R
Q
Q
S
S
D
D
R
R
4
4
4
4
K
K
R
R
T
T
C
C
5 |
P a g e
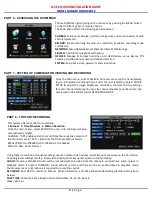
The Motion detection Menu has three sections, including
Channel Status, Sensitivity and Motion area.
STATUS
: This option allows you enable motion detection on
any channel.
SENSITIVITY:
This option allows you to set sensitivity level
of motion detection from 1 to 4, with 4 being the highest.
Next, click on the MD AREA SETUP button, which will display the picture on
the left. This option allows you to select the area you want to be sensitive
to motion. The area in red is sensitive to motion. You can set this area by
using the mouse or REV, FWD, and SEL keys on the front panel. Once you
have set the area, right click with the mouse or push the ESC key to save
the setting. After you have set all of the cameras, click on the Apply button
to save the settings.
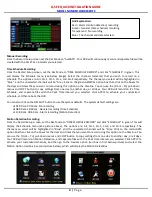
PART 9 - SETTING UP THE DVR TO PLAYBACK
Searched Playback:
From the Main Menu select SEARCH to display the Video Search
Menu shown to the right. If you input a specific date and click
Search, you will find all the recordings for that day. When you select
an item, you will playback the recordings in 4 channel mode; or, click
[File list] button to display File list interface, where you can playback
or backup the file you selected. See File List heading below.
In the playback window you can play video Forward at 2x, 4x, and 8x speeds, Slow play at 1/2x, 1/4x, and 1/8x, or normal
play, pause and play frame by frame using the playback control bar, and adjust volume by clicking or sliding tune control
bar. When playback has finished, system will return to previous menu.
File List:
On the Video search menu mode, click File list to display the sub-
menu shown in the picture on the left.
This option will allow you to view all of the available files by channel
and type (all, normal, or alarm).
You can select a file and push the SEL button to playback the file, or
use the FWD button and down button to select the backup option and
backup the recorded file you selected. You can also put a checkmark
in the BAK box at the end of multiple files if you want to backup more
than one file. See section 5.2.4 Search Recordings in the User Manual
for more information on using the File List option.