background image

QSD42908C8 User’s Manual 


96 

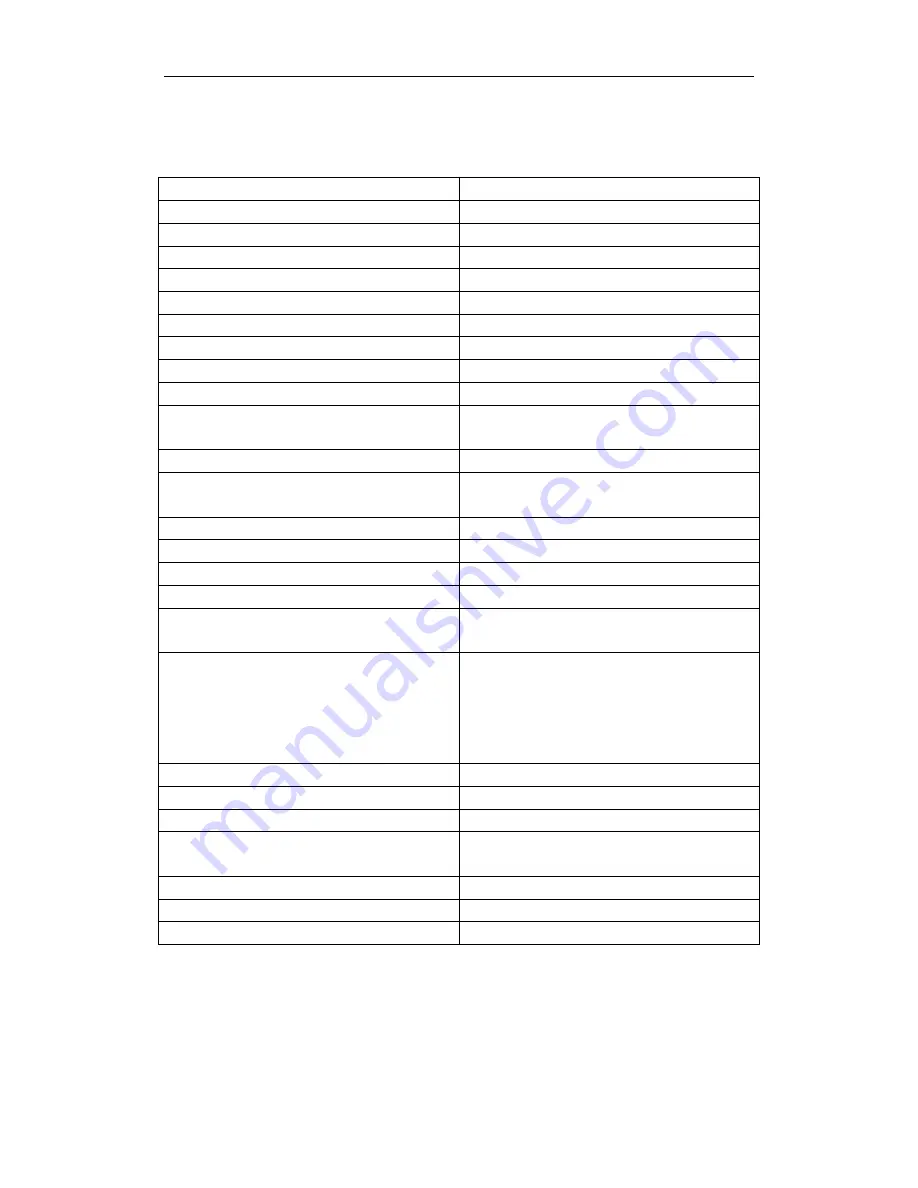
Appendix D: DVR Specifications 

Model 

QSD42908 

Compression standard 

H.264 

Preview resolution 

PAL:704*576(4CIF) NTSC704*480(4CIF) 

Recording resolution 

PAL:352*288(CIF)  NTSC352*240(CIF) 

Video input 

8 channels BNC ( 1.0 Vp-p ,75 Ohm) 

Video out 

1 channel BNC (1.0Vp-p ,75 Ohm) 

Video spot ou

1 channel BNC (1.0Vp-p , 75 Ohm) 

Frame rate 

PAL: 15FPS, NTSC: 20FPS 

Audio compression standard 

OggVorbis 16Kbps 

Audio in 

4 channels RCA (2 Vp-p ,1KOhm) 

Audio out 

1 channel RCA (Linear electrical level, 

1KOhm) 

Stream type 

Video or Video&Audio 

Bit rate 

32Kbps-2Mbps (user  defined)  recommend  

768Kbps each channel 

IDE interface 

1 IDE interface , supports 2 HDDs 

Network port 

10M/100M self-adapt Ethernet port 

RS-232 port 

RS-485 port 

T+T- R+R- 

USB 

1 USB 2.0 interface ,support USB disk, USB 

HDD, USB CD/DVD-R/W 

VGA 

1VGA Port 

Resolution: 

800*600/60Hz 

1024*768/60Hz 

1280*1024/60Hz 

Alarm in 

16 channels 

Alarm out 

4 channels 

Power supply 

DC 12V 

Power consumption 

10W

without HDD


Working temperature 

14 F--131 F 

Working humidity 

10%-90% 

Dimensions 

17.5in*11.5in*1.75in 

PAL: 176*144(QCIF), 352*288(CIF), 704*288(2CIF), 528*384(DCIF), 704*576(4CIF); 

NTSC: 176*120(QCIF), 352*240(CIF), 704*240(2CIF), 528*320(DCIF), 704*480(4CIF). 


Summary of Contents for QSD42908C8

Page 1: ...Manual V2 1 Contact Us Q See Products 8015 E Crystal Dr Anaheim CA 92807 Website http www q see com Customer Service Phone 877 998 3440 x 538 Email cs dpsi usa com Tech Support Phone 877 998 3440 x 5...

Page 2: ...4 4 PTZ Pan Tilt Zoom Control 23 4 5 Manual Record 25 4 6 Playback 26 4 7 Backup Recorded Files 30 4 8 Shutting Down DVR 32 Chapter 5 Parameters Setup Guide 33 5 1 Administrator and Password 33 5 2 Ad...

Page 3: ...ver Setup 82 7 2 Upgrade Mode 84 Appendix A Mouse control function 90 Appendix B HDD Capacity Calculation 92 Appendix C DVR Connect Cable Definition 93 1 How to make a RS 485 connect cable 93 2 How to...

Page 4: ...ly and safely DISCLAIMER The contents of this Manual are subject to change without notice we are also not responsible for typing errors or errors of omission Contact Us Q See Products 8015 E Crystal D...

Page 5: ...n algorithm PAL is 15FPS and NTSC is 20FPS Supports multi zone motion detection Supports mask function to mask sensitive area Supports view tampering alarm function for spiteful camera block Supports...

Page 6: ...VR firmware Remotely control PTZ Supports Internet Explore for network control Remotely get alarm information of DVR Others Supports network voice talk Supports PTZ local and remote control Supports m...

Page 7: ...as 9 Female RCA to Male BNC connectors 1 USB 2 0 Cable 1 320GB Hard Drive installed in DVR 1 USB Mouse 1 Remote Control with 2 AA Batteries 1 Product manual 1 RJ45 Ethernet Cable 1 Power supply for DV...

Page 8: ...ig 2 1 QSD42908 Rear panel 1 Video Out 6 Power Switch 11 Ethernet Port 2 Video In 7 Alarm In Out 12 RS 485 Port 3 Audio I n 8 Spot O ut 13 Alarm in Ports 4 Audio Out 9 VGA Video Out 14 Alarm out Ports...

Page 9: ...MENU 2 3 ESC EDIT PLAY REC PTZ PREV A SHIFT 1 Switch preview mode into menu 2 Brush control short key WIPER 3 Press MENU for more than 5 seconds to cancel button beep sound ZOOM in PTZ control ZOOM i...

Page 10: ...and function keys 4 Status Lights READY STATUS ALARM RECORD NETWORK DVR is ready Green means you can use IR remote control Red means there is an alarm Blinking red means reading or writing to HDD Netw...

Page 11: ...4 EDIT Same as EDIT key of front panel 5 A Same as A key of front panel 6 REC Same as REC key of front panel 7 PLAY Same as PLAY key of front panel 8 INFO Same as INFO key of front panel 9 VOIP Same...

Page 12: ...y menu and then press the ENTER key If the STATUS light of the DVR front panel is green it means you can use the remote control to operate the DVR Disabling the Remote Control When the remote control...

Page 13: ...top recording Select camera Stream type Resolution Frame rate Bit rate Enable Rec Schedule PreRec time PostRec time Copy to camera function Network DVR IP address DVR port Subnet mask Gateway Remote h...

Page 14: ...user name and password The default user name is admin and password is 12345 Main Menu Description The main menu interface is shown as fig 3 3 Fig 3 3 Main menu There is one highlighted frame called t...

Page 15: ...ve Frame can be moved by direction keys The different kinds of menu items are 1 Check Box Provides two options means enabled and means disabled You can use ENTER or EDIT key to switch 2 List Box Provi...

Page 16: ...the character in front of cursor d Press ENTER to save exit or ESC to exit without saving 4 Button Trigger a specific function or enter into next sub menu For example press Policy button to enter int...

Page 17: ...x at the bottom of screen the input status is appeared Here you can press numeric keys to input digital numbers Press A key to change input methods You can select number Uppercase Lowercase or Symbol...

Page 18: ...zation If the DSP icon is it means there is a DSP initialization error please contact administrator at once The second line represents HDD initialization If the HDD icon is it means the HDD is not ins...

Page 19: ...1 Recording status Form 4 1 Camera record status Icon Icon Color Status Description White No video signal Yellow Video input Pink Manual recording Green Real time recording Blue Motion detection recor...

Page 20: ...w tampering alarm Pink Motion External alarm Green No alarm Blue Motion alarm Red External alarm Press numeric keys to switch to individual camera view For example press 2 key to view 2nd Press EDIT k...

Page 21: ...Password edit box input corresponding password press ENTER key to exit edit box The Active Frame will be moved to Confirm button Press ENTER key to enter into main menu If there is buzzing alarm it m...

Page 22: ...QSD42908C8 User s Manual 22 Fig 4 5 Main menu Step 2 Select the user name by using then move the Active Frame to Password icon by using keys As fig 4 6 shows Fig 4 6 Change users password...

Page 23: ...ssword is modified successfully you will return to the main menu if not an error dialog box will pop up You can repeat step 3 to try again 4 4 PTZ Pan Tilt Zoom Control Note The user must have the PTZ...

Page 24: ...Description In PTZ control mode press REC SHOT key and press the preset number three numeric keys DVR will adjust the corresponding preset number Repeat pressing REC SHOT key and press the preset numb...

Page 25: ...interface In menu mode press REC key to enter into Manual Record interface directly Fig 4 8 Manual record interface Description Manual record interface has the following parts channel number channel...

Page 26: ...o main menu Press PLAY key to enter into playback menu Press PTZ key to enter into PTZ control mode 4 6 Playback Note The user must have Playback right Playback Interface In preview mode press the PLA...

Page 27: ...nding dialog box will pop up Play by Time Playback the recorded stream directly based on the time section Select Page In the file list box each page will only display 8 files If there are more than 8...

Page 28: ...ayback If played frame by frame Press ENTER to play one frame Copy segment EDIT Stop copy EDIT you need a back up device to store the segment Exit ESC Note When DVR is busy if you select high play spe...

Page 29: ...lick this button to mute click it again to recover the sound Click this button to start copying the segment click it again to stop Click this button to hide the control bar right click your mouse and...

Page 30: ...vice A pop up dialog box will display the backup status If the backup device is not connected correctly or DVR does not detect the backup device an exception dialog box will pop up Please ask administ...

Page 31: ...gment You also can backup the image segments when the image is being played back The steps are 1 Enter into the playback interface playback by file or playback by time 2 Press EDIT key to start select...

Page 32: ...Utilities menu move Active Frame to Power Off button and enter into power off dialog press Confirm to shut down the DVR Using POWER key of front panel or IR remote control Press POWER key for 3 second...

Page 33: ...ule External alarm sensor type View tampering alarm schedule Video lost alarm schedule Motion detection alarm schedule External alarm schedule Alarm output schedule 5 1 Administrator and Password When...

Page 34: ...ess EDIT key to enter into edit status Press numeric keys to input a new password The password is made up of 16 numbers at most After you finish inputting password press ENTER key to exit Move Active...

Page 35: ...R to return password edit box and input the new password again 5 2 Add and Delete User Enter into User Management interface Add user The steps are as follows Step 1 Enter into User Management menu sho...

Page 36: ...nagement menu use keys to select the new user name then use key to go to the password edit box Press EDIT key to enter into edit box use numeric keys to input the new password Step 3 Setup the rights...

Page 37: ...ser Management menu press Confirm button the user s password and rights will be saved and you will return to the main menu If you press the Cancel button the configuration will be abandoned User right...

Page 38: ...deo output Com Control DVR RS 232 transparent channel function MAC address This MAC address is not the address of DVR but the PC that will access DVR If you setup this MAC address only the PC with thi...

Page 39: ...e and make it effective Press Cancel button or ESC key to abort modification Device ID When you use the remote control to operate the DVR you must use the device ID to select the DVR The default devic...

Page 40: ...ey to select PAL or NTSC video output VGA setup There is one VGA interface on the rear panel of the DVR You can use it to connect with a VGA display You can define VGA resolution and refresh frequency...

Page 41: ...e then move Active Frame to Position button press ENTER to enter into camera name position setup interface as shown below in that interface you can use keys to move camera name position When the posit...

Page 42: ...Camera menu you can adjust the position where you want the Date to display move active frame to Position on the right side of Date OSD and press the ENTER button Then you will see the picture below U...

Page 43: ...lect a camera then enter Color setup menu as shown in fig5 12 Fig 5 12 Color setup Step 2 Select camera Please use keys to select a camera Step 3 Adjust brightness contrast saturation and hue Move Act...

Page 44: ...camera You can use keys to select the camera Step 3 Enter into Advanced settings enable the check box beside Privacy Mask you can press the Enter or edit key to change the flag into and activate Area...

Page 45: ...at most After you finish setup press ENTER key to return to Advanced settings menu You can press A key to clear all mask areas Step 5 Save mask area You can repeat step 2 step 3 and step 4 to setup m...

Page 46: ...rmal and High Selecting one of them will active Area Setup and Policy configurations Step 4 View tampering area setup Move Active Frame to Area button press ENTER key to enter into area setup interfac...

Page 47: ...ters and return main menu Step 9 Save all cameras If you want to setup other cameras repeat step 2 to step 8 In Image Setup menu press Confirm key to save all cameras parameters Press Cancel button or...

Page 48: ...se solutions including On Screen Warning Audible Warning Upload to Center and Trigger Alarm Output You can use and EDIT key to enable or disable them is disabled and is enabled Step 6 Save alarm setup...

Page 49: ...on the DVR will not response even if there is motion detected If you select other options it will activate the Motion Area Setup button and Policy Setup button If you select low sensitivity such as 0...

Page 50: ...clear press EDIT you will find the yellow panel is turned into a black panel You can use key to enlarge or shrink the blue area Press EDIT key to clear this part of the motion area Press Enter key to...

Page 51: ...When a motion alarm occurs during a schedule the DVR will respond with a On Screen Warning Audible Warning Upload to Center or Trigger Alarm Output depending on your setup You can setup 4 time period...

Page 52: ...arameters of one camera to any other cameras Note Motion alarm area can not be copied If you want to disable motion alarm area and motion alarm policy you just need to set the motion alarm sensitivity...

Page 53: ...preview when you preview single camera DVR will play the audio of that channel Preview layout setup There is a square frame divided into many windows If you select 4 Screen preview mode this frame is...

Page 54: ...ne Stream Type There are two options one is Audio Video stream and the other is Video stream only If you want to record video and audio please select Audio Video option otherwise you can select Video...

Page 55: ...onds On the other hand if the bit rate is high and you set PreRecord Time as 30 Seconds the actual prerecord time may be less than 30 seconds PostRecord Time When external alarm or motion alarm is sto...

Page 56: ...sabled and means enabled Step 3 Setup time period and record type There are 4 time periods for one day and each time period can select different record type Input start time and stop time for each tim...

Page 57: ...p 1 Select one alarm input Use keys to select one alarm input Step 2 Alarm type This is the sensor type You can select Normal Open or Normal Close according to the sensor type Step 3 Enter into Alarm...

Page 58: ...rnal alarm occurs in the schedule the DVR will respond according to the handle methods Step 6 Alarm handle method You can select one or more handle methods On Screen Warning Audible Warning Upload to...

Page 59: ...umber that has been setup already Please refer to Chapter 5 15 for sequence setup Cruise Set the flag as to enable cruise Please refer to Chapter 5 15 for cruise setup Press Confirm button to save and...

Page 60: ...time is made up of alarm input time and this delay time Step 3 Enter into alarm out schedule You can set the schedule to make alarm output effective Move the Active Frame to the Schedule button on rig...

Page 61: ...disk error illegal access IP address conflict network failure and NTSC PAL difference Enter into the Exceptions menu as shown in fig 5 26 Fig 5 26 Exceptions setup Includes the following handle metho...

Page 62: ...must not be conflict with another IP address on the router If there is a DHCP server in the network you can set the IP as 0 0 0 0 save and reboot the DVR In reboot process the DVR will search the DHC...

Page 63: ...Full Dup IP server address If DVR uses PPPoE function it can get one dynamic IP address If you set DNS IP with one fixed Internet IP the DVR will send some information such as DVR name DVR serial num...

Page 64: ...run Step 5 Input PPPoE parameters Use ENTER or EDIT key to enable PPPoE function set PPPoE flag as Input PPPoE username password and verify password that ISP provided Step 6 Save parameters In the Net...

Page 65: ...t software program To access the DVR through Internet Explorer once you have set up the network settings on the DVR to match the settings of your router you need to modify your browser controls You ne...

Page 66: ...and select Turn Off Pop up Blocker You will also need to enable Active X controls To do so go to the Internet Explorer tool bar and select the tools option then Internet Options then Security then cli...

Page 67: ...e the same as those of PTZ Protocol PTZ address Each PTZ has a different address PTZ type DVR supports the following PTZ protocols YouLi LinLin 1016 LinLin 820 Pelco p DM DynaColor HD600 JC 4116 Pelco...

Page 68: ...he preset function before you setup preset Sequence setup Each sequence is made up of several cruise points Each cruise point includes one preset number dwell time and dwell speed Please make sure the...

Page 69: ...set numbers After you setup all preset numbers press the Return button to return to the PTZ menu In PTZ menu press Confirm button to save all parameters Delete preset number In Preset setup menu input...

Page 70: ...You can delete cruise points in a sequence After you finish sequence setup press the Return button to return to the PTZ menu In PTZ menu press Confirm button to save the modifications Note Please mak...

Page 71: ...ect Modem using PSTN to transfer video image Transparent channel Connect serial devices Remote PC can control these serial devices through a network PPP Mode Only used when work mode is PPP There are...

Page 72: ...urn to main menu Example PPP Modem passive dialup through PSTN There are two Modems One is connected to DVR RS 232 port with DCE cable The other is connected with PC COM port Setup at DVR end Step 1 R...

Page 73: ...em with PC serial port You can use HyperTerminal or NetTerm to setup modem AT F Restore default parameters Generally Modem is hard flow control AT W W1 Save parameters Step 2 Open Network and Dial up...

Page 74: ...QSD42908C8 User s Manual 74...

Page 75: ...n it will give the message of verification of username and password after successfully verification the message will be given on process of register in PC The process is the same as the common dialup...

Page 76: ...torePara Upgrade Hard Disk Stop Alarm Out Reboot Power Off View Log and System Info Enter into Utilities menu as shown in fig 6 1 Fig 6 1 Utilities 6 1 Restore Parameters Restore factory parameters fo...

Page 77: ...lect FTP mode you will enter into FTP Upgrade menu Fig 6 4 FTP IP setup Input the ftp server IP and press ENTER key DVR will connect with FTP server through the network and download the firmware file...

Page 78: ...k status Capacity Free space Stand by or not Normal status or not Format HDD Before formatting stop all recording After formatting you must reboot DVR otherwise DVR will not work correctly 6 4 Stop Al...

Page 79: ...d all For operation major type there are many minor types including Power On Shut Down Abnormal Shut Panel Login Panel Logout Panel Config Panel File Play Panel Time Play Local Start Record Local Stop...

Page 80: ...es Index Occur Time Major Type Minor Type Panel User Net User Host Address Para Type Channel No HDD No Alarm In and Alarm Out You can press More Info button for more information also select page numbe...

Page 81: ...press ENTER key to start searching Step 5 After finishing search the DVR will list the matched log information Step 6 Press Return button to return to Utilities menu 6 8 System Information Press the S...

Page 82: ...o update old firmware the other is when the code in DVR FLASH has crashed Note Make sure you are using the correct firmware for your DVR model before you upgrade 7 1 FTP Server Setup You can download...

Page 83: ...w user dialog box is displayed Input user name target Click OK Fig 7 4 username 5 In the password dialog box input password target in New Password and Verify Password edit box Click OK to save and exi...

Page 84: ...e USB function of Upgrade sub menu in Utilities menu Please make sure the firmware file digicap is placed in the root directory of USB flash drive 4 Use the TFTP server Please follow the next steps St...

Page 85: ...QSD42908C8 User s Manual 85 Fig1 Fig 2 2 Put in the name hikvision And do step 1 again Then enter into fig 4 and select COM1 and click OK to enter into fig 5 Fig3 Fig 4...

Page 86: ...device and press any button in the pc keyboard again and again until the HIK comes out in the Hyper Terminal interface shown as fig 6 then input print to check if the IP of the server and device are...

Page 87: ...QSD42908C8 User s Manual 87 Fig 6 Fig 7...

Page 88: ...nual 88 Step 3 Input the command save and press the enter button Shown as fig 8 Fig 8 Step 4 Input the command update and press the enter button then the space button After that the update will start...

Page 89: ...QSD42908C8 User s Manual 89 Step 5 After the update finishes please input the command reset and press the enter button The device will reset Shown as fig 10 Fig 10...

Page 90: ...Move to the center of the screen For SAE YAAN protocol Drag the left key Select an area to zoom in For SAE YAAN protocol Single click the left key If you selected an area for zooming in this action i...

Page 91: ...rd Select the front file Scroll wheel backward Select the next file Signal click the right key Cancel and return to the preview interface Double click the left key Play the selected file 7 User interf...

Page 92: ...the storage capacity i m which is storage of each channel needed unit Mbyte i m i q i h i D 2 In the formula i h Represents the recording time for each day hour i D Represents number of days for which...

Page 93: ...connector and one tool special for RJ45 RJ45 introduction Pin definition Make the connect cable according the following to left point of RJ45 head 1st and 2nd cables are the anode and cathode line for...

Page 94: ...t to Send 8 CTS I Clear Data 3 How to Make a UTP network Connect Cable Material and tool One twist cable 8 pin the length can be defined as to the actual demand but must be within 100m 2 standard RJ45...

Page 95: ...QSD42908C8 User s Manual 95 2 Use the following method to make the cross network cable when DVR is directly connected with client end PC The corresponding relationship of cross cable...

Page 96: ...level 1KOhm Stream type Video or Video Audio Bit rate 32Kbps 2Mbps user defined recommend 768Kbps each channel IDE interface 1 IDE interface supports 2 HDDs Network port 10M 100M self adapt Ethernet p...

Page 97: ...ternal Sync Horizontal Resolution 420 TV Lines Video Output 1 0 V p p 75 ohm S N Ratio 48 dB Gamma Characteristic 0 45 White Balance Auto Lens 4 with 6 mm 4 with 3 6 mm Minimum Illumination 0 Lux w IR...

Page 98: ...d has problems There are no images in the monitor connected with VOUT after DVR is started 1 The cable connected with the monitor is damaged 2 Real board of DVR has problems 3 Main board of DVR has pr...

Page 99: ...rvice 2 Improper environment and conditions in on which the equipment operates e g improper power environment temperature humidity and lightening strike etc that cause equipment damage 3 Damage caused...

Page 100: ...er s Manual 100 Appendix G Customer Information Card User s Name Mr Mrs Company Name Postal Address Postal code Phone Number E mail Model Number of Product Serial Number of Product Purchase Date Distr...

Page 101: ...Contact Us Q See Products 8015 E Crystal Dr Anaheim CA 92807 Website http www q see com Customer Service Phone 877 998 3440 x 538 Email cs dpsi usa com Tech Support Phone 877 998 3440 x 539 Email ts d...

Reviews: