


.
COM
VGA
NET
USB
PS/2
AUDIO OUT
VIDEO IN
VIDEO OUT
AUDIO IN
S-VIDEO
C
E
VGA
Page 3
Page 4
Page 2
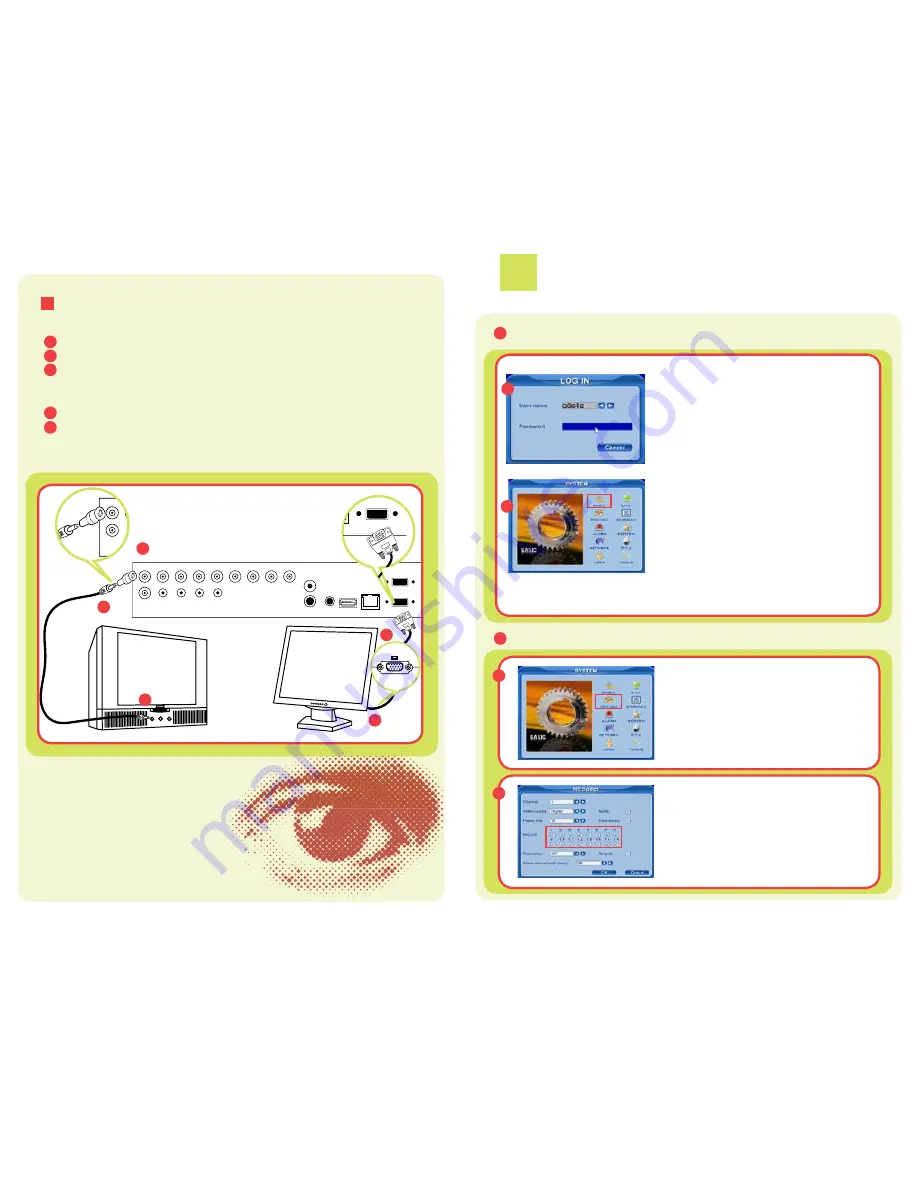
CONNECTING THE DVR TO A TV OR MONITOR
2
To Connect a TV:
Plug in the BNC–RCA adapter to the Video Out port on the back of the DVR (A).
Connect a RCA cable to the BNC-RCA adapter. (RCA Cable not included).
Connect the other end of the RCA cable to the Video Input on the TV.
To Connect a VGA Monitor:
Plug a VGA cable into the VGA port on the DVR (VGA Cable not included).
Connect the other end of the VGA cable to the Monitor.
Note:
The monitor resolution should auto-configure. In case it does not, please set
your monitor resolution to 800 x 600 60hz.
Accessing the DVR menus from the front panel of the DVR:
2
Setup
A
Setting up the DVR to record
B
B1
B2
Use the Direction Keys and ENTER button to
put check marks in the boxes for the cameras
that you want to record. You can also setup the
record quality, resolution, and frame rate for the
cameras on this screen.
A1
A2
Push MENU to display the LOG IN screen (A1), and
enter the admin password:123456. This will display
SYSTEM SCREEN (A2). Use the Direction Keys to
move the cursor, the selected icon will have a square
around it.
BASIC:
set time, date, video format, language,
and audio channel.
LIVE:
to adjust camera images.
RECORD:
enable channels to record, setup
resolution, frame rate, and video quality.
SCHEDULE:
setup recording schedules.
ALARM:
setup external alarm sensors. (optional)
MOTION:
setup the system to record when
motion is detected.
PTZ:
setup Pan-Tilt-Zoom cameras.
(PTZ Cameras not included)
USER:
setup users on the system.
NETWORK:
setup the unit for remote access.
TOOLS:
access hard drive info, update firmware,
and restore system defaults.
Before you can record, enable recording on
the channels where you want to record, by
following the SYSTEM screen instructions
above (A2). Select RECORD (B1) to display
RECORD screen (B2).
A
B
C
D
E
A
B
D
VIDEO OUT


