background image

QSD2014 User’s Manual


15 


Chapter 8

  USB Program 

8.1 Software Installation   


8.2 Program Interface 


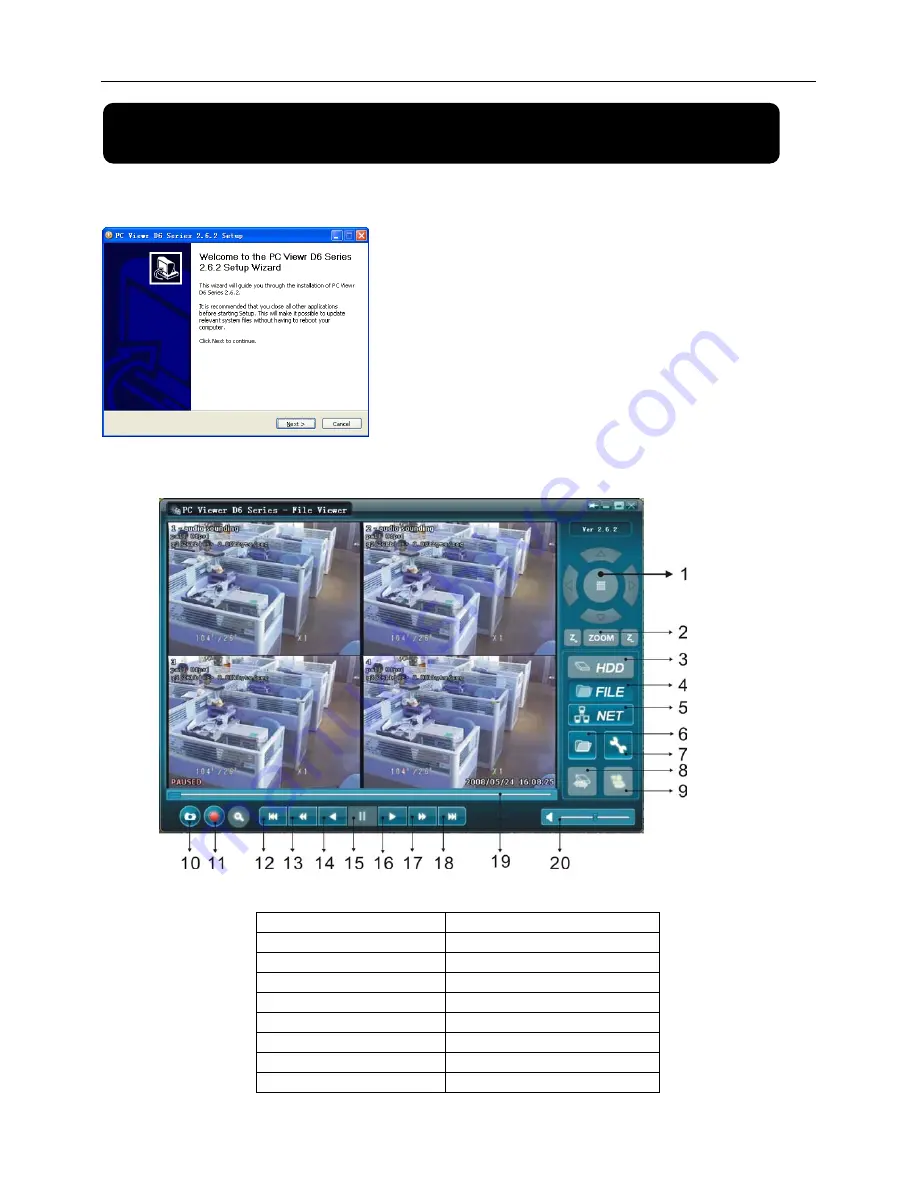
NOTE: Since this DVR does not support PTZ cameras the functions marked as 1 and 2 will not work. 


1. PTZ Control

(NO Function) 

11. Convert Streams to AVI file 

2  Z


i

Z


12. Fast Rewind 60s 

3. HDD Play Mode 

13. Fast Rewind 10s 

4. FILE Play Mode 

14. Forward 

5. NET Play Mode 

15. Stop 

6. Event List 

16. Playback 

7. Program Local Setting 

17. Fast Forward 10s 

8. Remote DVR Control 

18. Fast Forward 60s 

9. Shift Storage Device 

19. Playback Slider 

Insert software CD to your CD-ROM drive; 

Open CD directory; 

Run “Installation” program; 

Follow the setup wizard to finish the installation. 


Button functions


Summary of Contents for QSD2014

Page 1: ...QSD2014 User s Manual Rev031309...

Page 2: ...Record Setup 7 5 5 Record Framerate 7 5 6 Video Quality 7 5 7 Record Schedule 8 5 8 Sensor Setup 8 5 9 Motion Detector Setup 8 5 10 Hard Drive Setup 9 5 11 Miscellaneous Setup Change Password 9 5 12 M...

Page 3: ...Software Installation 15 8 2 Program Interface 15 8 3 Program Running 16 8 3 1 HDD Play Mode 16 8 3 2 FILE Play Mode 17 Chapter 9 Specification 18 Chapter 10 Appendix 19 10 1 System Connection Layout...

Page 4: ...mat NTSC PAL Uses SOC chip with high stability Linux operation System Supports Multiple recording Modes Continuous Motion Detection Time Schedule Supports Event List and Search Playback by specified t...

Page 5: ...Edit 13 Select modify item Quad 5 Quad View Up 14 Move up REW 6 Rewind Move Left Down 15 Move down Pause 7 Pause PWR 16 Power indicator LED Play 8 Play recorded video HDD 17 Hard drive indicator FWD 9...

Page 6: ...t and numbers 1 9 0 Number ALL Display all Channels Menu Enter or Exit Menu Move Up Move Down SEL Select Modify Item Rewind Move Left Fast Forward Move Left Play Recording Move Right Record Pause Stop...

Page 7: ...2 Connect the power cord and data cable to hard drive 3 Replace the top cover 3 2 Connecting Camera and Monitor Attach the Camera cable to the DVR s BNC video inputs and DVR s video output signal to M...

Page 8: ...V2 X V EN BG 2008 XX XX During start up DVR will automatically detect the installed hard drive and show the hard drive information MASTER MAXTOR STM3250310A SLAVE When detecting a new hard drive DVR w...

Page 9: ...he Menu 5 3 Camera Setup Camera Setup allows you to turn cameras on or off Press and buttons to select a channel and then press SEL to modify the setting to on or off When start up is finished please...

Page 10: ...est High Normal and Low The Higher the video quality the better the quality of Images However higher quality images require more hard drive space Press SEL button to change the quality setting Record...

Page 11: ...ns for each camera The time line indicates 24 hours of a day based on AM PM 0 12 Press and buttons to select a time point press SEL to modify the recording mode On off Enable or disable motion detecti...

Page 12: ...ow OVERWRITE ENABLED ON System overwrites oldest files when hard drive is full OFF System stops recording when hard drive is full Hard Drive Setup OVERWRITE ENABLED ON MAXTOR STM250310AS MASTER HDD SI...

Page 13: ...it s hidden but the video will not be viewable on the live screen Press SEL to select a channel to hide You can adjust the image parameters to meet your needs The controls are shown below CON Contrast...

Page 14: ...can be 1sec 5sec 10sec 15sec 30sec or 60sec Miscellaneous Setup CHANGE PASSWORD SET TIME HIDDEN CHANNEL IMAGE PARAMETERS PASSWORD ENABLE KEYPAD TONES SEQ DWELL TIME VIDEO LOSS SOUND MOVE SEL SELECT ME...

Page 15: ...er 6 Record 6 1 Starting Recording Press REC button to start the record according to the record schedule you have set There will be a red icon shown in the top left of the screen when recording Change...

Page 16: ...and the audio output is on You could press the DOWN button on front panel to mute the audio output The audio input can be still recorded while the output is muted 6 3 Stopping Recording Press STOP bu...

Page 17: ...ecord will be on top of the list Press the UP or DOWN buttons to select an event and then press to play the event SEACH VIDEO DISK MASTER SLAVE NONE 08 09 19 11 16 31 08 09 19 15 05 48 TYPE EVENT TIME...

Page 18: ...s to AVI file 2 Z i Z t 12 Fast Rewind 60s 3 HDD Play Mode 13 Fast Rewind 10s 4 FILE Play Mode 14 Forward 5 NET Play Mode 15 Stop 6 Event List 16 Playback 7 Program Local Setting 17 Fast Forward 10s 8...

Page 19: ...in the system tray right bottom corner of the screen After seeing this icon double click the icon on your desktop to run the program Note If you do not strictly follow above mentioned steps the progr...

Page 20: ...r s Manual 17 Press the button to play video 8 3 2 FILE Play Mode Only when you have saved files to your PC Press the button to open a folder select the file which you want to Play and double click to...

Page 21: ...Features Full D1 1 Channel 4 Channel 1 channel Playback display Recording Resolution NTSC 720X240 60fps Total PAL 720X288 50fps Total Features Variable Frame Rate Quality 4 Level Highest High Normal...

Page 22: ...QSD2014 User s Manual 19 Chapter 10 Appendix 10 1 System Connection Layout 10 2 Accessories...

Page 23: ...es e g improper power environment temperature humidity and lightening strike etc that cause equipment damage 3 Damage caused by acts of nature earthquake and fire etc 4 Equipment damage caused by the...

Page 24: ...by any means without our company s prior written permission 1 Our products are under continual improvement and we reserve the right to make changes without notice But no guarantee is given as to the c...

Reviews: