background image

Q-SEE QUICK INSTALLATION GUIDE 

M

M

O

O

D

D

E

E

L

L


N

N

U

U

M

M

B

B

E

E

R

R


Q

Q

R

R

4

4

0

0

4

4

-

-

4

4

1

1

4

4


7 | 

P a g e


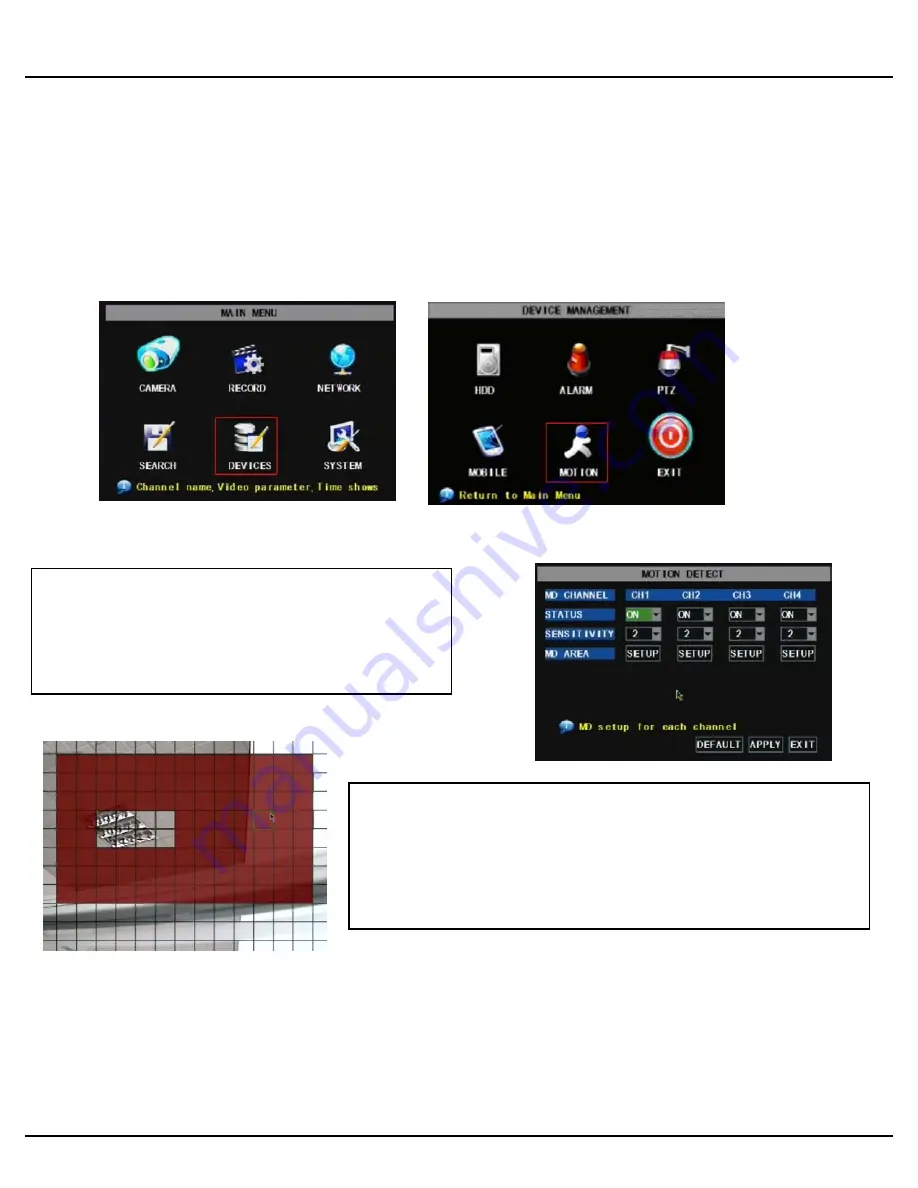
Motion Detection Recording: 

From the Record Setup screen, set the Rec Mode to “TIME SCHEDULE RECORD” and click “SCHEDULE” in green. This will 
display the Schedule menu (See picture above).  The options  are:  All, CH-1, CH-2, CH-3,  and  CH-4 respectively. The 
channel you select will be highlighted in “Blue”, and the unselected channels will be  “Grey. Click on the red ALARM 
option box then click on the boxes for the days and times that you want to record using this option on the timeline. You 
can use the [From – To] pull-down menus and COPY button to copy settings from one day to another day, or all days. 
Your DVR will record on Motion Detection.  Click APPLY to activate your customized schedule, and then go to the Devices 
option (red box in first below picture) and select the Motion Option (red box in second picture below), which will display 
the Motion Detect Box. 


The Motion detection  Menu has  three  sections, including 
Channel Status, Sensitivity and Motion area. 

STATUS

: This option allows you enable motion detection on 

any channel. 

SENSITIVITY:

 This option allows you to set sensitivity level 

of motion detection from 1 to 4, with 4 being the highest. 


Next, click on the MD AREA SETUP button, which will display the picture on 
the left. This option allows you to select the area you want to be sensitive 
to motion. The area in red is sensitive to motion. You can set this area by 
using the mouse or REV, FWD, and SEL keys on the front panel. Once you 
have set the area, right click with the mouse or push the ESC key to save 
the setting. After you have set all of the cameras, click on the Apply button 
to save the settings.  


Summary of Contents for QR404-414

Page 1: ...4 Channel H 264 Compression DVR with CIF Real Time Recording and 4 Color CCD Camera Kits M MO OD DE EL L Q QR R4 40 04 4 4 41 14 4 Quick Installation Guide...

Page 2: ...th Audio Power Supply For DVR Power Supply 4 Way Splitter For Cameras User s Manual Pre Installed Hard Drive 4 Cameras with Stands 2 QSC1336B 1 w Audio 2 QSC1330B 1 w Audio QR404 DVR Remote Control US...

Page 3: ...04 4 4 41 14 4 2 P a g e PART 2 DVR CAMERA AND POWER CONNECTIONS Please note that it is STRONGLY recommended to use a surge protector that is UL 1449 rated Look for a clamping voltage of 330 or lower...

Page 4: ...he BNC to RCA adapter in to Video Out port then connect the RCA cable not included to the DVR 2 Connect the other end of the RCA cable to the Video Input on the TV if you are using a television screen...

Page 5: ...it Means the Hard Drive is Being Read or Written to 4 CH 1 CH2 Select Single Channel Display CH3 CH4 5 QUAD Display all Cameras in Live Display or Playback Mode 6 REW Move Left Reverse 7 PAUSE Pause...

Page 6: ...cording audio set resolution quality recording mode and file size NETWORK Setup Network access Remote Internet Monitoring SEARCH Find files for playback and backup DEVICES Manage Format hard drive and...

Page 7: ...ls cameras that you wish to record on a schedule The options are All CH 1 CH 2 CH 3 and CH 4 respectively The channel you select will be highlighted in Blue and the unselected channels will be Grey Cl...

Page 8: ...vate your customized schedule and then go to the Devices option red box in first below picture and select the Motion Option red box in second picture below which will display the Motion Detect Box The...

Page 9: ...m the File List dialog box pictured above select the file you wish to back up by placing a check mark in the accompanying green box and hit the BACKUP button on the right of the screen You will then r...

Page 10: ...mments Contact Us Mailing Address Customer Service DPS Inc Phone 877 998 3440 x 538 8015 E Crystal Dr Email cs dpsi usa com Anaheim CA 92807 Live Chat from our Website Website Tech Support http www q...

Reviews: