Q-See QC444 Quick Installation Manual Download Page 7

Q-SEE QUICK INSTALLATION GUIDE 

M

M

O

O

D

D

E

E

L

L


N

N

U

U

M

M

B

B

E

E

R

R


Q

Q

C

C

4

4

4

4

4

4

-

-

4

4

0

0

3

3


6 | 

P a g e


2. Scheduled Recording:  


To record on a schedule you would go to the Main Menu, Manual Record and select the cameras on the 
Schedule line instead of the Manual line in the Manual Record screen shown in Pic 5.1, then go to the 
Main Menu, click on Settings, and select Schedule. This will bring up the screen shown in Pic 5.3. You can 
set up a schedule for all channels or different times for different cameras. You can also set up the same 
schedule for all days, or set up different schedules for different days. You can also setup a mixed schedule 
where you have some cameras recording all of time during certain times and on motion or alarm detection 
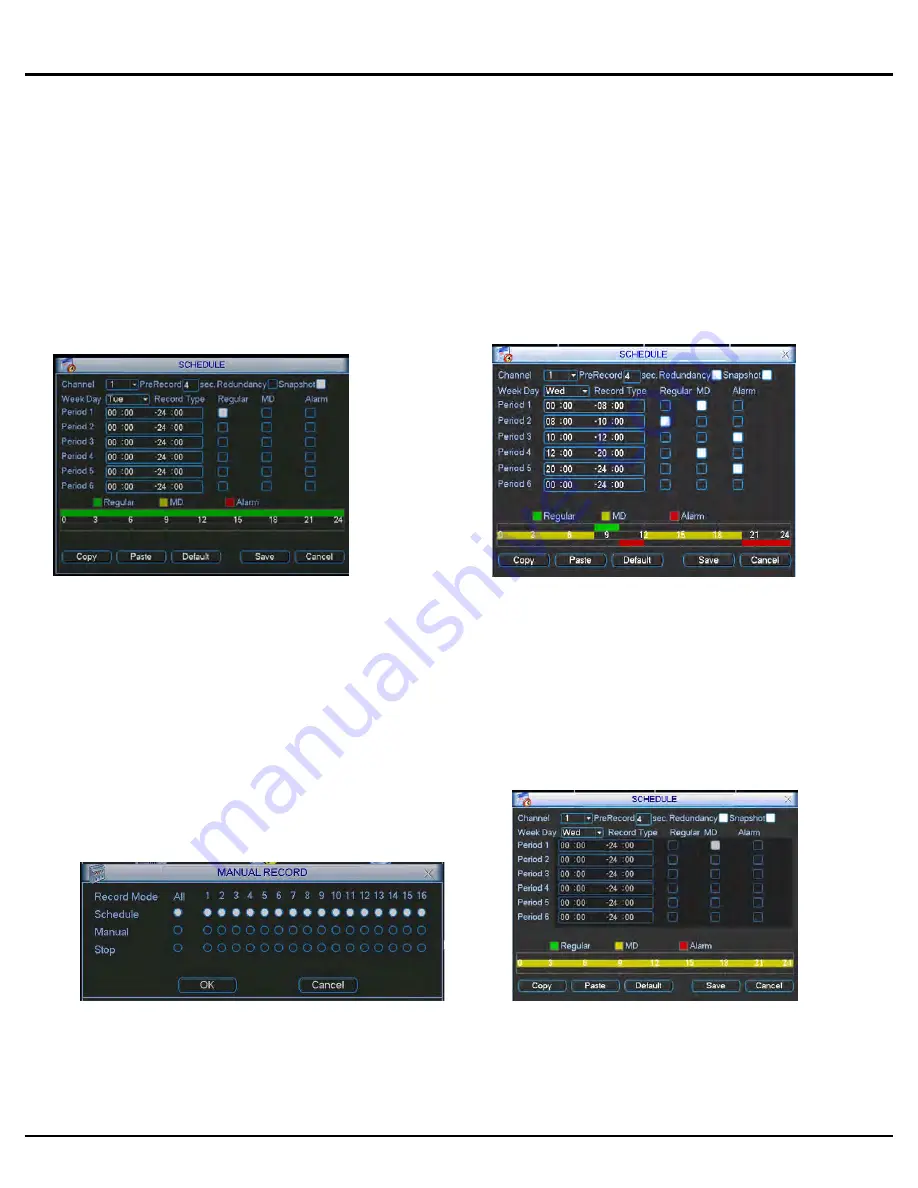
during others. Pic 5.4 shows a mixed schedule were some the cameras are set to record all the  time 
between 8 and 10am, record on motion detection between 12am and 8am and 12pm to 8pm and then on 
external alarm from 10am to 12pm and 8pm to 12am. The time line on the bottom of the screen shows 
how the day is broken up by the recording methods. 


Pic 5.3 

Pic 5.4 


3. Motion Detection Recording: 
 

There are 3 steps to setting up the DVR to record on motion. The first is to go to the Main Menu, Advanced, 
Manual Record option which will display the screen shown in Pic 5.5. You can select the All  option on the 
Schedule line to record on all cameras or you can select the cameras that you want to schedule motion 
recording on. Next you would go to the Main Menu, Setting, Schedule option to setup the schedule for when you 
want the cameras to record on motion. This is shown in Pic 5.6 where Channel one is scheduled to record 24 
hours on Wednesday. Set the schedule for all cameras on all days that you want them to record on motion. 


Pic 5.5 

Pic 5.6 

Summary of Contents for QC444

Page 1: ...Quick Installation Guide 4 Channel H 264 Compression DVR and 4 Color CCD Camera Kits M MO OD DE EL L Q QC C4 44 44 4 4 40 03 3 ...

Page 2: ...or CCD Cameras with Stands 2 QSDS14273 6mm 2 QSDS14273W 3 6mm Remote Control USB 2 0 Mouse Ethernet Cable BNC M RCA F Adapter Camera Cables 2 Included Power Supply For DVR Pre Installed Hard Drive Software CD Software CD Power Supply 4 Way Splitter For Cameras QC444 DVR PART 1 PACKAGE CONTENTS User s Manual ...

Page 3: ...C4 44 44 4 4 40 03 3 PART 2 DVR CAMERA AND POWER CONNECTIONS Please note that it is STRONGLY recommended to use a surge protector that is UL 1449 rated Look for a clamping voltage of 330 or lower a Joule rating of at least 400 and a response time of 10 nanoseconds or less ...

Page 4: ... playback click these buttons to control playback bar In text mode input number 2 letters A B C 3 letters D E F ESC ESC Go to previous menu or cancel current operation In playback click it to restore real time monitor mode Enter ENTER Confirm current operation Go to default button Go to menu Record REC Manually stop start recording working with direction keys or numeral keys to select the recordin...

Page 5: ... ward of the dropdown list In text mode input number 9 letters W X Y Z Play Pause 5 In normal playback click this button to pause playback In pause mode click this button to resume playback In text mode input number 5 letters J K L USB port To connect USB storage device USB mouse Network abnormal indication light Net Network error occurred or there is no network connection the light becomes red to...

Page 6: ...pression frame rate bit rate audio and sub stream Schedule setup RS232 setup Network setup Alarm setup motion detection setup PTZ setup Display setup and Load Default setup The Advanced option is used for hard drive management alarm output manual recording account setup auto maintenance and TV output adjustment The Backup icon is used to backup files from the hard drive and the Shutdown option is ...

Page 7: ...le were some the cameras are set to record all the time between 8 and 10am record on motion detection between 12am and 8am and 12pm to 8pm and then on external alarm from 10am to 12pm and 8pm to 12am The time line on the bottom of the screen shows how the day is broken up by the recording methods Pic 5 3 Pic 5 4 3 Motion Detection Recording There are 3 steps to setting up the DVR to record on moti...

Page 8: ...s not sensitive to motion Click the Fn button on the remote control to adjust the sensitivity of your mouse as you move the cursor After you have finished the setup click the Enter button on the remote control to exit Next set your sensitivity level from 1 to 6 6 being the most sensitive then click the Save button on the Detect screen to save the setting Pic 5 7 Pic 5 8 Part 6 Playing Back Files C...

Page 9: ...ckup The bottom of the window will show the space required to back up the files and how much space is left on the backup media Click on the Backup button and the window will display a progress bar and the Backup button will become a Stop button as shown in Pic 7 3 in the event you wish to terminate the backup process Once you have backed up the files you can play them using the file player program...

Page 10: ...omments Contact Us Mailing Address Customer Service DPS Inc Phone 877 998 3440 x 538 8015 E Crystal Dr Email cs dpsi usa com Anaheim CA 92807 Live Chat from our Website Website Tech Support http www q see com Phone 877 998 3440 x 539 Fax Email ts dpsi usa com 714 998 3509 Live Chat from our Website REVISED 8 30 2010 ...

Reviews: