PRECAUTIONS FOR USE
INSTALLATION
• Unpack all parts and remove protective material.
• Do not connect the unit to the mains before checking the mains voltage and before all other connections
have been made.
• Do not cover any vents and make sure that there is a space of several centimeters around the unit for
ventilation.
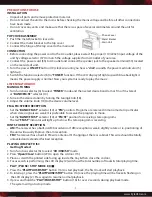
TOP COVER ASSEMBLY
1. Push the metal bracket to rear side.
2. Connect the metal bracket to the top cover
3. Connect the hinge of the top cover to the main unit
CONNECTION
1. Before connecting the power cord to the AC outlet, please select the proper (110/220v) input voltage of the
unit by voltage selector (37) to match the voltage supplier from AC outlet of your area.
2. Connect the power cord (35) to AC outlet and connect the speaker jack to the speaker terminal (33) located
on the rear side of unit.
3. Turn the power
ON/OFF
button (19) clockwise until you hear a “
click
“ sound & the power Led indicator (5)
lights up.
4. Switch the function selector (6) to “
TUNER
“ function. If the LCD display (2) lights up with blue backlight, it
means the power supply is normal. Now your system is ready to play the music.
LISTENING TO RADIO
MANUAL TUNING
1. Turn function selector (6) to select “
TUNER
“ mode and then select desire band (am or fm or fm-stereo)
at “
BAND/FM-ST
“ selector (10).
2. Tune to the desire station by turning the tuning knob (18).
3. Adjust the volume knob (19) to the desire volume level.
FM & FM-STEREO RECEPTION
• Set the “
BAND/FM-ST
“ selector (10) at “
FM
” position. Programs are received in mono mode. In particular
when stereo signals are weak. It is preferable to receive the program in mono.
• Set the “
BAND/FM-ST
“ selector (10) at “
FM-ST
” position for receiving stereo programs.
The led “
FM-ST
” indicator will light up to show fm stereo program is receiving.
HINTS FOR BEST RECEPTION
•
AM:
The receiver has a built-in AM bar antenna. If AM
rececption is weak, slightly rotate or re-positioning of
the unit will usually improve the am reception.
•
FM:
The receiver has a built-in FM wire antenna (31) hanging at the rear cabinet. This wire should be totally
unraveled and extended for best reception.
PLAYING COMPACT DISC
•
Getting Started
1. Turn function selector (6) to select “
CD/USB/SD
” mode.
2. Press “
Open/Close
” button (27) to open the cd door (15).
3. Place a cd with the printed side facing up inside the tray & then close the co door.
4. Focus search is performing, the LCD display (2) will show the total number of tracks & total playing time.
•
PLAY / PAUSE / STOP MODE
1. Press the “
PLAY/PAUSE/STOP
” button (16) to start playback, the first track will start playback.
2. To interrupt, press the “
PLAY/PAUSE/STOP
” button (16) once, the playing time will be freeze & flashing on
the LCD display (2). Press again to resume normal playback.
3. If press and hold the “
PLAY/PAUSE/STOP
“ button (16) for over 2 seconds during playback mode.
The system will go to stop mode.
www.PyleUSA.com
3
Phono Cover
Metal Bracket
Main Unit
/
Summary of Contents for Vintage PTTCSM70BT
Page 12: ......


