background image

MAIN MENU

Press 

MENU

 to display the main menu or return to the previous menu or close the main menu

Press             to highlight the desired menu icon, and press 

ENTER

 to select.

MAIN MENU OPERATION

Picture Menu

Press 

MENU

 to enter the main menu, Press             button to select. Press ENTER /     to enter.

Press 

MENU

 again to exit or back to parent menu.

Press             button to select among Picture Mode/Brightness/Contrast/Color/Tint/Sharpness/Color 

Temperature/

3D Settings/Advanced Settings.

Press

 ENTER / 

     to enter.

Press            button to adjust.

Press 

MENU

 again or back to parent menu.


Picture Mode

Adjust picture mode to change picture appearance.

Press             button to select (Standard / Dynamic / Soft / User).

Note: 

The brightness, contrast, color, tint and sharpness are only available in User mode, you can adjust as     

             you like.

Standard:

 Produces a highly defined image in a normally lit room.

Dynamic:

 Produces a highly defined image in a brightly lit room.

Soft:

 Produces a highly defined image in a soft lit room.

User:

 Select to customize picture settings.


Brightness

Adjust the visual perception output of the entire picture, it will effect the iuminousness  of the picture.

Press            button to adjust.


Contrast

Adjust the highlight intensity of the picture, but the shadow of the picture is invariable.

Press            button to adjust.

www.PyleUSA.com

12


Color

Adjust the saturation of the color based on your own like. Press 


button to adjust.

   Tint

Adjust the hue (Red, Green, Blue) of the picture. Press  


 button to adjust.


Sharpness

Adjust the peaking in the detail of the picture. Press            button to adjust.


Color Temperature

Increase or reduce warm color of the picture personally (red), and the cool color personally (blue) according  

to your like.

Normal            

Increase the sex-linked colors for the white.

Warm

               Increase the red color for the white. 

Cool

                  Increase the blue tone for the white.

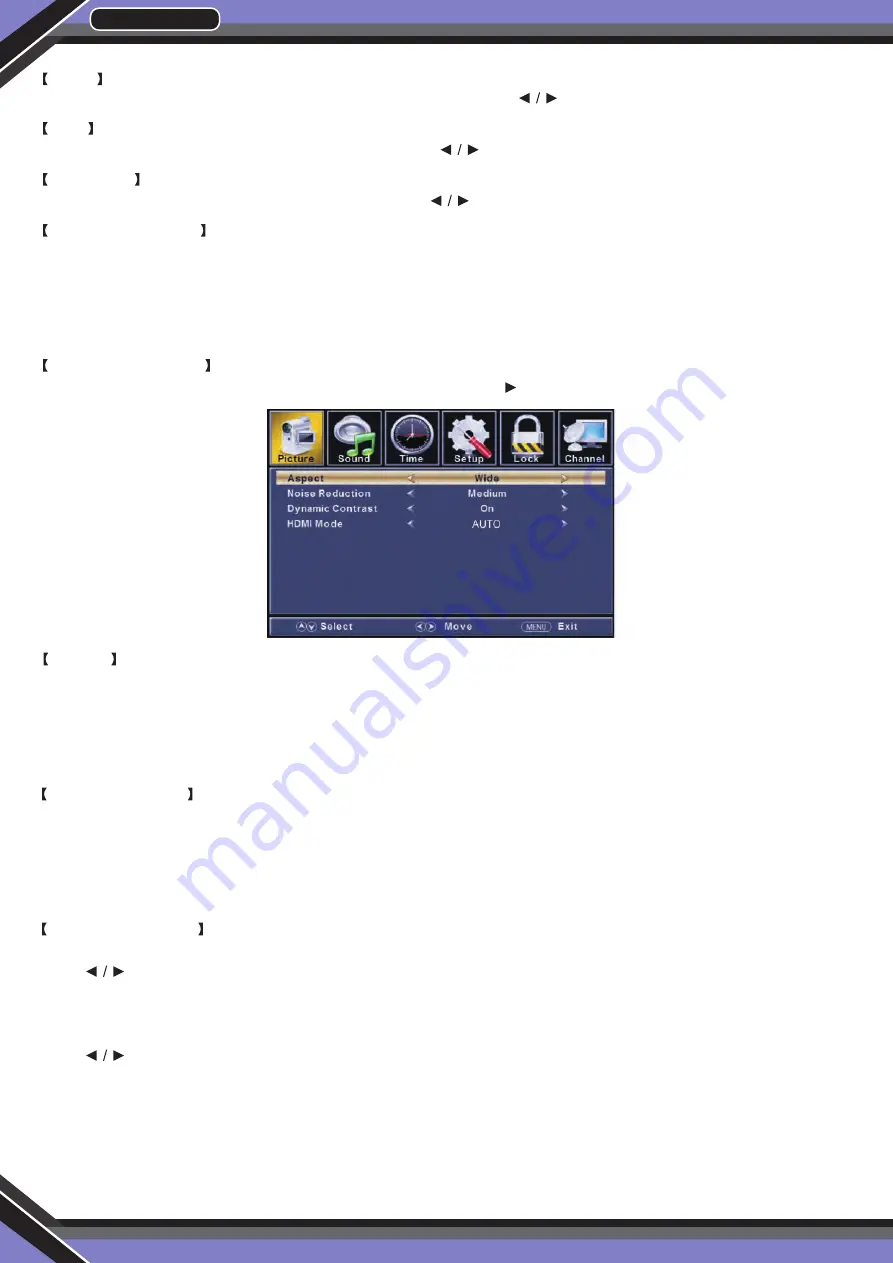
   Advanced Settings

Adjust advanced video features to fine tune the picture. Press 


 button to enter sub-menu..

   Aspect

Adjust how the picture fills the screen.

Normal

          Automatically adjust Aspect Ratio based on TV size and TV program.

Wide

              Use to watch wide screen (16:9) content.

Zoom

             Expands image to fill screen. Top and button maybe cut off.

Cinema

         Stretches image at edges but keeps a clear image in the center.

   Noise Reduction

Set options to reduce video noise.

Off

                  Select to turn off video noise detection.

Low

                Detect and reduce low video noise.

Medium

       Detect and reduce moderate video noise.

High

               Detect and reduce enhanced video noise.

   Dynamic Contrast 

Automatically adjust picture detail and brightness.

Press             button to select (Off/On).

( HDMI Mode)

Only available in HDMI input.

Press             button to select (Video/Graphic).

Summary of Contents for PTVLED32

Page 1: ...Note Keep this document for operation and performance reference Please visit us online for further reference and detailed product specifications...

Page 2: ...5 PRODUCT INTRODUCTION 5 CONNECTIONS 6 REMOTE CONTROL 8 SETUP WIZARD 9 SELECT INPUT SOURCE 10 MAIN MENU 11 PICTURE MENU 11 12 SOUND MENU 13 14 TIME MENU 14 CLOSE CAPTION 14 SETUP MENU 15 LOCK MENU 17...

Page 3: ...ge of a table Unplug this TV during lightening storms or when unused for long periods of time NOTE No naked flames such as candles should be placed on the TV CAUTION TO PREVENT ELECTRICAL SHOCK DO NOT...

Page 4: ...njoy biting into electric flexes Always hold the plug when pulling out the plug from the mains supply socket Do not pull on the flex the flex can become overloaded and cause short circuit Set up the u...

Page 5: ...To clean the TV use a soft dry cloth Do NOT use solvents or petrol based fluids For stubborn stains you may use a damp cloth with dilute detergent HEADPHONE WARNING Loud music can damage your hearing...

Page 6: ...o equipment 3 Connect a stereo headphone 3 5mm for private listening 4 Connect an optional coaxial digital cable through a compatible amp receiver to enjoy superior audio sound 5 6 Connect to an AV de...

Page 7: ...source menu CURSOR KEYS Allows you to navigate the on screen menus and adjust the system settings to your preference MTS Press to select an alternate audio language if applicable EXIT Exit the OSD me...

Page 8: ...6 7 Connect it to the HDMI of DVD or other equipment 8 Connect antenna or cable for television reception Note Use an 9 10 11 Connect to an YPbPr device that features compo nent video and audio output...

Page 9: ...ct the language to be used for menus and message Press button to select go to next step and press ENTER button to go SELECT TIME Press button to select the time zone daylight saving time and time form...

Page 10: ...ess button to select go to next step and press ENTER button to start auto scan SELECT INPUT SOURCE Press INPUT button to display the input source list Press or INPUT button to select the input source...

Page 11: ...n or back to parent menu Picture Mode Adjust picture mode to change picture appearance Press button to select Standard Dynamic Soft User Note The brightness contrast color tint and sharpness are only...

Page 12: ...video features to fine tune the picture Press button to enter sub menu Aspect Adjust how the picture fills the screen Normal Automatically adjust Aspect Ratio based on TV size and TV program Wide Use...

Page 13: ...audio settings BASS Adjust the bass e ect Increases or decreases lower pitched sounds Press button to adjust TREBLE Adjust the treble e ect Increases or decreases high pitched sounds Press button to a...

Page 14: ...Sleep Timer Time Zone Daylight Saving Time Time Format Auto Clock Clock Press ENTER to enter Press button to adjust Press MENU again or back to parent menu SLEEP TIMER Set a timer for the TV to turn...

Page 15: ...digital Closed Captioning box Press button to select Default None Raised Depressed Uniform Left Shadow Right Shadow FONT EDGE COLOR Adjust the color of the digital Closed Captioning box Press button...

Page 16: ...to select 5 Sec 15Sec 30Sec 45Sec 60Sec CLOSED CAPTION Adjust Closed Captioning settings Only available under TV and AV source Press ENTER button to enter For detail please refer to page 12 OVER SCAN...

Page 17: ...only When current stream has downloadable rating data US RATING For the United States the rating setting basically include the following options TV MPAA TV The TV rating compose of two aspects age ba...

Page 18: ...up to 7 characters Press button to adjust PC MENU Press INPUT to select PC source Press MENU to enter the main menu Press button to select Setup menu Press to select PC Settings Press button to selec...

Page 19: ...hannel Label Press ENTER to enter Press button to adjust Press MENU again or back to parent menu AIR CABLE Select signal type Press button to select Air Cable AUTO SCAN Automatically search for channe...

Page 20: ...ing RRT Setting and Reset RRT in LOCK menu are invalid 6 PC mode has no CHANNEL menu Adjust the horizontal position of the picture Press button to adjust V POS Adjust the vertical position of the pict...

Page 21: ...www PyleUSA com 22 PTVLED32 SPECIFICATION LED Display Pixel Class 1...

Page 22: ...ock Input Block US Rating Canada Rating RRT Setting Reset RRT Press ENTER to enter Press button to adjust Press MENU again or back to parent menu Enter your 4 digital password Default password is 0000...

Page 23: ...www PyleUSA com 23 PTVLED50 SPECIFICATION LED Display Pixel Class 1...

Page 24: ......

Reviews: