background image

Page

15

Page

10

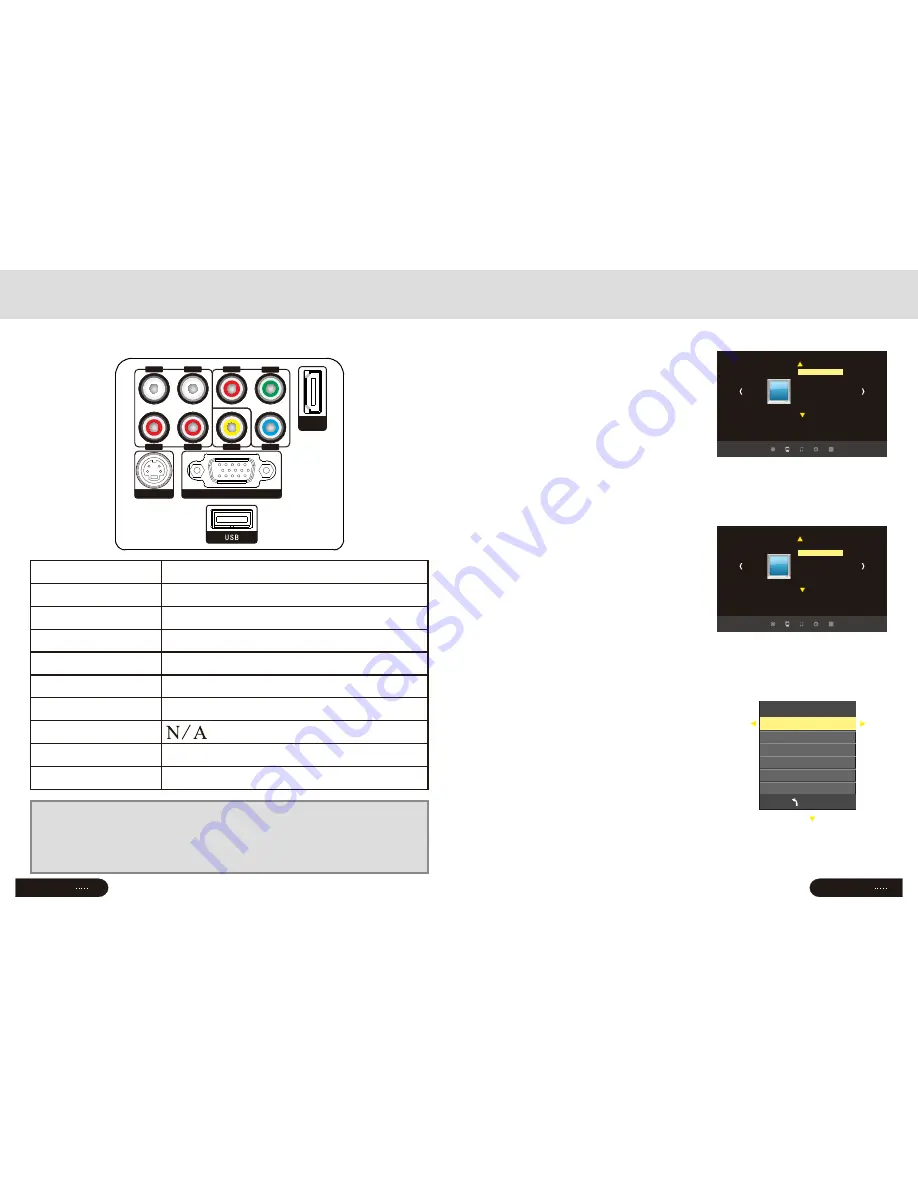
Signal terminals description

Input


terminals

Lout

Rout

Y/Pb/Pr

Video

Lin

Rin

PC-RGB IN

Svideo

HDMI 

USB

TV

Name

Description

Conponent


video


input

AV input
Audio output
Audio


input

VGA input
Svideo


input

HDMI


Signal input

  ☆

Turn off the power of projector and the device before connecting,

          Either on may cause a break down of machine


Check the shape of the plug,DO NOT try the wrong plug

CAUTION

1. 

Menu


setting


method

    
    1. 

Using the projector

press

menu

”.


The picture display on screen to adjust

               menu(picture I) 

    2. 

Press

◀/▶

key

,

the


menu


in


turn

              circle into

picture

”>“

sound

       >“

time

”>“

system

    3. 

Select


the


adjust interface,use

“▲/▼”


key


to choose


the


wanted


item

              (picture II)

    4. 

Press

OK

or

/

to


adjust


the


item


parameter

.

    5. 

Finished the elected item parameter, press

              the “menu”key again, exit the page

    6. 

Repeat operating step 

2~5,

till you

finished all the parameters, press

exit

"

exit


the


menu page, otherwise, the menu page 

will auto exit after a period time


2. 

Parameter


adjustment


A.

Press

"

menu

"

key

,

until


display


the


above

   picture of the menu;
b. Press

“▲/▼”

key

elect


the


option that

   need to adjust
c. Press

OK

key

use

/

button


to


adjust


the


certain


parameters

d. Press the “menu”key again exit the
   menu page parameter adjust station

Menu


Setting

USB


signal


input

details


at


page17

P

C-RGB


IN

HDMI

Svideo

L out

R out

R in

L in

Pr

Y

Pb

Video

Picture1

Picture

Picture mode standard

Color temperature
Aspect ratio 4:3
Noise reduction middle
Flip horizon
Flip vertical
PC setup 

Picture2

Picture

Picture mode standar

Aspect ratio 4:3
Noise reduction middle
Flip horizon
Flip vertical
PC setup 

d

Color temperature

Picture mode  user

MENU

Contrast       0

Brightness 50
Color         50
Sharpness  50
Tune          50

Summary of Contents for PRJLE84H

Page 1: ...使 使用说明书 HD LED PROJECTOR User s Manual ...

Page 2: ...inals 10 Remote control 11 Panel instruction 12 Turn on shut down 13 turn on 13 shut down 13 Image adjustment 14 focus adjustment 14 keystone adjustment 14 Menu settings 15 1 Menu setting method 15 2 Parameter adjustment 15 3 Picture 16 4 Audio 16 5 Time 16 6 OSD 17 7 Multimedia 17 Trouble shooting 19 Specification 21 Packing list Accessories 22 Contents ...

Page 3: ...ge away When you use this projector please carefully read user manual Warning High brightness lamp Avoid staring or look directly at the light specially for children Warning Avoid to place the projector in wet condition in case of the electric shock danger High voltage inside DO NOT open except for technicians WANING It indicates there is a dangerous Voltage inside that may cause shock It indicate...

Page 4: ...ty Card Ⅱ The following information shall be filled by sellers Item NO Model NO Name USER Sales INFO Product Address Zip Code Zip Code Address Sales Date Installation Date Invoice No Series NO Phone NO Contact INVOICE Seller 2 ...

Page 5: ...Page 3 Page 22 ...

Page 6: ...minals Details at page 10 7 Power switch 6 Hot winds output ventilation 5 2 1 3 4 6 5 7 Focus lens 1 IR receiver 2 Hight feet adjustment 3 Cool winds input Ventilation 4 Packing list Please confirm the following after you open the package Projector 1 Lens lid 1 Remote control 1 Power cable 1 AV cable 1 User manual 1 Extra fuse 1 Len cleaner 1 PWM4x8 screws 1 Optional accessories 1 Projector screen...

Page 7: ...n 1280X768 support 1080P Contrast ratio 2000 1 Lens Aperture 3 8 Focus 198mm Lamp LED 200W Color temputure 9300K Life 20000hours Continuous working time 24hours Image Size 60 120inch Brightness 2800 Lumens Keystone 15 degree Power Voltage 100 220V 50 60Hz Power consumption 240W Working condition Temperature 5 35 Humidity 10 65 Store condition Temperature 10 60 Humidity 10 90 Remote control Frequen...

Page 8: ...Q Q Blue screen no picture no sound A Input cables connected right Q Picture right no sound A Input cables connected right Volume at min Or on Mute Q Audio right no picture A Input signal connected right In VGA mode The PC refresh rate 75Hz In VGA mode The PC contrast ratio is 1024 768 Q Can t find devices when pluged with hard drive or fresh drive A Re plug the device Check if the device is broke...

Page 9: ...to the technicians Problem The possibility reason 1 when turn on the power switch the indicator light do not work The power switch fuse is burned 2 The remote control can not turn on projector The power switch turn on or off The remote control out of battery Something stands between the remote and IR Strong light on IR directly The power can does not connect well Is there an input signal Is the in...

Page 10: ...nu Music Movie TXT Viewthephotos ingallery Play an album Watchamovie Read the book Multimedia Format MOVIE MUSIC PICTURE avi mpg dat rm rmvb mov mkv DivX Xvid MPEG 4 MPEG 1 MPEG 2 MPEG 1 RealMedia video H 264 MP3 WMA AAC jpg jpeg bmp png Progressive JPEG Baseline JPEG BMP Non interlaced Interlaced mp3 wma m4a aac Mp3 WMA AAC Video Decode Audio Decode Format Task CAUTIONS 1 The usb interface suppor...

Page 11: ...se life threatening situations 5 The first operation of the projector may cause a unclear image Please refer to the image adjustment for help Picture Mode Standard warm user Appendix1 Dynamic Standard warm cool Auto 4 3 16 9 Appendix 2 OFF LOW MID HIGH OFF ON OFF ON Picture Menu Color temperature Aspect Noise reduction Flip horizon Flip vertical Page 16 Menu Setting 3 Picture Menu Appendix I Appen...

Page 12: ...ed item parameter press the menu key again exit the page 6 Repeat operating step 2 5 till you finished all the parameters press exit exit the menu page otherwise the menu page will auto exit after a period time 2 Parameter adjustment A Press menu key until display the above picture of the menu b Press key elect the option that need to adjust c Press OK key use button to adjust the certain paramete...

Page 13: ...r projector is not leveled Please reposition the projector to improve its angle to the screen However the circumference of the image may not be focused 4 5 Page 14 DO NOT mix use the new and old battery Make sure nothing stands in the middle of remote and IR Avoid the light shine on the IR directly Point the remote right to IR within 6m and 30 degrees Cautions Pull out the battery if you are not g...

Page 14: ...emote control before using 2 Pull the power switch on the backboard as the power light turn red 3 Press the power key on the remote or panel the indicator light turn green 4 The lamp start working 2 seconds later image projected on the screen the machine is working smoothly 5 The new projector may have problems like image unclear or trapezoid distortion Please read image adjustment chapter 6 After...

Reviews: