background image

19

SETUP

INITIAL SETUP

SETUP MENU --- MAIN PAGE

1. Press 

SETUP

 in the stop mode.

(Press the stop button twice to ensure
the player under STOP mode.)

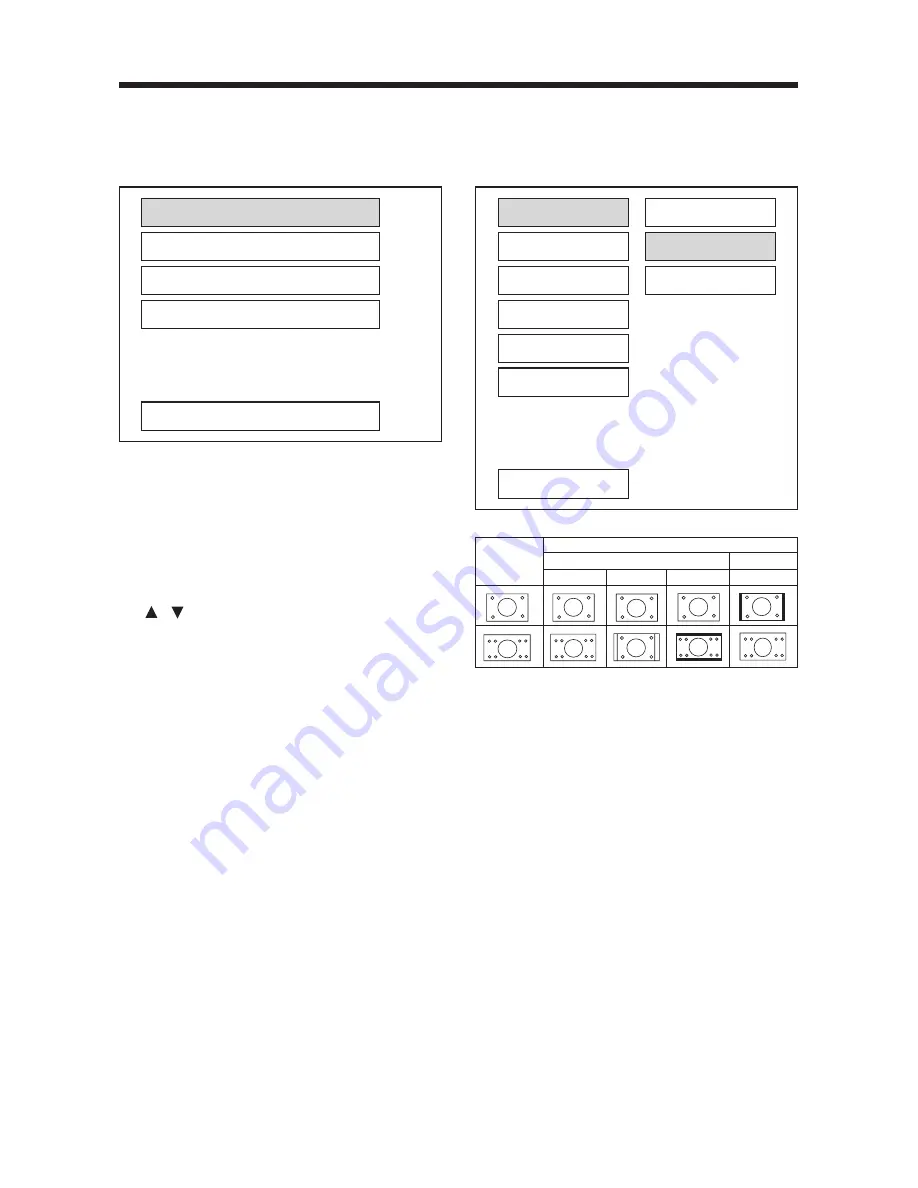
2. The initial SETUP menu is displayed.

3. Select the preferred item by using the

    /    buttons.

4. Press ENTER buttons.

    a. GENERAL SETUP

This setup page includes all the 
item of TV display & audio output 
feature.  The detail please refer to 

GENERAL SETUP MENU

.

    b. SPEAKER SETUP

This is to activate the audio output
from DOLBY AC3 5.1 DOWNMIX 
to 2 channel mode.  Please refer to

SPEAKER SETUP MENU

.

c. AUDIO SETUP

This setup page includes all the 
items for AUDIO.  Please refer to 

AUDIO SETUP MENU

.

d. PREFERENCE SETUP

This setup page includes all the 
configuration of support feature.  
The detail please refer to 

PREFERENCES SETUP MENU

.

GENERAL SETUP

--- GENERAL PAGE ---

TV display setup

This is to select the appropriate TV
aspect (4:3 or 16:9) according to the
connected TV set.

Normal/PS (For 4:3 TV)

Played back in the PAN & SCAN style.
(If connected to wide-screen TV, the left
and right edges are cut off.)

Normal/LB (For 4:3 TV)

Played back in letterbox style.
(If connected to wide-screen TV, black
bands appear at top and bottom of the
screen.)

Wide (For 16:9 TV)

Select when a wide-screen TV set is
connected.

Video Material

Normal

TV Screen

Pan Scan

Letter-box

4:3

Wide (16:9)

4:3

16:9

GENERAL SETUP

SPEAKER SETUP

AUDIO SETUP

PREFERENCES

EXIT SETUP

TV DISPLAY

PIC MODE

ANGLE MARK

OSD LANG

CAPTIONS

SCR SAVER

MAIN PAGE

NORMAL/PS

NORMAL/LB

WIDE

Summary of Contents for PLTVD7P

Page 1: ...bile Video System Digital Audio Out Coaxial DVD Player With TV Tuner Multi Color TFT Monitor Multi subtitle Languages Function Multi audio Languages Function Multi angle Function Parental Control Remote Control PLTVD7P ...

Page 2: ...e the product to water or excessive moisture This could cause electrical shorts fire or other damage When Parked Parking in direct sunlight can produce very high temperatures inside your vehicle Give the interior a chance to cool down before starting playback Use the Proper Power Supply This product is designed to operate with a 12 volt DC negative ground battery system the regular system in a Nor...

Page 3: ...VD VCD CD Disc 13 Ejecting a Disc 13 Basic Operation 14 On Screen Display Function 16 Multi audio Language Function 17 Menu Function 17 Title Menu Function 17 Multi subtitle Language Function 17 Multi angle Function 17 MP3 Disc Play 18 TV Operation 18 Setup 19 Initial Setup 19 General Setup 19 Speaker Setup 21 Audio Setup 21 Preferences Setup 22 Defaults Table 24 Specifications 25 3 CONTENTS ...

Page 4: ...IS DEVICE IS INTENDED FOR CONTINUOUS OPERATION This product incorporates copyright protection technology that is protected by method claims of certain U S patents and other intellectual property rights owned by Macrovision Corporation and other rights owners Use of this copyright protection technology must be authorized by Macrovision Corporation and is intended for home and other limited viewing ...

Page 5: ...vents such as benzine thinner or conventional record cleaners as they may mar the surface of the disc Note A disc may become somewhat scratched although not enough to make it unusable depending on your handle it and conditions in the usage environment Note these scratches are not an indication of any problem with the player Preparing New Discs with Rough Spots A new disc may have rough edges on it...

Page 6: ... 12 Indicator Light for DVD 13 Indicator Light for TV 14 Indicator Light for AV 15 SPEAKER ON VOLUME 16 MULTI COLOR TFT MONITOR 17 COLOR Adjustment knob 18 BRIGHTNESS Adjustment knob 19 CONTRAST Adjustment knob FRONT VIEW 5 INCH MULTI COLOR TFT MONITOR 4 1 14 11 7 12 13 15 2 10 9 5 3 6 8 19 18 17 16 7 INCH MULTI COLOR TFT MONITOR ...

Page 7: ...of the earphone 22 Antenna This antenna can receive TV signal BACK VIEW 23 DC 12V Power Input Socket 24 DC 12V Power Output Socket 25 Remote Control Socket 26 Digital Audio Out Coaxial 27 AUDIO VIDEO OUTPUT 28 Diversity Antenna Input 29 OPEN Button Press to eject the screen display from the base at a little angle SIDE VIEW 20 21 22 29 23 24 25 26 27 28 ...

Page 8: ... monitor back into the monitor base unit until the screen engages with OPEN button Then attach the brackets on both sides of unit with screws M4x5 last install the unit with screws M5x25 When fix the unit you can slide the screw M5x25 to left side or right side to meet your needed position In the figure below select two holes among the positions that marked 1 2 3 and 4 to fix the bracket Remove th...

Page 9: ...t the monitor left and right from the central viewing position at a certain angle range Don t rotate the monitor forcibly to avoid mechanical damage Note When the monitor is in upright position to the base you can adjust the monitor left or right Otherwise the monitor may scrape the base surface when rotated Closing the Monitor Rotate the monitor left and let the back of the monitor upward then re...

Page 10: ...C ADAPTOR OPTIONAL YELLOW VIDEO OUT RED AUDIO R OUT WHITE AUDIO L OUT DIVERSITY ANTENNA INPUT CIGARETTE LIGHTER REMOTE CONTROL RECEIVER OPTIONAL DC 12V INPUT OUTPUT REMOTE AUDIO VIDEO OUTPUT DIVERSITY ANTENNA INPUT DIGITAL AUDIO ...

Page 11: ...11 REMOTE CONTROL 6 1 3 7 11 4 8 10 5 9 12 13 14 16 15 17 20 18 19 24 21 28 22 32 23 25 29 27 26 31 30 2 ...

Page 12: ... with the numeric buttons or selected with the cursor buttons on TV screen 15 Changing for slow forward reverse playback motion 16 Press to play the disc 17 Press to start forward rapidly to reverse rapidly 18 CH CH Press to skip to the next track press to skip back one track In TV mode press CH button or CH button to choose channel upward or downward 19 Press it to stop playback 20 Press it to pa...

Page 13: ...ote control towards the player front face IR mark remote control signal receiver Operation angle About 30 degree in each the direction of the front of the IR mark To prevent damage to the unit be sure to follow the connection diagram page 11 Loading a DVD VCD CD Disc 1 Turn the ignition on the accessory position 2 Press the POWER button 1 3 Insert the disc with printed side facing up into the disc...

Page 14: ... or on the front panel MUTE Will mute the sound but the disc continues playing When you unmute the sound press MUTE again a later passage will be playing Repeat FOR DVD Press the REPEAT button to select repeat mode as follow FOR VCD CD Press the REPEAT button to select repeat mode as follow 1 Continuously repeat at the current chapter track when selected REP ONE mode 2 Select REP ALL mode to conti...

Page 15: ... on front of panel or on remote control to turn the player on or off Reset Function When the function buttons are operated in error state please unplug the DC 12V INPUT plug then put the plug in the socket again 15 Disc Search GOTO FOR DVD Press GOTO button twice the screen will display the following message You can select the item you want to watch through TIME setting by using numeric buttons an...

Page 16: ...14 TRACK 01 On Screen Display Function Press the DISPLAY button during playback to display the contents of the current disc on the screen Example DVD 1 Press DISPLAY for the first time TITLE 01 03 CHAPTER 002 025 00 02 25 Title Number Total Title Number Chapter Number Total Chapter Number of this Title of the disc currently being played will be shown on the screen along with the elapsed time 2 Pre...

Page 17: ... playback Each time the button is pressed number of the angle changes in sequential order Notes The angle number is different according to the disc The function only works for discs having scenes recorded at different angles When no different angle are recorded will be displayed at screen left top corner BASIC OPERATION 4 Press DISPLAY for the fourth time TOTAL REMAIN 00 40 35 TOTAL TRACK 14 TRACK...

Page 18: ...d ROOT 0 MP3 MUSIC 1 SKY MP3 HEAR YOUR DISC BASIC OPERATION ROOT SMART NAVI PLAY MODE TV Operation Press the MODE button on the remote control to switch among DVD mode TV mode an AV mode When in TV mode the function of the buttons served in DVD mode is locked Searching channels Press MENU button will enter into searching mode Then press CH button to start searching TV channels and press CH button ...

Page 19: ...REFERENCE SETUP This setup page includes all the configuration of support feature The detail please refer to PREFERENCES SETUP MENU GENERAL SETUP GENERAL PAGE TV display setup This is to select the appropriate TV aspect 4 3 or 16 9 according to the connected TV set Normal PS For 4 3 TV Played back in the PAN SCAN style If connected to wide screen TV the left and right edges are cut off Normal LB F...

Page 20: ...to OFF the mark will not appear GENERAL PAGE OSD LANG type setup Select the preferred OSD language by using the buttons GENERAL PAGE CAPTIONS setup Activate the CAPTIONS feature by selecting ON And release this feature by selecting OFF TV DISPLAY PIC MODE ANGLE MARK OSD LANG CAPTIONS SCR SAVER MAIN PAGE AUTO HI RES N FLICKER TV DISPLAY PIC MODE ANGLE MARK OSD LANG CAPTIONS SCR SAVER MAIN PAGE ENGL...

Page 21: ... Select the STEREO to activate simple stereo mode AUDIO SETUP AUDIO SETUP AUDIO OUT This is to activate the audio output from ANALOG mode to SPDIF RAW mode to SPDIF PCM mode AUDIO SETUP OP MODE There are two operating modes for the Dolby Digital decoder LINE OUT and RF REMOD TV DISPLAY PIC MODE ANGLE MARK OSD LANG CAPTIONS SCR SAVER MAIN PAGE ON OFF AUDIO OUT OP MODE DYNAMIC LPCM OUTPUT MAIN PAGE ...

Page 22: ...ttons AUDIO SETUP Dynamic Range Control Select DRC and adjust the dynamic range of a Dobly Digital encoded program There are 8 steps between full compression and off compression AUDIO SETUP LPCM OUTPUT Select the LPCM OUTPUT between LPCM 48K and LPCM 96K AUDIO OUT OP MODE DYNAMIC LPCM OUTPUT MAIN PAGE FULL 6 8 4 8 2 8 OFF AUDIO OUT OP MODE DYNAMIC LPCM OUTPUT MAIN PAGE LPCM 48K LPCM 96K TV TYPE AU...

Page 23: ...ype the old password The initial factory code is 3308 and key in 4 characters password now you want to use and retype again to confirm key in correctly TV TYPE AUDIO SUBTITLE DISC MENU PARENTAL PASSWORD DEFAULTS SMART NAV MAIN PAGE ENGLISH FRENCH SPANISH CHINESE JAPANESE TV TYPE AUDIO SUBTITLE DISC MENU PARENTAL PASSWORD DEFAULTS SMART NAV MAIN PAGE 1 G 2 3 PG 4 PG 13 5 6 PG R 7 NC 17 8 ADULT NO_P...

Page 24: ...AIN PAGE DEFAULTS TABLE General Setup TV Display Normal LB PIC Mode AUTO Angle Mark ON OSD Language English Captions ON SCR Saver ON Speaker Setup Downmix Stereo Audio Setup Audio Out SPDIF RAW OP Mode Line Out Dynamic FULL LPCM Output LPCM 96K Preferences TV Type AUTO Audio English Subtitle English DISC Menu English Parental NO Parental Password 3308 Smart NAV With Menu PREFERENCES PAGE SMART NAV...

Page 25: ...3 Wow and Flutter Below measurable limits Note Specifications and design are subject to modification without notice due to improvements in technology 25 This product incorporates copyright protection technology that is protected by method claims of certain U S patents and other intellectual property rights owned by Macrovision Corporation and other rights owners Use of this copyright protection te...

Page 26: ......

Page 27: ......

Page 28: ...www pyleaudio com 88 V1851 07 ...

Reviews: