background image

www.PyleUSA.com

14

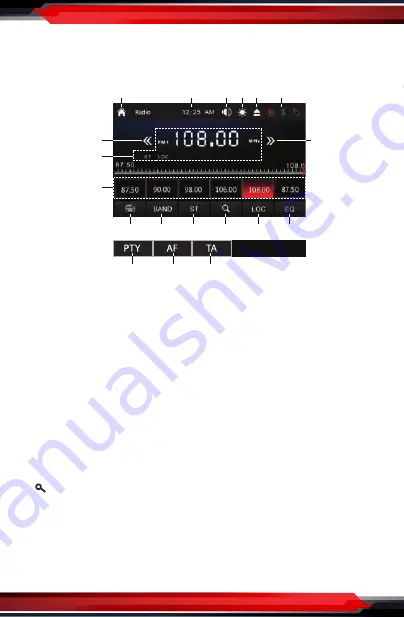
Radio Operations:

Press MODE button on the control panel or on the remote control, or tap the “Radio” 

icon on touch screen until Tuner is selected.


1. 

Home Page

2. 

Clock Time

3. 

Volume Level Adjust

4. 

TFT Screen Backlight brightness Adjust

5. 

Disc Eject

6. 

Active Media

7/8. 

Tune/Seek Down & Tune/Seek Up

         Tap this button to seek tuning down or up.

         Tap and hold this button to move radio frequency down or up one step

         at a time.

9. 

Current Radio Reception State

10. 

Preset Stations

       Tap and hold one of preset station touch buttons to store the preset station.

       Tap one of preset station touch buttons to recall the preset station.

11. 

Input a specific radio frequency

12. 

Band Selector

13. 

Stereo/Mono Reception

14.       

(Automatic Store Preset Stations, Automatic Scan Preset station)

       Tap and hold this button for more than 2 second to store station automatically.

       Tap this button to recall each preset station that stored in the memories.

15. 

DX/LOC Reception

16. 

EQ/Audio Setting

17. 

PTY (Program Types)

       Touch to display program types. Search for stations according to program type

       as follows:

11

1

2

5

6

4

3

10

7
9

8

12

13

14

15

16

17

18

19

Summary of Contents for PLTS79DUB

Page 1: ...with Multimedia Disc Player BT Wireless Streaming Hands Free Talking Motorized Fold Out 7 Touchscreen Display DVD CDMP4 MP3 USB AM FM Radio Single DIN PLTS79DUB Car Stereo Video Receiver ...

Page 2: ...Precautions Installation Control Panel Remote Control Set Up Operations Radio Operations DVD CD MP3 USB Device Operations Wireless BT Operations Features Technical Specs 3 3 4 7 9 11 15 16 19 21 22 Download the Phonelink Apk from Google Play Store ...

Page 3: ...cing to a qualified technician 2 This digital video player is compatible with VIDEO AUDIO discs with 12 cm size DVD disc VCD disc CD CD R CD RW disc MP3 disc 3 Do not switch ON this digital video player for a long time when the vehicle s 4 Do not apply strong mechanical stress like drop shock or any force to the TFT LCD Do not hard hit press or rub the TFT LCD display surface If the display surfac...

Page 4: ...e unit in the vehicle Disconnect negative battery terminal of vehicle Installation Process Carefully remove the existing head unit Before finally installing this product connect wiring harness temporarily and make sure it s all connected up properly and test the head unit if it can work properly Consult a qualified technician if you unsure Lift the left or right top corner of the plastic outer tri...

Page 5: ...Bolt Spring Washer Plain Washer Tapping Screw Screwdriver Tabs Hex Nut Dash Board Key Plate Key Plate Plastic Trim Out Metal Mounting Strap Console Slide Bracket Housing CAM R CAM F SUB OUT V IN AV L AV R V OUT1 RL RR V OUT2 FL FR 10 RADIO ANTENNA JACK 10A ...

Page 6: ...B ILLUMINATION FRONT RIGHT CHANNEL SPEAKER REAR RIGHT CHANNEL SPEAKER ORANGE BROWN BROWN WHITE BLACK PINK ORANGE BLACK GRAY GRAY BLACK VIOLET VIOLET BLACK CAM R Rear Camera Video input Socket Yellow CAM F Front Camera Video input Socket Yellow SUB1 Subwoofer Output Socket Green V IN AV IN Video input Socket Yellow AV L AV IN Left CH Audio input Socket White AV R AV IN Right CH Audio input Socket R...

Page 7: ...ume level Press the SEL button to turn to audio settings Volume Dimmer Balance Fader 4 Handsfree Microphone Uses the Wireless BT handsfree system to receive your voice when calling 5 IR REMOTE SENSOR 6 BAND In radio model press BAND to select between FM1 FM2 FM3 AM1 and AM2 bands 7 Tune Previous Skip Previous track Reject and End Call In Radio mode press to scan strong signal radio station downwar...

Page 8: ...isc USB BT music playback press to skip next track Press and hold to fast forward playback In BT phone mode press the button to make a call receive a call redial the last dialed phone number 11 TA Traffic Announcement Settings AF Alternative Frequencies TA AF ON TA symbol will be displayed if this function is activated In the TA mode OFF The function is deactivated In Radio mode press and hold the...

Page 9: ...isabled press the release button to detach the front panel 16 RESET SYSTEM The RESET button is used to reset all paramenters to factory default setttings This function may be used when the LCD does not display normally or sound is distorted or when any of controls are disabled Gently press the RESET button to reset your system with a thin object with a pointed end REMOTE CONTROL ...

Page 10: ...io frequency down or up one step at a time 8 TITLE When playing a DVD disc press this TITLE button will open the TITLE menu which is recorded on the media If the DVD disc with title menu 9 RPT Repeat playback 2 In Disc USB playback mode press and hold the RPT button to repeat playback modes Repeat title Repeat One Repeat Dir folder Repeat All In radio mode press to store or recall the preset stati...

Page 11: ...tation 3 20 SUB T 6 In Disc USB Playback mode press and hold the SUB T button to change the subtitle language on discs which have this as an option In radio mode press to store or recall the preset station 6 Setup Operations Main Menu In each mode touch the icon to enter the main menu as below image In the main menu screen press the desired icon to enter each of the following settings Disc CD VCD ...

Page 12: ...r Disables the camera mirror image Auto Front Camera Allows you to preset the duration of the front view camera SWC Steering Wheel Control Tap SWC to enter the study operation menu First make sure the SWC connecting wires have been connected to this unit Before study tap the icon to clear all previous settings Press and hold a steering wheel button at the same time tap the function button on touch...

Page 13: ...s Touch Calibration Touch this item to enter touch screen calibration mode tap the cursor calibration of touch screen Wallpaper To change the wallpaper D Audio Settings Tap the icon to enter the audio setting mode tap the EQ button to enter EQ setting Sound effect Tap the FL FR RL RR ALL button to preset the Move the blue circle at the middle of car inside front seat passenger left back passenger ...

Page 14: ...ate 10 Preset Stations Tap and hold one of preset station touch buttons to store the preset station Tap one of preset station touch buttons to recall the preset station 11 Input a specific radio frequency 12 Band Selector 13 Stereo Mono Reception 14 Automatic Store Preset Stations Automatic Scan Preset station Tap and hold this button for more than 2 second to store station automatically Tap this ...

Page 15: ... Alarm 18 AF Alternative Frequencies Tap this button to enables or disables the alternative frequency search mode AF This function is used for maintaining a program being listened to during a trip if its frequency changes 19 TA Traffic Announcement Tap the TA button to enables or disables the TA function traffic information When this function is enabled the tuner will periodically scan received fr...

Page 16: ...in the disc slot for video disc playback Press MODE button on the control panel or on the remote control or tap the DISC icon on touch screen to switch DVD playback 1 Home Page 2 Time 3 Volume Level Adjust 4 TFT Screen Backlight brightness Adjust 5 Disc Eject 6 Active Media 7 Previous Track Fast backward 8 Play Pause 9 Next Track Fast forward 10 Stop Playback 4 1 2 3 6 5 7 8 9 10 11 12 13 14 15 16...

Page 17: ...back 16 Zoom In Zoom Out 17 Audio Track Selector 18 Audio Settings 1 Home Page 2 Time 3 Volume Level Adjust 4 TFT Screen Backlight Brightness Adjust 5 Disc Eject 6 Active Media 7 Previous Track Fast backward 8 Play Pause 9 Next Track Fast forward 10 Sort the List of the Folders and Files 11 View the Music File List 4 1 2 3 6 5 7 8 9 10 11 12 13 14 15 16 17 18 19 20 21 12 Next Page of the Menu Bar ...

Page 18: ... of the Menu Bar 14 Repeat Playback 15 Random Playback 16 Audio Settings 17 View the Root Directory in USB Flash Memory Device 18 View the Music Files Folders 19 View the Video Files Folders 20 View the Photo Files Folders 21 Return 1 Home Page 2 Time 3 Volume Level Adjust 4 TFT Screen Backlight Brightness Adjust 5 Disc Eject 6 Active Media 7 Previous Photo 8 Play Pause 9 Next Photo 4 1 2 3 6 5 7 ...

Page 19: ...ed phone number Transferring Audio Tap icon to transfer audio between this car BT hands free system and mobile phone Disconnect or re establish BT connection Tap to disconnect the BT connection Tap to reconnect the BT connection Viewing Recent Call List Tap icon to view the income calls Tap icon to view the outgoing calls Tap icon to view the missed calls Tap icon to refresh the recent call list C...

Page 20: ... the mirror function with your smartphone and you will be able to run any application or function of your smartphone Using of the Icons 1 Return to the previous step 2 Return to home page of smart devices 3 Landscape mode Rotate the screen 4 Exit the phone link mode Android Phone Link Operations Note a To unlink your smartphone from the car DVD player just disconnect the USB cable again b For Andr...

Page 21: ...www PyleUSA com 21 ...

Page 22: ... Fold Out Video Screen Display Panel Backup Camera Support Rear Camera Parking Video Input Multi Color Receiver Illumination Display Detachable Stereo Face Wireless BT Connectivity Built in Wireless BT for Wireless Music Streaming Hands Free Calling Ability with Built in Microphone Compatible with All of Your Favorite Bluetooth Devices iPhone Androids Smartphones iPad Tablets etc Convenient Contac...

Page 23: ...o Auto Store Preset Scan Wireless BT A2DP AVRCP Support Impedance 4 Ohm Signal to Noise Ratio 70dBA Frequency Response 20Hz 20kHz PLL Synthesizer Tuner 30 Station Memory ESP Electronic Shock Protection Anti Shock Mechanism Anti Shock Mechanism ESP Function LO DX ST MO Selector PLL Synthesizer Tuner Clock Mute Preset EQ Treble Bass Balance Fader Encoder Volume Connection Interface AV RCA Inputs Out...

Page 24: ...Questions Issues We are here to help Phone 1 718 535 1800 Email support pyleusa com ...

Reviews: