background image

BASIC OPERATION

10

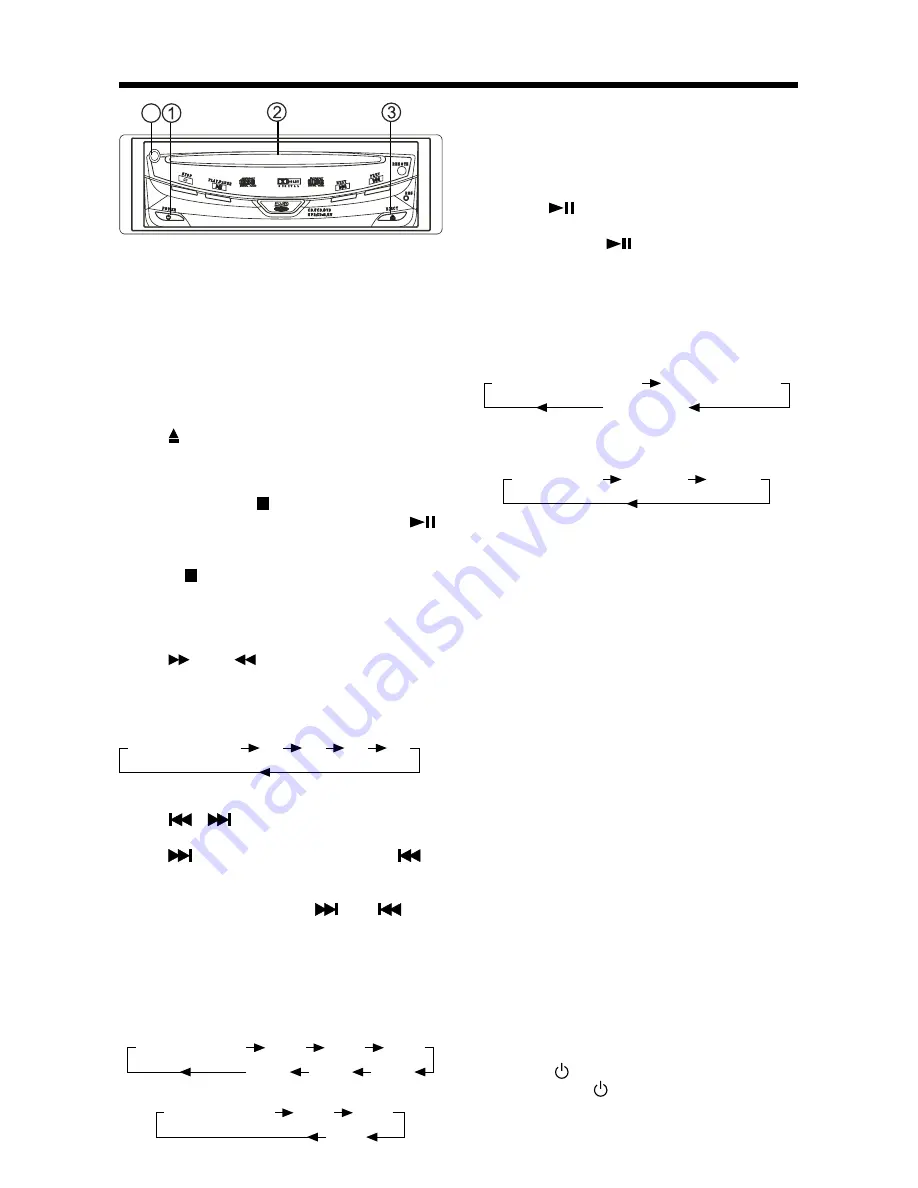
Loading a DVD/VCD/CD Disc

1. Turn the ignition on the accessory 

position.

2. Press the POWER button (1).
3. Insert the disc with printed side facing

up into the disc slot (2).

4. The player starts playback 

automatically.

Ejecting a Disc

Press   (EJECT) button (3) to eject the
disc.

Stopping Play

- Brief press the   (Stop) button to stop

the unit playback, when press the 
(Play) button it can continuous normal
playback.

- Press   (Stop) button twice, it will stop

the playback and go back to initial 
Track/Chapter.

Rapid Forward/Rapid Reverse

Press 

 FF & 

 REW during play.

Each time the button is pressed, the
speed of rapid forward/reverse changes
according to the disc as follow.
DVD/VCD/CD/MP3:

Skipping Track

Press 

 / 

 on the remote handset or

 front panel during playback.
Press 

 to skip to next track, and 

 to

back one track.
Note:  For some VCD 2.0 discs
(PBC-playback control), 

 and 

buttons may be unavailable.

Slow Motion Play

Press slow button during playback.
Each time the button is pressed, the slow
mode changes according to the disc as follow.
DVD:

VCD:

Normal Playback

2X

4X

6X

8X

Note:  For VCD, in any slow mode, press
ENTER button to return to normal
playback.

Pause (still picture)

Pressing 

 during playback will stop

play temporary.  Return to normal
playback, press 

 once again.

Repeat

Press the REPEAT button to select repeat
mode as follow.
DVD:
Press the REPEAT button to select repeat
mode as follow.

VCD/CD:
Press the REPEAT button to select repeat
mode as follow.

1. Continuously repeat at the current chapter/

track, when selected REP-ONE mode.

2. Select REP-ALL mode to continuously 

repeat all chapter/track on the current disc.

3. When the player finish playback the current

disc last chapter/track, it will stop display
the elapsed time.  When selected REPEAT
OFF mode (REP-ONE & REP-ALL 
disappear at the screen display).

4. REPEAT feature does not support 

VCD2.0 (with PBC ON).

Aux input jack (4)

When the unit connect external A/V you
can press the AUX on the remote controller
to switch to the aux input mode.

Reset

Reset button is placed on the front panel
and must be activated with a ball point
pen or thin metal object.  Reset button is
to be activated for the following reasons:
• Initial installation of the unit when all 

wiring is completed.

• All the function buttons do not operate.
• Error symbol on the display.

Remote Sensor (IR)

Point the remote handset to the remote sensor.
Receive the signal from remote handset.

Turning the player on/off

Press the   (POWER) button on front of
panel or press   (POWER) button on
remote control to turn the player on or off.

Normal Playback

SF 2X

SF 4X

SF 8X

SR 8X

SR 4X

SR 2X

CHAPTER REPEAT ON

TITLE REPEAT ON

REPEAT OFF

REPEAT OFF

REP-ONE

REP-ALL

Normal Playback

SF 1X

SF 2X

SF 3X

4

Summary of Contents for PLDVD134F

Page 1: ...n Multi audio Languages Function Multi angle Function Parental Control AUX OSD DISPLAY POWER SLOW TITLE AUDIO SUBTITLE A B MUTE PLAY PAUSE PBC STOP MENU ANGLE REPEAT GOTO ZOOM 3 2 1 4 SETUP 10 EJECT E...

Page 2: ...cessive moisture This could cause electrical shorts fire or other damage When Parked Parking in direct sunlight can produce very high temperatures inside your vehicle Give the interior a chance to coo...

Page 3: ...tion 11 Multi audio Language Function 11 Title Menu Function For DVD only 12 Multi subtitle Language Function For DVD only 12 Multi angle Function For DVD only 12 MP3 Disc Play 12 Using the FM modulat...

Page 4: ...LY THE RECOMMENDED ACCESSORIES THIS DEVICE IS INTENDED FOR CONTINUOUS OPERATION This product incorporates copyright protection technology that is protected by method claims of certain U S patents and...

Page 5: ...uch as benzine thinner or conventional record cleaners as they may mar the surface of the disc Note A disc may become somewhat scratched although not enough to make it unusable depending on your handl...

Page 6: ...sides of unit with screws M4x6 last install the unit with screws M5x25 2 When fix the unit you can slide the screw M5x25 to left side or right side to meet your needed position In the figure above se...

Page 7: ...DC 12 V OUT _ REMOTE DIGITAL AUDIO A V OUT L R VIDEO DVD PLAYER AC DC ADAPTOR OPTIONAL YELLOW RED WHITE VIDEO OUT AUDIO R OUT AUDIO L OUT REMOTE CONTROL RECEIVER CIGARETTE LIGHTER OPTIONAL 7 DIGITAL A...

Page 8: ...rack press to skip back one track 10 ZOOM Press it to zoom the picture in scale x1 5 x2 0 x3 0 11 Press to start forward rapidly to reverse rapidly 12 SETUP Display the SETUP menu 13 DISPLAY Display s...

Page 9: ...positive and negative terminals of the batteries are oriented indicated 3 Close the battery cover Using the Remote Control Face the remote control towards the player front face IR mark remote control...

Page 10: ...s once again Repeat Press the REPEAT button to select repeat mode as follow DVD Press the REPEAT button to select repeat mode as follow VCD CD Press the REPEAT button to select repeat mode as follow 1...

Page 11: ...und On Screen Display Function Press the DISPLAY button during playback to display the contents of the current disc on the screen Example DVD 1 Press DISPLAY for the first time Title Number Total Titl...

Page 12: ...work for discs having scenes recorded at different angles When no different angle are recorded will be displayed at screen left top corner BASIC OPERATION 12 MP3 Disc Play MP3 disc is playing in the D...

Page 13: ...CE SETUP This setup page includes all the configuration of support feature The detail please refer to PREFERENCES SETUP MENU GENERAL SETUP GENERAL PAGE TV display setup This is to select the appropria...

Page 14: ...AL PAGE OSD LANG type setup Select the preferred OSD language by using the buttons GENERAL PAGE CAPTIONS setup Activate the CAPTIONS feature by selecting ON And release this feature by selecting OFF T...

Page 15: ...nnection by using the cursor buttons Select the LT RT to activate the Dolby surround compatible output Select the STEREO to activate simple stereo mode AUDIO SETUP AUDIO SETUP AUDIO OUT This is to act...

Page 16: ...he LPCM OUTPUT between LPCM 48K and LPCM 96K PREFERENCES SETUP PREFERENCES PAGE TV type setup This player can play discs recorded in either PAL or NTSC format Select NTSC format when you connected to...

Page 17: ...by pressing ENTER button TV TYPE AUDIO SUBTITLE DISC MENU PARENTAL PASSWORD DEFAULTS FM MODULATOR MP3 PLAYER MAIN PAGE 1 G 2 3 PG 4 PG 13 5 6 PG R 7 NC 17 8 ADULT NO_PARENTAL TV TYPE AUDIO SUBTITLE D...

Page 18: ...And release this feature by selecting OFF Note The built in FM Modulator is an optional feature PREFERENCES PAGE Mp3 PLAYER In this item you can select NO MENU mode or WITH MENU mode TV TYPE AUDIO SUB...

Page 19: ...ON SCR Saver ON Speaker Setup Downmix Stereo Audio Setup Audio Out Analog OP Mode Line Out Dynamic FULL LPCM Output LPCM 96K Preferences TV Type AUTO Audio English Subtitle English DISC Menu English...

Page 20: ...ow and Flutter Below measurable limits Note Specifications and design are subject to modification without notice due to improvements in technology This product incorporates copyright protection techno...

Reviews: