background image

7

Configuration

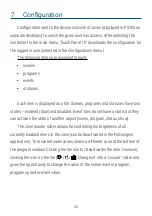
Configuration sent to the device consists of zones (displayed in PX703 as 

separate desktops) to which the given user has access. After selecting the 
controller fro the main menu, Touch Panel 10" downloads the configuration for
the logged in user (selected in the 

Configurations

 menu).

The following items are assigned to each:

scenes

programs

events

statuses

Each item is displayed as a tile. Scenes, programs and statuses have two 

states – enabled (blue) and disabled. Event tiles do not have a state, but they 
can activate the state of another object (scene, program, status, show).

The zone master slider allows for controlling the brightness of all 

currently enabled items in the zone (can be deactivated in the PxDesigner 
application). To move between zones, select a different zone at the bottom of 
the program window. Clicking the tile starts / deactivates the item. However, 
clicking the icon on the tile (  /   /  ) changes it into a “circular” slider and 
gives the opportunity to change the value of the scene master, program, 
program speed or event value.

28

Summary of Contents for PX703

Page 1: ...PX703 Touch Panel 10 User manual ...

Page 2: ...tration 21 5 6 1 Change password 22 5 6 2 Restore to default settings 23 5 6 3 Restart device 24 5 6 4 Remove all configurations 25 5 6 5 Advanced tools 26 6 Structure of the application window 27 7 Configuration 28 7 1 Scene 29 7 2 Program 29 7 3 Status 30 7 4 Events 30 8 Recovery button 31 9 Firmware update from USB 32 10 WWW interface 32 11 Montage 35 12 Connection scheme 40 13 Dimensions 42 14...

Page 3: ...ves the right to make modifications in order to improve device operation PXM Marek Żupnik sp k Podłęże 654 32 003 Podłęże BDO register number 000005972 tel 48 12 385 83 06 mail info pxm pl www pxm pl Rev 1 0 14 05 2020 3 ...

Page 4: ...riate access rights and the appropriate controller configuration via the PxDesigner application description of creating the configuration was placed in the PxDesigner manual available on the manufacturer s website Touch Panel 10 can be powered by 12 24V DC voltage in addition it has the ability to power PoE Power over Ethernet in IEEE 802 3af standard which allows you to power the device via twist...

Page 5: ...ctors should be protected against mechanical and thermal damage 3 In the event of damaging any conductor it should be replaced with a conductor of the same technical data and attestation 4 All repairs and connections of outputs can only be made with cut off power supply 5 PX703 should be strictly protected against contact with water and other liquids 6 All sudden shocks particularly dropping shoul...

Page 6: ...3 Connectors and control elements Back of the device 6 USB port Ethernet PoE connector recovery mode button 12 24V DC power supply ...

Page 7: ...es NOTE To make available devices appear in the start page they must first be added to the Configurations menu see section 5 4 Configurations 7 list of available controllers in the network with which the user can connect the device name is displayed button that opens the menu with the device settings ...

Page 8: ...roller to the PX703 you can open the configuration and control it yellow the device is in the network and the connection has been established but the wrong username or password is entered in the Configurations menu red a connection has been established with the device but it was interrupted To reconnect to the device wait 10 seconds until the list of drivers available on the network is refreshed 8...

Page 9: ...g the menu a window containing the following tiles will appear 9 clock settings network settings display settings configuration management drivers device and manufacturer information administration tools return to the main window ...

Page 10: ...TP server and select the time zone The Time settings window looks like this To change the date and time click on left side of the Time settings window A new window will appear in which you can change the time by moving the roller up or down and the date by selecting the appropriate on from the calendar 10 ...

Page 11: ...able the NTP server and specify two servers from which the Touch Panel 10 will obtain the date and time PX703 must be connected to the internet NTP servers can be found at https www ntppool org Below the NTP setting is the zone selection 11 ...

Page 12: ...you can enter the network settings manually or enable automatic addressing DHCP If the connection is active the green circle indicating the connection status lights up with the Ethernet inscription Red circle indicates a connection problem such as an unconnected Ethernet cable NOTE When making any changes to the settings save them by clicking the button in the upper right corner of the screen you ...

Page 13: ...a DHCP enabled all networks settings are downloaded automatically b DHCP off network settings are set manually NOTE Pleas note that PX703 must be on the same network as the drivers to connected to 13 ...

Page 14: ...which the brightness change will be introduced This menu is also responsible for changing the interface language Polish English NOTE When making any changes to the settings save them by clicking the button in the upper right corner of the screen you can also exit without saving them by selecting the button in the upper left corner of the screen 14 ...

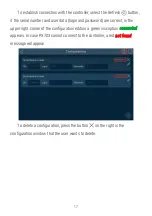
Page 15: ...he button in the bottom right corner of the screen To edit the configuration controller press the button after selecting it the SN Login and Password fields will be activated and they will be editable Enter the device SN serial number Login and Password of the user to be connected to the controller 15 ...

Page 16: ...After entering the login data for the controller press the edit button again to deactivate the option of editing the fields then press the save changes button in the upper right corner of the screen 16 ...

Page 17: ...d password are correct in the upper right corner of the configuration edition a green inscription connected appears In case PX703 cannot connect to the controller a red not found message will appear To delete a configuration press the button on the right in the configuration window that the user wants to delete 17 ...

Page 18: ...delete all configurations by selecting the Administration tile and then Remove all configurations see section 5 6 Administration NOTE Only the configuration with the connected status is visible on the main screen 18 ...

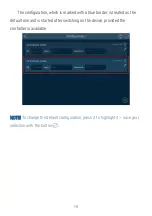
Page 19: ...with a blue border is treated as the default one and is started after switching on the device provided the controller is available NOTE To change the default configuration press it to highlight it save your selection with the button 19 ...

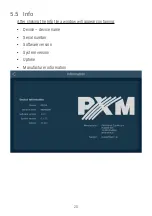
Page 20: ...5 5 Info After clicking the Info tile a window will appear containing Device device name Serial number Software version System version Uptime Manufacturer information 20 ...

Page 21: ...ation The Administration tab looks like this 21 change password access to all settings deleting all configurations saved in the device s memory restart the device go to advanced settings restoring defaults settings ...

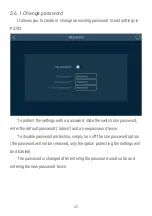
Page 22: ...de the switch Use password enter the default password admin and a new password twice To disable password protection simply turn off the Use password option the password will not be removed only the option protecting the settings will be disabled The password is changed after entering the password used so far and entering the new password twice 22 ...

Page 23: ...r right corner of the screen you can also exit without saving them by selecting the button in the upper left corner of the screen 5 6 2 Restore to default settings Resets the device to default settings the device displays the message Are you sure you want to restore to defaults settings 23 ...

Page 24: ...5 6 3 Restart device Restarts the device the device displays the message Are you sure 24 ...

Page 25: ...5 6 4 Remove all configurations Deletes all configurations saved in the device s memory the device displays the message Are you sure you want to remove all configs 25 ...

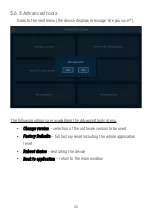
Page 26: ...e The following options are available in the Advanced tools menu Change version selection of the software version to be used Factory Defaults full factory reset including the whole application reset Reboot device restarting the device Back to application return to the main window 26 ...

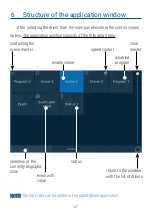
Page 27: ...The application window consists of the following items NOTE The tile order can be edited in the smartphone application 27 selection of the currently displayed zone status event with value return to the window with the list of drivers enable scene disabled program zone master controlling the scene master speed control ...

Page 28: ...d statuses have two states enabled blue and disabled Event tiles do not have a state but they can activate the state of another object scene program status show The zone master slider allows for controlling the brightness of all currently enabled items in the zone can be deactivated in the PxDesigner application To move between zones select a different zone at the bottom of the program window Clic...

Page 29: ... can be changed is indicated by the symbol Clicking on changes the tile into a circular slider Exiting the scene master edit is possible after clicking the icon 7 2 Program For a program you can control the master value and speed Clicking the program tile switches its state on off The tile color indicates the currently state of the scene navy blue when it is disabled and blue when it is enabled Cl...

Page 30: ...ich sends an appropriate event to the controller every time it is pressed on The tile is highlighted when it is clicked Event with value Clicking the icon displays a circular slider on which you can select the value to be sent to the device NOTE The sent value to the device in the event of an event opposed to change of scene or program master is sent after selecting the set value with the slider a...

Page 31: ...X703 After starting this mode the Advanced Tools window will be launched in Advanced Tools menu the available options are Reset Password reset the password you must enter a new one Change version selection of the software version to be used Factory Defaults full factory reset including the reset of the entire application Reboot device restarting the device Back to application return to the main wi...

Page 32: ...t automatically 6 After update is completed a message will be display instructing you to disconnect the pendrive 7 Then the device will reboot automatically NOTE The firmware bin file is available for download from the manufacturer s website http pxm pl 10 WWW interface PX703 can be managed from a web browser To do this go to http device_IP_address e g 192 168 1 100 the IP address can be checked b...

Page 33: ...anagement page you can set exactly the same parameters as using the setting i e Time and Date change the time date zone or NTP server settings Ethernet Network network setting such as DHCP IP mask gate DNS and host name 33 ...

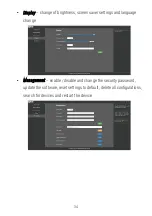
Page 34: ...htness screen saver settings and language change Management enable disable and change the security password update the software reset settings to default delete all configurations search for devices and restart the device 34 ...

Page 35: ...ing the box in the wall you can proceed to install the screen First connect the cabling and then apply the PX703 to the box with its upper part so that the tooth protruding from the screen enters the hole in the metal box 35 ...

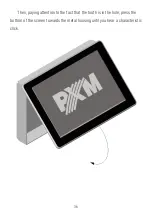
Page 36: ...Then paying attention to the fact that the tooth is in the hole press the bottom of the screen towards the metal housing until you hear a characteristic click 36 ...

Page 37: ...The screen mounded in this way is ready for use 37 ...

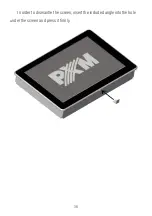
Page 38: ...In order to dismantle the screen insert the included angle into the hole under the screen and press it firmly 38 ...

Page 39: ...When the metal angle is inserted under the screen and pressed down swing the bottom of the screen down and pull it towards you 39 ...

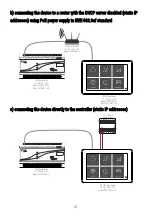
Page 40: ...d 40 12 24V DC power supply V V L N REMOTE 10V 0 10V OUT 2 1 1 2 3 4 0 10V IN 1 1 2 3 4 6 7 8 5 10 11 12 9 14 15 16 13 SS 1 RX RX TX TX KBD VCK EXT SYNC PX340 controller with DHCP server enabled router with DHCP server enabled without PoE PX703 touch panel with DHCP enabled power from an external power supply ...

Page 41: ... 13 SS 1 RX RX TX TX KBD VCK EXT SYNC PX340 controller IP 192 168 1 101 PX703 touch panel Mask 255 255 255 0 IP 192 168 1 102 Mask 255 255 255 0 12 24V DC power supply V V L N REMOTE 10V 0 10V OUT 2 1 1 2 3 4 0 10V IN 1 1 2 3 4 6 7 8 5 10 11 12 9 14 15 16 13 SS 1 RX RX TX TX KBD VCK EXT SYNC PX340 controller router with PoE PX703 touch panel IP 192 168 1 102 Mask 255 255 255 0 IP 192 168 1 101 Mas...

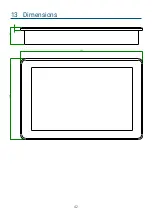
Page 42: ...13 Dimensions 42 5 37 264 175 ...

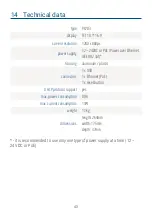
Page 43: ...thernet IEEE 802 3af housing aluminum plastic connectors 1 x USB 1 x Ethernet PoE 1 x reset button DHCP protocol support yes max power consumption 0 9A max current consumption 11W weight 1 1kg dimensions length 264mm width 175mm depth 37mm it is recommended to use only one type of power supply at a time 12 24V DC or PoE 43 ...

Page 44: ...0 2018 EN 55103 2 2009 EN 61000 4 2 2009 EN IEC 61000 6 1 2019 EN 61000 6 3 2007 and meets the essential requirements of the following directives 2011 65 UE DIRECTIVE OF THE EUROPEAN PARLIAMENT AND OF THE COUNCIL of 8 June 2011 on the restriction of the use of certain hazardous substances in electrical and electronic equipment Text with EEA relevance 2014 30 UE DIRECTIVE OF THE EUROPEAN PARLIAMENT...

Reviews: