background image

15 CPU temperature

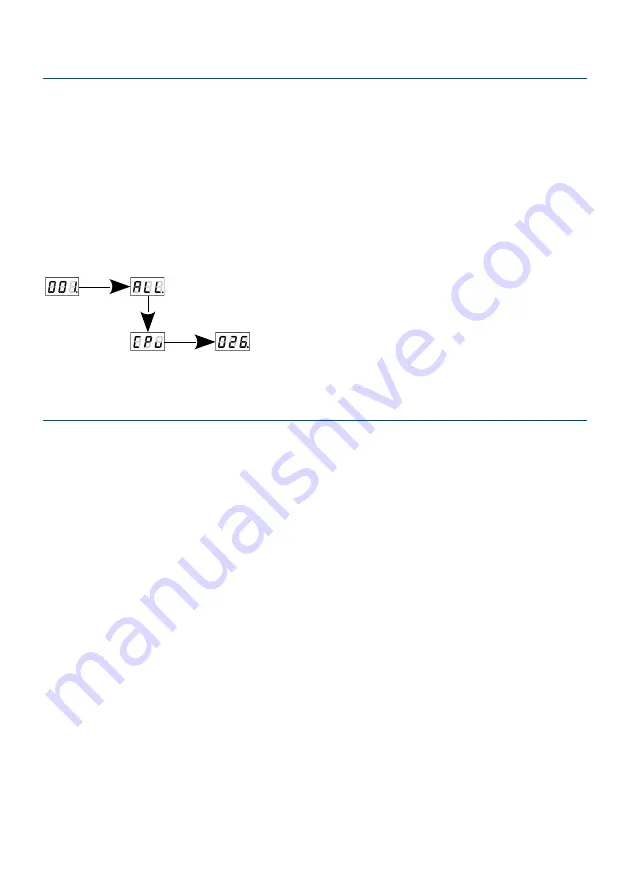
The PX282 has a built in processor temperature measurement function. If

the temperature exceeds 70°C, the temperature limitation is activated linearly 
decreasing the current on the outputs from the device. After reaching of 
the 82°C the total exclusion of all outputs is taking place. To check the current
CPU temperature You should go to the "

CPu

" menu.

16 Default settings and device errors

If you have any difficulty accessing the device menu, e.g. it is not possible

to enter a particular menu level or it is necessary to restore the device to its
default settings, follow the instructions below.

In the first case, when a particular menu level cannot be accessed or

menu items are displayed incorrectly, this may indicate that a saving-in-
memory error has occurred. In such a case, try to restore the device to its
default settings before sending the PX282 to the service center. If, after
restoring to its default settings, the device still does not operate correctly,
please send it to our service center.

21

ENTER

 4 x NEXT

ENTER

Summary of Contents for LED driver 3x6A/OC

Page 1: ...PX282 LED driver 3x6A OC User manual ...

Page 2: ...response 13 9 1 Descriptions of programs 15 10 Master Slave function 16 11 White balance 17 12 Smooth 18 13 Light control frequency 19 14 Screen saving screen blanking 20 15 CPU temperature 21 16 Default settings and device errors 21 16 1 Restore default settings 22 16 2 Error message 23 16 3 Overloading the device 23 17 DMX signal connecting 24 18 RDM available parameters 25 19 Programming 28 20 ...

Page 3: ...ves the right to make modifications in order to improve device operation PXM Marek Żupnik sp k Podłęże 654 32 003 Podłęże BDO register number 000005972 tel 48 12 385 83 06 mail info pxm pl www pxm pl Rev 2 2 26 11 2018 3 ...

Page 4: ...olling the parameters of channels is completely smooth Moreover the driver offers an effect control mode which allows for controlling the programs that are built into the device and at the same time changing such parameters as speed brightness and fade settings using the DMX 512 signal sent from an external controller PX282 also supports DMX RDM protocol with is extension of DMX 512 protocol The d...

Page 5: ...nical data 2 All the conductors should be protected against mechanical and thermal damage 3 In the event of damaging any conductor it should be replaced with a conductor of the same technical data 4 Connection of power supply can only be made with a conductor of minimum cross section area of 2 5mm2 and DMX signal with shielded conductor 5 All repairs and connections of outputs or DMX signal can on...

Page 6: ...n places with temperature lower than 2 C or higher than 40 C 10 Clean with damp duster only 3 Connectors and control elements 6 www pxm pl DMX 512 input DMX 512 output display programming keys control outputs power supply 12 24V DC ...

Page 7: ... Lightness Colour etc no DMX signal response method selection Master Slave mode settings Lightness Colour control mode RGB control mode RGB Dimmer control mode HSL control mode Hue Saturation Lightness effect control mode dynamic white mode all outputs at 100 all outputs off scene programme no 17 DMX address settings for first channel Master mode on off number of channels being sent in the Master ...

Page 8: ...tore default device settings menu message about overloading Red channel when start address is set to 001 message about overloading Green channel when start address is set to 001 message about overloading Blue channel when start address is set to 001 message about overloading all RGB channels Temperature inside the device In case when MASTER feature is active dot in the lower right corner starts to...

Page 9: ...nd confirms changes made 6 Group DMX address settings The menu of the PX282 driver allows for setting the DMX address within a range between 1 and 506 511 depending on work mode of device For example in RGB mode it occupies three consecutive DMX addresses If start address is set to 510 the last channel is occupied by address 512 To set the DMX address 1 Set the Adr function 2 Use the next or prev ...

Page 10: ...DMX address to every output channel The simplest example of implementation of this function is to control the lightness of one color LEDs connected to all outputs In such case the same address must be assigned to all channels so that all outputs are controlled by one slider on the control panel 10 ENTER NEXT ENTER ENTER NEXT NEXT NEXT ...

Page 11: ...tion is implemented dimming all outputs The 3b mode 3 channel 3 byte each colour R G B can be set separately The 2b mode 2 channel 2 byte consists in selecting lightness and one of the 256 colors define by the manufacturer The dW dynamic white control of channel cold white warm white by means of two DMX channels The first DMX channel is responsible for colour temperature and the other channel for ...

Page 12: ... Program 5 x x x 40 47 Program 6 x x x 48 55 Program 7 x x x 56 63 Program 8 x x x 64 71 Program 9 x x x 72 79 Program 10 x x x 80 87 Program 11 x x x 88 95 Program 12 x x x 96 103 Program 13 x x x 104 111 Program 14 x x x 112 119 Program 15 x x x 120 127 Program 16 x x x 128 135 Program 17 x x x 136 143 Program 18 x x x 144 151 OFF x x x 152 169 Strobo 10 x x x x x 170 199 Strobo 20 x x x x x 200...

Page 13: ...elected mode sign no possibility to control a given parameter of a selected mode 9 No DMX signal response This function is used both to protect the installation against the DMX signal loss and to obtain control over LEDs without connecting an external controller Once it is activated if there is no DMX signal the module will realize a desired function independently Reconnecting the DMX signal will ...

Page 14: ... self programmed scene in which it possible to set values for RGB colors rEd Grn bLu in range 0 255 for each colour separately Additionally can set the scene entry time SPd after decay DMX signal in range 0 1 99 9s on activation of all outputs at 100 with the possibility of setting the switch on time SPd all outputs after decay DMX signal oFF disabling all outputs after DMX signal loss 14 ENTER 2 ...

Page 15: ...channel blanking P01 P02 P03 P04 P05 P06 P07 P08 P09 Step 1 R 255 0 0 0 255 255 0 0 255 G 0 0 0 0 0 0 255 255 0 B 0 255 0 0 0 0 255 0 0 Step 2 R 0 0 255 0 255 255 255 0 0 G 255 255 0 0 255 0 0 0 0 B 0 0 0 255 0 255 255 255 255 Step 3 R 0 255 0 0 0 0 255 G 0 0 0 0 255 0 255 B 255 0 0 0 0 255 0 Step 4 R 0 0 0 0 G 255 255 255 255 B 0 0 255 255 Step 5 R 0 0 0 0 G 0 0 0 255 B 0 0 255 0 Step 6 R 0 255 2...

Page 16: ...an be controlled from any desktop or controller running in this standard Moreover it is equipped with a programmable function of response to no DMX signal noS With 18 built in default programs it is possible to obtain interesting effects without an external controller However in larger installations several PX282 drivers implementing the same program cannot provide a full playback synchronization ...

Page 17: ...frequency When the PX282 is receiving DMX 512 signal it starts to blink with 2 times bigger frequency 0 5Hz 11 White balance Sometimes there can be problems with getting white colour on the RGB series LEDs This may be a result of using diodes with different technical parameters For this reason the PX282 module is equipped with a white balance function This option allows for choosing a correct colo...

Page 18: ... to changes in lightness are smooth with no visible twitches which prevents the common light vibrations effect Two consecutive DMX values sent to the lamp are smoothed linearly between the DMX signal packets for the selected option or the time interval set in the menu in range 10 999ms The smooth function may slightly slow down the lamp s response rate to changes in the DMX signal therefore it is ...

Page 19: ...leasant flickering effect which is caused by improper signal synchronization that controls the LEDs The user can choose from the available frequency range from 366Hz up to 25 0kHz which can be smoothly changed using the prev or next buttons and selecting a different value The frequency value in the upper range e g 1 50 1 5kHz helps to avoid the flickering effects that are visible in video cameras ...

Page 20: ... option is marked with the SCr sign With this feature the display is turned off after about 60s if the keys of the device are not pressed Of course the device continues its operation without interfering with other parameters Press any key to restore the backlight 20 ENTER ENTER 2 x NEXT NEXT ENTER ENTER 3 x NEXT NEXT ...

Page 21: ...any difficulty accessing the device menu e g it is not possible to enter a particular menu level or it is necessary to restore the device to its default settings follow the instructions below In the first case when a particular menu level cannot be accessed or menu items are displayed incorrectly this may indicate that a saving in memory error has occurred In such a case try to restore the device ...

Page 22: ...splayed If this message is accepted by pressing enter the default settings will be restored The user can also exit this menu level without restoring the default settings In order to do this press the esc key Please note that after restoring to default settings all the operating parameters of the device will revert to the following ones DMX address 1 driver operating mode RGB 3b 3 byte master mode ...

Page 23: ... case of exceeding the permissible load on the display starts to display a flashing sign r when the load is exceeded on the R red G for channel G green and b for channel B blue Starting from firmware version 2 03 there has been introduced an update that any overload or short circuit on the output channel causes channel shut down and than a slow and smooth transition to a previously predetermined v...

Page 24: ...ol cable That means that DMX line from the signal source must be connected to DMX IN pins of PX282 and later directly from DMX OUT pins to the next device in DMX chain If the PX282 is the last DMX chain receiver there should be terminator resistor 120 Ohm mounted between DMX and DMX pins of DMX OUT section 24 ...

Page 25: ...ocol List of RDM parameters supported by the PX282 Parameter name PiD Description SUPPORTED_PARAMETERS 0x0050 all supported parameters PARAMETER_DESCRIPTION 0x0051 description of additional parameters DEVICE_INFO 0x0060 information concerning the device SOFTWARE_VERSION_LABEL 0x00C0 firmware version of the device DMX_START_ADDRESS 0x00F0 DMX starting address of the device Range 1 512 IDENTIFY_DEVI...

Page 26: ...control level of red channel balance BALANCE_GREEN 0x8012 value of control level of green channel balance BALANCE_BLUE 0x8013 value of control level of blue channel balance SMOOTH_DIS_0 P2P_1 TIM_2 0x801A the choice of options relating to the Smooth function SMOOTH_TIME 0x801B Smooth time for tiN function chosen in subsection above NO_SIG_P1 18 SC_19 ON_20 OFF_21 0x801C choice of work mode for No ...

Page 27: ...ograms playback speed settings playing next steps of program PROGRAM_FADE 0x8026 settings of smooth transition between following steps of a program BALANCE ON OFF 0x8027 to activate or deactivate the balance of output channels PWM_FREQENCY 0x8028 LEDs refresh frequency SERIAL_NUMBER 0x8030 device serial number editable parameter 27 ...

Page 28: ...19 Programming 28 ENTER NEXT ENTER ENTER NEXT ENTER NEXT NEXT NEXT NEXT NEXT NEXT ENTER NEXT ENTER NEXT NEXT NEXT ENTER NEXT ENTER NEXT NEXT NEXT next page ...

Page 29: ...29 previous page ENTER ENTER NEXT NEXT NEXT ENTER NEXT NEXT NEXT ENTER NEXT NEXT NEXT ENTER NEXT ENTER NEXT NEXT NEXT ENTER NEXT NEXT ...

Page 30: ...al LED strips are supplied with 12V DC then the PX282 has to be connected also the 12V DC power supply with adequate power in the case of using LED strips supplied with 24V DC the PX282 has to be connected to 24V DC power supply that power is matched to the length of the strip Schematic connection of LEDs R G B www pxm pl 30 ...

Page 31: ...m pl 22 Technical data type PX282 DMX channels 512 RDM protocol support yes power supply 12 24V DC max current consumption 18A power consumption without load max 0 8W output channel number 3 control accuracy 16 bit programmable scenes 1 31 ...

Page 32: ...built in programs 18 outputs current capacity 6A channel output sockets screw connectors Master mode yes weight 0 1kg dimensions width 35mm 2 DIN rail modules height 90mm depth 58mm 32 ...

Page 33: ...00 2018 EN 61000 4 2 2009 EN IEC 61000 6 1 2019 EN 61000 6 3 2007 and meets the essential requirements of the following directives 2011 65 UE DIRECTIVE OF THE EUROPEAN PARLIAMENT AND OF THE COUNCIL of 8 June 2011 on the restriction of the use of certain hazardous substances in electrical and electronic equipment Text with EEA relevance 2014 30 UE DIRECTIVE OF THE EUROPEAN PARLIAMENT AND OF THE COU...

Reviews: