


11
EN
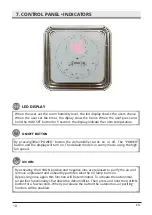
HUMIDITY SET BUTTON
By pressing this button, the dehumidifier passes from continuous CONT mode to
smart mode. Press this button to set the desired humidity as follows from 40% to 80%
in 5% increments of:
40%
→
45%
→
50%
→
55%
→
60%
→
65%
→
70%
→
75%
→
80%
→
--
.
When the internal humidity is less than the adjusted humidity, the compressor will
stop automatically. The optimum humidity is between 50% - 60%. When the humidity
is set to "--%", the dehumidifier switches to CONT (constant drying / drying of clothes),
after 5 seconds the light "HUMSET" goes off and "CONT" indicator lights up.
After adjusting the desired humidity, the machine stops flashing in 5 seconds to show
the current ambient humidity.
Press and hold this key for 3 seconds, and the display shows the current ambient
temperature.
TIMER BUTTON
By pressing this button you can set between 1-24 hours of working time. When the
user sets the time of use, it will apear on the display. When the set is ''00'', it means
that the timer function has been canceled.
Press this button to adjust the fan speed. Each time you press the button the speed
changes between normal speed and high speed. At high speed the indicator light is
red, at low speed the indicator light is blue.
FAN SPEED
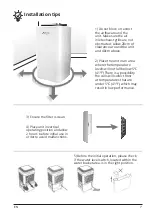
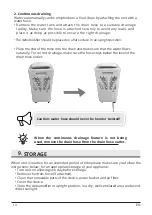
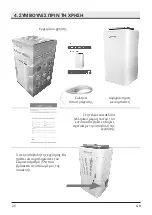
Dryer
Dryer mode
:
In this mode, the product works without stopping, despite the room's
humidity level. This is ideal for making sure that the clothes are perfectly dry.
• For drying clothes: place the dehumidiifer in a small room and set nearby the
clothes rack. Keep doors shut and allow the dehumidiifer to dry the clothes.
• For optimal results manual wringing of the clothes is suggested.
• Allow 30-50cm distance from the moist clothe..
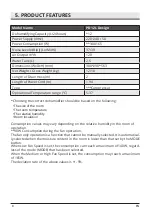
Summary of Contents for PD 12L Design
Page 1: ...USER S MANUAL ENGLISH DEHUMIDIFIER PD 12L Design...
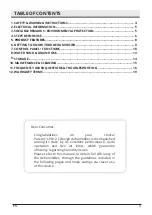
Page 2: ...LANGUAGES ENGLISH 3 23...
Page 23: ...1 24 2 25 3 25 4 26 6 29 7 30 9 33 11 35 10 34 36 PD12L Design 5 28 8 12 39 GR 23...
Page 24: ...1 l 8 l l l l l l l l l 3 l l l l l l l l l l l l l l l l 24 GR...
Page 25: ...24 2 l l l l l l l l PCB T 3 15A 250V 350V 3 l 2002 96 EC 27 2003 l CO2 l A B 25 GR...
Page 26: ...26 SN 4 GR...
Page 27: ...27 1 2 5 C 41 F 5 C 41 F 3 4 2 5 GR 20cm...
Page 29: ...29 GR 6...
Page 30: ...7 LED DISPLAY HUM SET 5 30 GR ON OFF BUTTON POWER CONT POWER CONT SPEED UV ION UV UV UV UV ION...
Page 33: ...GR 8 O 1 33...
Page 34: ...GR 34 2 9 24...
Page 35: ...35 10 l 5 GR...
Page 36: ...GR 36 11 HEPA 50 60...
Page 37: ...GR 37 2 5 Dryer O Dryer l l l l l l l l l l l...
Page 38: ...l l l l l l l l l l l l CL 5 C CH 38 C LO 20 RH HI 95 RH E1 2 38 GR...
Page 39: ...12 GR 39 Silver 2 Puredry Hellas EE Silver Puredry Hellas Puredry...
Page 41: ...1 6 2018 2 Puredry Puredry Puredry Puredry Hellas EE service 15 GR 41...
Page 42: ...l link https www puredryhellas com egguiseis l email 42 GR...


