background image

8

EN

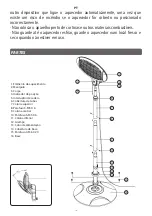
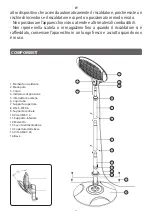
1. Heating Element Assembly 

2. Knob 

3. Body 

4. Position Indication Plate

5. Pull Switch

6. Tube Cover

7. Upper Post Assembly

8. 3-M5 X 6 Screw

9. Middle Post Assembly

10. 3-M5 X 6 Screw

11. Lower Post Assembly

12. Clamp

13. Power Cord

14. Base Cover

15. 4-M6 X 24 Screw

16. Base Assembly

1

2
3

4

5

6

7

8

9

10

11

12
13
14

15

16

PARTS

· Do not use this heater with a programmer, timer or any other device that 

switches the heater on automatically, since a fire risk exists if the heater is 

covered or positioned incorrectly.

· Do not place the appliance close to curtains and other combustible materials.

· Do not store away until the heater cools down, store the heater in cool dry 

location when not in use.

Summary of Contents for HEATY EX2000

Page 1: ...ional Il presente prodotto adatto solo a ambienti correttamente isolati o ad un uso occasionale Dieses Produkt ist nur f r gut isolierte R ume oder f r den gelegentlichen Gebrauch geeignet MANUAL de U...

Page 2: ......

Page 3: ...dades f sicas sensoriales o mentales reducidas o falta de experiencia y conocimiento si se les ha dado la supervisi noformaci napropiadasrespecto alusodelaparatodeunamaneraseguraycomprendenlos peligro...

Page 4: ...tras est en uso Nocoloqueelcalentadorsobreunaalfombra nocolocarelcabledebajodeuna alfombra Mantener el cable fuera de las reas de tr fico para evitar tropiezos No utilizar este calentador cerca de ba...

Page 5: ...M6 X 24 16 Base 1 2 3 4 5 6 7 8 9 10 11 12 13 14 15 16 No utilice este calefactor con un programador un temporizador o cualquier otro dispositivo que encienda el calefactor autom ticamente ya que exi...

Page 6: ...on el tornillo 3 M5X6 4 Unir el elemento calefactor 1 y el poste superior 7 luego fijarlos firmemente girando la perilla y poner el cable de alimentaci n en la abrazadera 5 De acuerdo con la solicitud...

Page 7: ...que ser devuelto a la tienda donde fue comprado para sustituirse de forma gratuita o reembolso del importe Con el fin de obtener un cambio o un reembolso es necesario presentar una prueba de compra al...

Page 8: ...f experience and knowledge if they have been given supervision or instruction concerning use of the appliance in a safe way and understand the hazards involved Children shall not play with the applian...

Page 9: ...not be tripped over Do not use this heater in the immediate surroundings of a bath a shower or a swimming pool Never operate your appliance if it has fallen over Never dismantle your appliance An inco...

Page 10: ...5 4 M6 X 24 Screw 16 Base Assembly 1 2 3 4 5 6 7 8 9 10 11 12 13 14 15 16 PARTS Do not use this heater with a programmer timer or any other device that switches the heater on automatically since a fir...

Page 11: ...ost 9 together with 3 M5X6 screw 4 Join the Heating Element Assembly 1 and the Upper Post Assembly 7 together then fix them tightly by rotating the Knob and put the power cord supply into the clamp 5...

Page 12: ...ned to the retailer where it was purchased to be replaced free of charge or a refund issued In order to obtain an exchange or a refund proof of purchase must be presented to the retailer ES WARRANTY M...

Page 13: ...ni r gler ni nettoyer l appareil et ni r aliser l entretien de l utilisateur Cet appareil peut tre utilis par des enfants g s d au moins 8 ans et par des personnes ayant des capacit s physiques senso...

Page 14: ...il ne se coince ou qu il ne soit endommag faites passer le cordon o il y a peu de circulation N utilisez pas ce radiateur dans les environs imm diats d une baignoire d une douche ou d une piscine Ne...

Page 15: ...Base 1 2 3 4 5 6 7 8 9 10 11 12 13 14 15 16 COMPOSANTS N utilisez pas ce chauffage avec un programmateur une minuterie ou tout autre dispositif qui allume automatiquement le chauffage car il existe un...

Page 16: ...tral 9 avec la vis 3 M5X6 4 Fixez l l ment chauffant 1 et le poteau sup rieur 7 puis fixez les en tournant le bouton et placez le cordon d alimentation dans la pince 5 Selon l application de l angle d...

Page 17: ...ni re gratuite ou contre remboursement du montant d achat Afin de pouvoir l changer ou d tre rembours il est n cessaire de pr senter une preuve d achat au vendeur ES GARANTIE ENTRETIEN AVERTISSEMENT T...

Page 18: ...sido dada supervis o ou instru es relativas utiliza o do aparelho de forma segura e compreendem os perigos envolvidos As crian as n o devem brincar com o aparelho A limpeza e manuten o n o devem ser...

Page 19: ...lize este aquecedor perto de banheiras chuveiros ou piscinas Nunca opere o seu aparelho se este tiver ca do Nuncadesmonteoseuaparelho Umaparelhoreparadoincorrectamentepode ser perigoso para o utilizad...

Page 20: ...imenta o 14 Cobertura de base 15 Parafuso 4 M6 X 24 16 Base 1 2 3 4 5 6 7 8 9 10 11 12 13 14 15 16 PARTES outro dispositivo que ligue o aquecedor automaticamente uma vez que existe um risco de inc ndi...

Page 21: ...9 juntamente com o parafuso 3 M5X6 4 Fixar o elemento de aquecimento 1 e o poste superior 7 depois fix los rodando o bot o e colocar o cabo de alimenta o na bra adeira 5 De acordo com a aplica o do ng...

Page 22: ...lvido para a loja onde foi comprado e substitu do gratuitamente ou reembolsar o valor A fim de obter uma troca ou reembolso voc dever apresentar o comprovante de compra para o vendedor ES GARANTIA ATE...

Page 23: ...erienza e conoscenze insufficienti purch attentamente sorvegliate o istruite su come utilizzareinmodosicurol apparecchioesuipericolicheci comporta Assicurarsi che i bambini non giochino con l apparecc...

Page 24: ...avo sotto un tappeto Tenere il cavo lontano da aree di passaggio per evitare inciampi Non utilizzare il riscaldamento nei pressi di bagni docce o piscine Non mettere mai in funzione l apparecchio se c...

Page 25: ...e 15 Vite 4 M6 X 24 16 Base 1 2 3 4 5 6 7 8 9 10 11 12 13 14 15 16 COMPONENTI altro dispositivo che accenda automaticamente il riscaldatore poich esiste un rischio di incendio se il riscaldatore coper...

Page 26: ...centrale 9 insieme alla vite 3 M5X6 4 Fissare l elemento riscaldante 1 e il supporto superiore 7 quindi fissarli ruotando la manopola e inserire il cavo di alimentazione nel morsetto 5 Secondo l appli...

Page 27: ...to per essere sostituito di forma gratuita o per ottenere il rimborso dell importo Col fine di ottenere una sostituzione del prodotto o un rimborso necessario presentare una prova di acquisto valida a...

Page 28: ...rden unter der Voraussetzung sie werden beaufsichtigt und im sicheren Gebrauch des Ger tes geschult und sind sich der damit verbundenen Gefahren bewusst Sorgen Sie daf r dass Kinder nicht mit dem Ger...

Page 29: ...abel nicht unter dem Teppich Verlegen Sie das Netzkabel fernab von Verkehrsfl chen um Stolperunf lle zu vermeiden Verwenden Sie dieses Heizger t nicht in unmittelbarer N he einer Badewanne Dusche oder...

Page 30: ...lich der Installationsm glichkeiten f r dieses Heizger t haben wenden Sie sich bitte an einen qualifizierten Elektriker Verwenden Sie dieses Heizger t nicht mit einem Programmierger t einer Zeitschalt...

Page 31: ...e 7 und den mittleren Stange 9 zusammen mit der Schraube 3 M5X6 4 Bringen Sie das Heizelement 1 und den oberen Stange 7 an sichern Sie sie dann durch Drehen des Knauf und legen Sie das Netzkabel in di...

Page 32: ...ersonen oder Sachschadenentsch digungen Aufgrund von Unf llen schlechter Bedienung oder Funktionsst rungen sind ausgeschlossen Die Gew hrleistung unterbricht sich wenn das Ger t durch nicht autorisier...

Page 33: ......

Page 34: ......

Page 35: ......

Page 36: ...ues de ce produit sont sujets modifications sans pr avis Vous pouvez t l charger la version actuelle du manuel www purline es O conte do deste manual e as especifica es deste produto est o sujeitos a...

Reviews: