T
P
Z
OPTICS
DATA SHEET
PTZ Optics Specifications & Diagrams
152 Robbins Road Downingtown, PA 19335 PTZOptics.com 800-486-5276
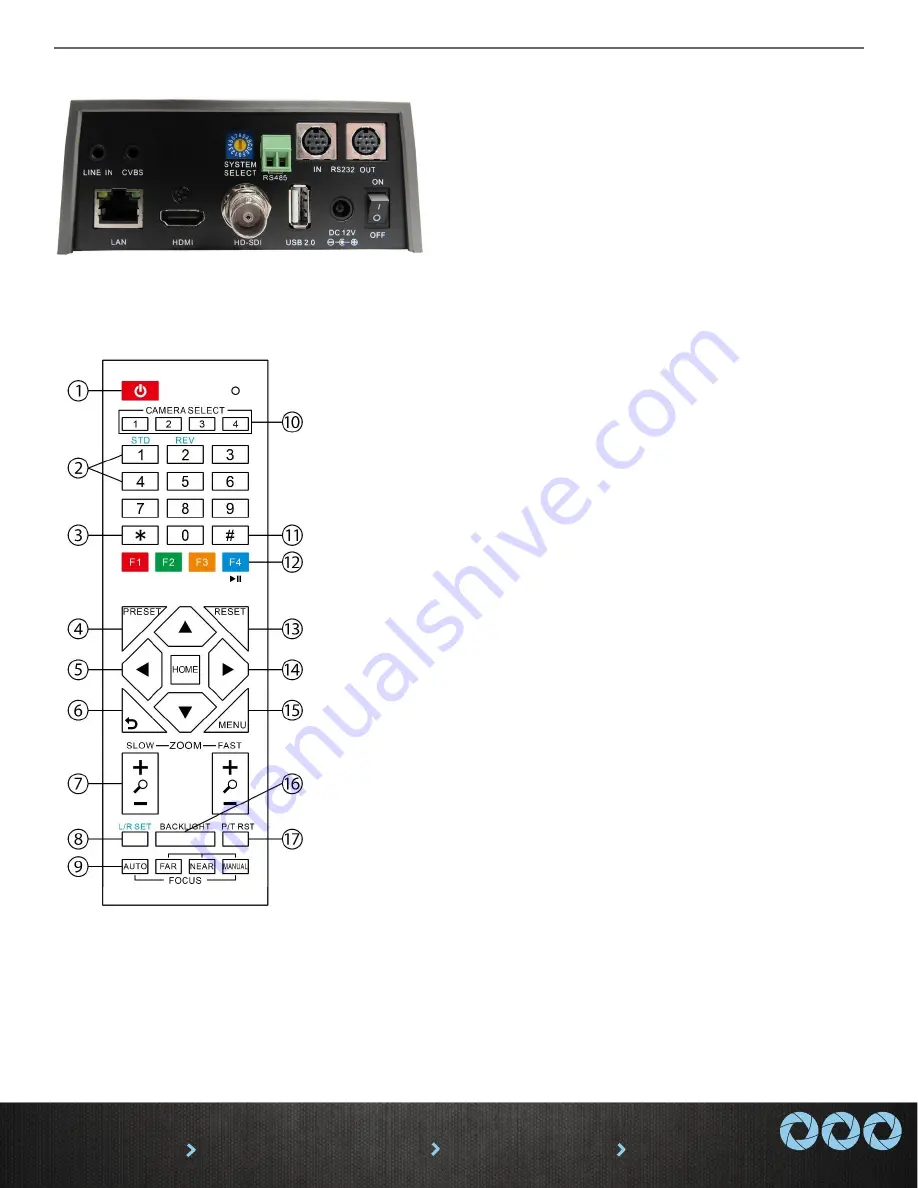
1.
Standby Button
Press this button to enter standby mode.
Press it again to enter normal mode.
NOTE: Power consumption in standby mode
is approximately half of the normal mode.
2.
Position Buttons (0-9)
To set preset or call presets and for Special
Shortcut Functions.
3. * (asterisk) Button
For use with multiple function buttons (see
12)
4&13. Set/Clear Preset Buttons
Set preset: Store a preset position [PRESET]
+ Numeric button (0-9): Setting a
corresponding numeric key preset position.
Clear preset: Erase a preset position
[RESET] + Numeric button (0-9)
Note: [*] + [#] + [RESET]: Erase all presets.
5&14.
Pan/Tilt & Home Control Buttons
Press the arrow buttons to perform panning
and tilting. Press the [HOME] button to face
the camera back to its Home position.
6.
Return Button
Press button to return to previous menu.
7.
Zoom Buttons (Slow & Fast)
Zoom+: Zoom In (Slow and fast speeds)
Zoom-: Zoom Out (Slow and fast speeds)
8.
L/R Set Button
Set the left & right direction of panning
control. Hold [L/R Set] + Press [1]: Normal
panning direction. Hold [L/R Set] + Press [2]:
Left and right panning direction will be
reversed.
9.
Focus Buttons
Used for focus adjustment. Press [AUTO] to
adjust the focus on the center of the object
automatically. To adjust the focus manually,
press the [MANUAL] button, and then
adjust focus with [Far] (focus on far object)
and [Near] focus on near object).
10. Camera Address Select Buttons
Press the button corresponding to the
camera which you want to operate with the
IR remote controller.
11. # Button
For use with multiple function buttons (see
12)
12
.
Multiple Function Buttons
Function 1. Set camera IR address function:
Press 3 keys consecutively to set the camera’s
IR address as follow:
[*] + [#] + [F1]: IR Address 1
[*] + [#] + [F2]: IR Address 2
[*] + [#] + [F3]: IR Address 3
[*] + [#] + [F4]: IR Address 4
Function 2. Image freezing function: Press [F4]
to start the freeze function. The word "Freeze"
displays on the upper left corner. After five
seconds, the display disappears automatically
(though the freeze feature continues). To cancel
the freeze, press the [F4] key the word
"Unfreeze" displays on the upper left corner.
After five seconds, the display disappears
automatically.
15.
Menu Button
OSD Menu Settings: Press this button to enter
or exit the OSD (on screen display) menu.
16.
Backlight Button
Backlight (aka BLC) button: Press this button to
enable backlight compensation. Press it again to
disable backlight compensation.
NOTE: Effective only in auto exposure mode.
NOTE: If there is a light behind the subject, the
subject will appear dark (i.e. silhouetted). In this
case, press the backlight button to turn BLC On.
To cancel this function, press the backlight
button to turn BLC Off.
17. P/T RST Button
Press the button to self-calibrate the pan and tilt
positions and limits.
Special Shortcut Functions
[*] + [#] + [1]: Display OSD menu in English
[*] + [#] + [3]: Display OSD menu in Chinese
[*] + [#] + [4]: Show IP address
[*] + [#] + [6]: Quickly restore default settings
[*] + [#] + [8]: Show the camera FW version
[*] + [#] + [9]: Quickly set mounting mode
(vertical flip / normal)
[*] + [#] + [MANUAL]: Resets IP information
[#] + [*] + [4]: Enable Dynamic IP addressing
[#] + [*] + [#] + [1]: Set IP to 192.168.100.81
[#] + [*] + [#] + [2]: Set IP to 192.168.100.82
[#] + [*] + [#] + [3]: Set IP to 192.168.100.83
[#] + [*] + [#] + [4]: Set IP to 192.168.100.84
[#] + [*] + [#] + [5]: Set IP to 192.168.100.85
[#] + [*] + [#] + [6]: Set IP to 192.168.100.86
[#] + [*] + [#] + [7]: Set IP to 192.168.100.87
[#] + [*] + [#] + [8]: Set IP to 192.168.100.88
[#] + [*] + [#] + [9]: Set IP to 192.168.100.89
[#] + [*] + [#] + [0]: Set IP to 192.168.100.80


