background image

Prudent Way Superior Series Power Supply User’s Manual 

ATX 12V version 2.2 &2.0 

Models: PWI-PR550 (2.2v), PWI-PR500 (2.2v), PWI-PR450 (2.0v), PWI-PR400 (2.0v) 

Step 7.


Assemble the power supply and screw it in your PC’s correct power 
supply position. 

Step 8.


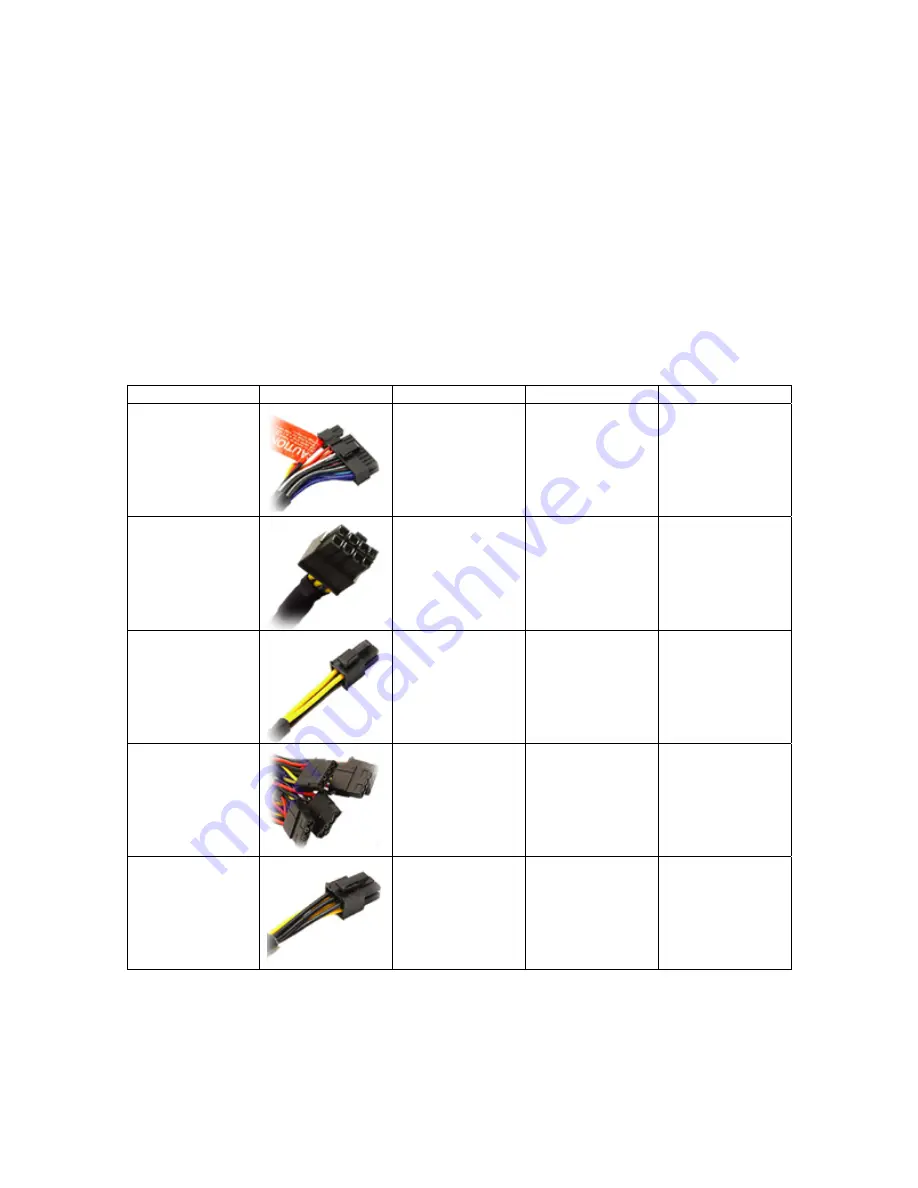
Connect the 24-pin main power connector (Table 1).  If your motherboard 
uses a 20-pin connector, detach the 4-pin attachment on the 24-pin power 
connector. 

Step 9.


Connect all other connectors to drives and peripheral correctly (Table 1). 

Step 10.


Make sure all connectors are connected correctly. 

Step 11.


Screw and close the side panel of your PC case. 

Step 12.


Plug in the power cord to the power supply.  Switch the on/off (I/O) 
button to “I”.  The system is now ready to go. 

 
Table 1 
 

Connector Image 

Number 

of 

Pins 

Qty 

Function 

Main Power Connector 


20+4 1 

Provide 

CPU, 

motherboard, memory, 
PCI, AGP, USB hub 
with power. 

ATX 12 V 2.2 Power 
Connector 


8 PWI-PR550: 

PWI-PR500: 0 
PWI-PR450: 0 
PWI-PR400: 0 

For processor 

ATX 12 V Power 
Connector 


4 1 For 

processor 

Peripheral Power 
Connector 


4 PWI-PR550: 

PWI-PR500: 8 
PWI-PR450: 6 
PWI-PR400: 6 

For, hard drive, IDE 
type optical drive and 
other peripherals 

PCI Express Connector 


6 PWI-PR550: 

PWI-PR500: 2 
PWI-PR450: 1 
PWI-PR400: 1 

For PCI Express Card 

Summary of Contents for PWI-PR550

Page 1: ...Solid Power Solution User s Manual Prudent Way Professional Series Power Supply PWI PR550 PWI PR500 PWI PR450 PWI PR400 ...

Page 2: ...upply User s Manual ATX 12V version 2 2 2 0 Models PWI PR550 2 2v PWI PR500 2 2v PWI PR450 2 0v PWI PR400 2 0v 1 Table of Contents 1 Introduction 2 2 Safety Warning 2 3 Installation 2 4 Product Specification 4 5 Simple Trouble Shooting 5 ...

Page 3: ...d up by a 3 year warranty to display the enduring value all at a friendly price 2 Safety Warning Please read the following information carefully before using the power supply 8 DO NOT take apart add to or remove any components from the power supply There are HAZARDOUS VOLTAGES inside the power supply Warranty will be voided by doing so 8 DO NOT expose the power supply or computer to water or moist...

Page 4: ...tors are connected correctly Step 11 Screw and close the side panel of your PC case Step 12 Plug in the power cord to the power supply Switch the on off I O button to I The system is now ready to go Table 1 Connector Image Number of Pins Qty Function Main Power Connector 20 4 1 Provide CPU motherboard memory PCI AGP USB hub with power ATX 12 V 2 2 Power Connector 8 PWI PR550 1 PWI PR500 0 PWI PR45...

Page 5: ...ge Protection Recycle AC to reset 12V1 12V2 13 4V 15 6V 5V 5 7V 7 0V 3 3V 3 7V 4 3V Special Connectors 1 Main Connector 20 4 pin 1 12V P4 8 Peripheral 6 Peripheral 2 SATA 2 Floppy 2 PCI E 12V 1 PCI E 12V 4 pin 8pin Adapter Nil Nil Nil Dual 12V Yes SLi Support NVIDIA SLi Certified No No Fans 9cm x 8cm with Smart Fan Control 8cm x 8cm with Smart Fan Control Cables Black Sleeved Cables DIMENSIONS Uni...

Page 6: ...OR 230VAC Hold up Time 17ms max Efficiency 70 EMI RFI FCC Class B ENVIRONMENTAL Operating Temp 0 to 50o C Operating Alt 10 000ft MTBF 100 000 Hours Safety Approval UL cUL CASA FCC Class B TUV CE CB NEMKO BSMI RoHS Compliant Yes PFC n a 5 Simple Trouble Shooting Condition No Power 1 Check that the power cord is plugged into an electrical outlet and the power switch is at I position 2 Make sure the ...

Page 7: ...wer up after following the above instructions please send the unit back to your dealer or retailer for service For feedback about this product please contact Prudent Way Inc Toll Free 866 384 3873 Email feedback prudentway com For support or general inquiry please contact Prudent Way Inc Toll Free 866 384 3873 Email Support prudentway com Prudent Way Inc www prudentway com 866 384 3873 ...

Reviews: