


41
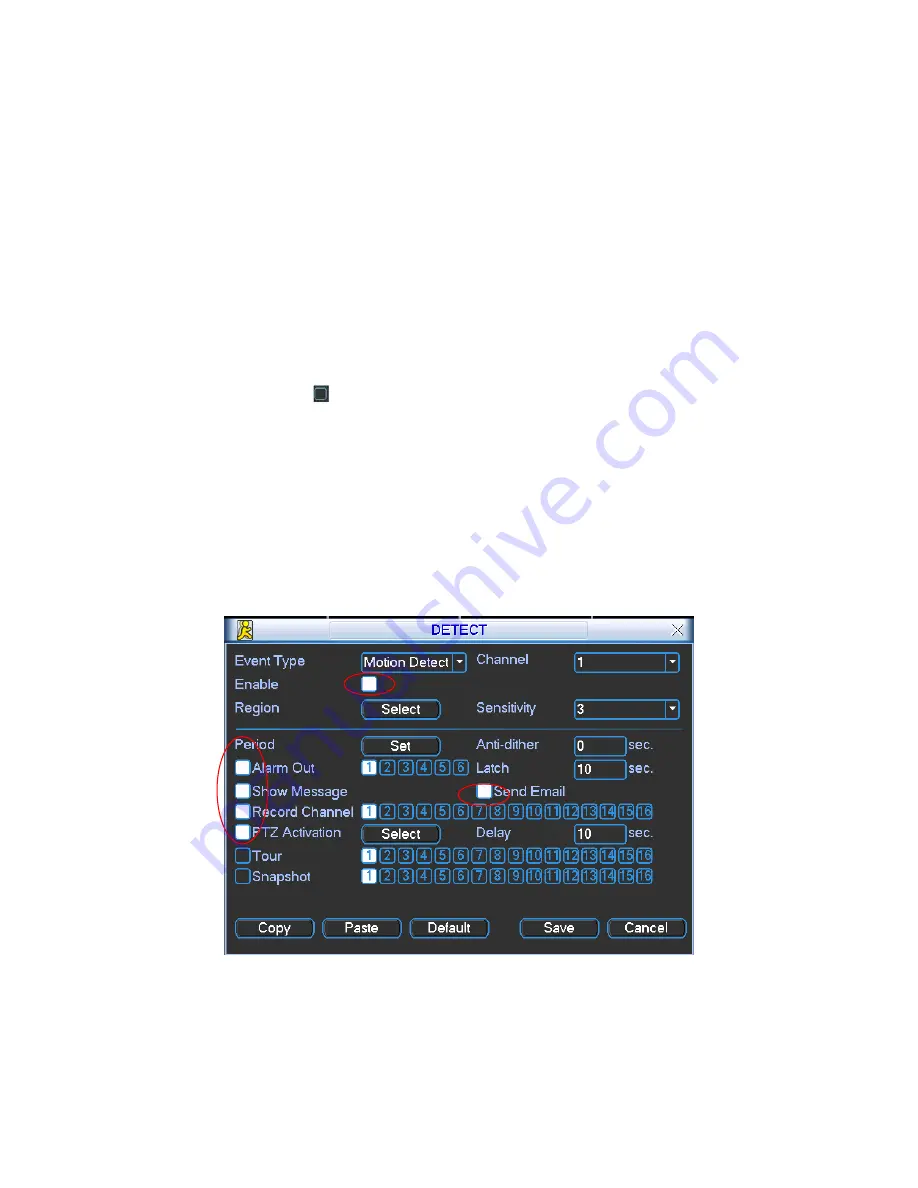
PTZ activation: Here you can set PTZ movement when alarm occurs. Such as go
to preset, tour &pattern when there is an alarm. Click
“
select
”
button, you can see
an interface is shown as in Figure 4-16.
Period: Click set button, you can see an interface is shown as in Figure 4-17.
Here you can set for business day and non-business day. In Figure 4-17, click set
button, you can see an interface is shown as in Figure 4-18. Here you can set
your own setup for business day and non-business day.
Anti-dither: Here you can set anti-dither time.
Sensitivity: there are six levels. The sixth level has the highest sensitivity.
Alarm output: when alarm occurred, system enables peripheral alarm devices.
Tour: Here you can enable tour function when alarm occurs. It is a one-window
tour. Please go to chapter 5.3.9 Display for tour interval setup.
Snapshot: System can snapshoot when alarm occurs.
Please highlight icon
to select the corresponding function. After all the setups
please click save button, system goes back to the previous menu.
Note:
In motion detection mode, you can not use copy/paste to set channel setup since the
video in each channel may not be the same.
In Figure 4-15, you can left click mouse and then drag it to set a region for motion
detection. Click Fn to switch between arm/withdraw motion detection. After setting,
click enter button to exit.
Figure 4-14
Summary of Contents for PRX-MG04 Series
Page 1: ...1 www protexitalia it Standalone DVR User s Manual PRX MG04x PRX MG08x PRX MG16x...
Page 42: ...42 Figure 4 15 Figure 4 16 Figure 4 17...
Page 84: ...84 Figure 5 50...
Page 89: ...89 Figure 6 11...
Page 113: ...113 Figure 7 39 Figure 7 40 Figure 7 41...
Page 128: ...128 Figure 8 5 Add device Add organization structure...


