background image

1

3

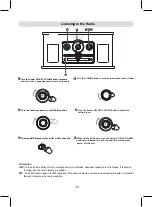
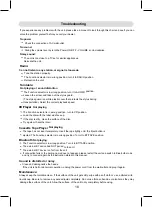
Turn the TUNING knob to receive the desired radio station.

4

5

2

AM/FM

3

M

IN

 O

N.O

FF

MA

X

VOLUME

M

IN

 O

N.O

FF

MA

X

VOLUME

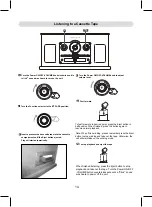
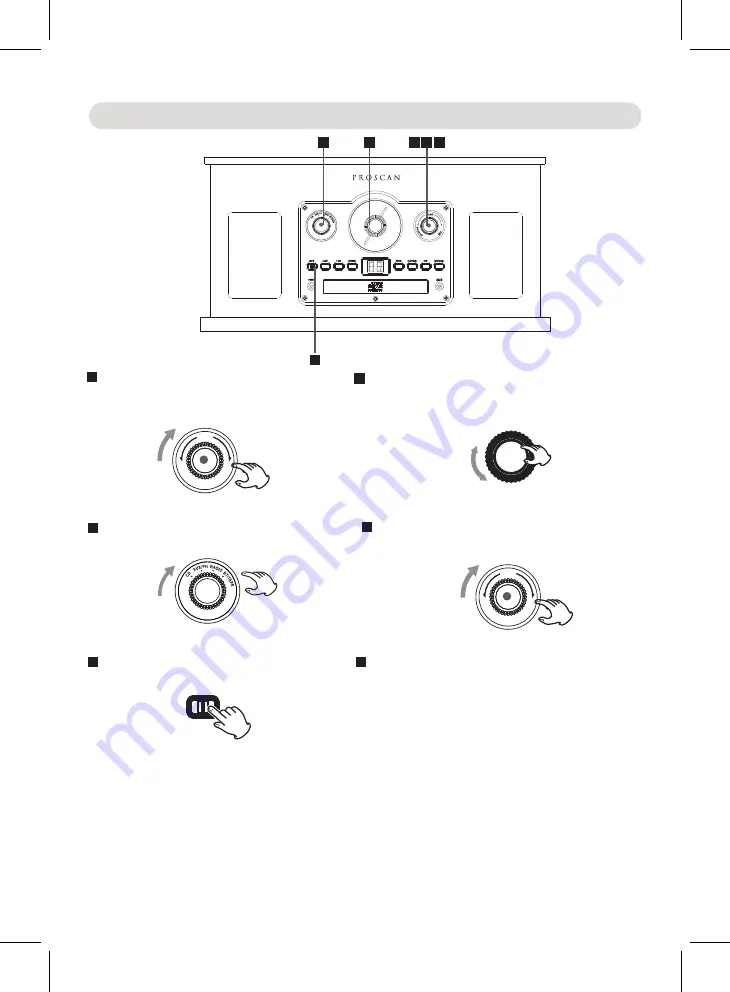
Listening to the Radio

Turn the Power ON/OFF-VOLUME knob clockwise

until a   click     sound was heard to turn on the unit.

Turn the Function selector to the RADIO position.

Slide the AM/FM band switch to AM or FM as desired.

Turn the Power ON/OFF-VOLUME knob to adjust the 

volume level.

6

When finished listening, turn the Power ON/OFF-VOLUME

knob counterclockwise until a sound 'click' was heard to

power off the unit.

Antennas:

AM

FM

 - This unit has a build in ferrite rod antenna, which provides  adequate reception in most areas. If

 reception 

is weak, turn the unit to improve reception. 

 - The FM Antenna wire is for FM reception. If reception is weak, unwound and extended the wire or

 relocation 

the wire to improve the radio reception.

"

"

12

2

1 5

4

4

3

6

Summary of Contents for PRCD838BT

Page 1: ...PRCD838BT INSTRUCTION MANUAL NOSTALGIA 6 IN 1 TURNTABLE RADIO PLEASE READ CAREFULLY BEFORE OPERATION PROSCAN IS A REGISTERED TRADEMARK OF TECHNICOLOR USA INC AND USED UNDER LICENSE TO CURTIS INTERNATIONAL LTD ...

Page 2: ...circuit different from that to which the receiver is connected Consult the dealer or an experienced radio TV technician for help FCC WARNING To assure continued compliance follow the attached installation instructions and use only shielded cables when connecting to other devices Modifications not authorized by the manufacturer may void user s authority to operate this device IMPORTANT SAFETY INSTR...

Page 3: ...ounding prong The wide blade or the third prong are provided for your safety If the provided plug does not fit into your outlet consult an electrician for replacement of the obsolete outlet 10 Protect the power cord from being walked on or pinched particularly at plugs convenience receptacles and the point where they exit from the apparatus 11 Only use attachments accessories specified by the manu...

Page 4: ... service or repairs to this product ask the service technician to perform safety checks to determine that the product is in proper operating condition 23 24 Damage requiring service Unplug this product from the wall outlet and refer service to qualified service personnel under the following conditions a When the power supply cord or plug is damaged b If liquid has been spilled or objects have fall...

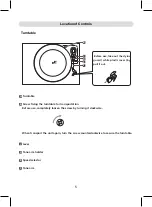
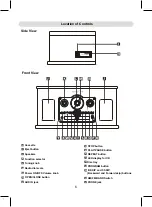
Page 5: ...eed selector F E D C B A A C D B E Location of Controls Turntable Before use completely loosen the screw by turning it clockwise When transport the unit again turn the screw counterclockwise to secure the turntable Before use take out the stylus guard white plastic cover by pull it out 5 F ...

Page 6: ...ector Radio dial scale Power ON OFF Volume knob Tuning knob AUX IN jack LED display for CD Cassette Eject button Speakers OPEN CLOSE button STOP button PLAY PAUSE button REPEAT button Disc tray PROGRAM button B SKIP and F SKIP Backward and Forward skip buttons AM FM BAND Switch PHONE jack 6 ...

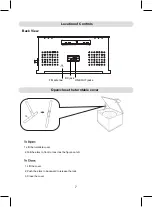
Page 7: ...he turntable cover 1 Lift the cover 2 Push the arms to backward to release the lock 3 Close the cover 2 Pull the arms to front to lock it as the figure on left LINE OUT jacks FM antenna 1 Lift the turntable cover 7 FM ANTENNA DC 9V 1 3A DC jack ...

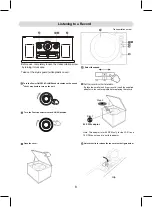
Page 8: ...pm record insert the supplied adaptor to the center spindle before placing the record clip Unlock the clip to release the tone arm as the figure below Transportation screw Select the speed 45 RPM adaptor Step 1 Step 2 8 Note This adaptor is for 45 RPM only for the 33 3 1 and 78 RPM do not need to put this adaptor Before use completely loosen the transportation screw by turning it clockwise Take ou...

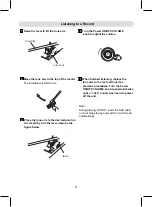
Page 9: ...tone arm to the rest and lock it as Place the tone arm to the desired point on the record by turn the lever down as the figure below 9 Turn the Power ON OFF VOLUME knob to adjust previous procedures Turn the Power ON OFF VOLUME knob counterclockwise until a click sound was heard to power off the unit cue lever tone arm Note During playing DO NOT insert the AUX cable or it will stop playing and swi...

Page 10: ...ton repeatedly to skip the tracks To stop press the STOP button During playback 8 When finished listening Press the OPEN CLOSE button to open the disc tray A few seconds later the total number of tracks will appear sound was heard to power off the unit Press the PLAY PAUSE button to pause press again to resume normal playback Press and hold the B SKIP or F SKIP button to fast searching the desired...

Page 11: ...s the REPEAT button twice the Repeate indicator will light and stop blinking All the tracks in the current 3 To cancel the repeat function during playback press the REPEAT button repeatedly until the Repeat indicator not light disc will playback repeatedly until the STOP button was pressed 1 In CD STOP mode press the PROGRAM button 01 will appear on the LED display and blinking 2 Select the first ...

Page 12: ... or FM as desired Turn the Power ON OFF VOLUME knob to adjust the volume level 6 When finished listening turn the Power ON OFF VOLUME knob counterclockwise until a sound click was heard to power off the unit Antennas AM FM This unit has a build in ferrite rod antenna which provides adequate reception in most areas If reception is weak turn the unit to improve reception The FM Antenna wire is for F...

Page 13: ...nder Bluetooth mode During playing DO NOT insert the cassette tape or the unit will switch to Cassette tape mode and the Bluetooth connection will get disconnected automaticallly M I N O N O FF M A X VOLUME Turn the Power ON OFF VOLUME knob to adjust volume level 5 3 The unit will search and connect last paired device automatically when both of them are in Bluetooth mode and working range Turn the...

Page 14: ...o Note When finish winding please remember press the Eject button to stop winding and take out the tape Otherwise the unit will maintains on the winding mode When finished listening press the Eject button to stop playback and take out the tape Turn the Power ON OFF To stop playback and eject the tape Turn the Power ON OFF VOLUME knob clockwise until a click 14 half position When finished press the...

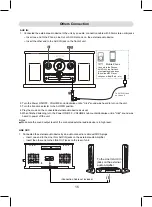
Page 15: ...output level of the connected external audio device is in high level Others Connection connection cable with 3 5mm stereo mini jacks 15 counterclockwise until a click sound was heard to power off the unit To the Line In AUX In jacks on the external audio Amplifier Connection Cable not included Insert the other end to the LINE OUT jacks on the rear of unit LINE OUT 1 Connected the external audio de...

Page 16: ...e the unit Do not stick papers or protective sheets on the discs and do not use any protective coating spray Use a soft oil based felt tipped pen to write the information on the label side Never use a ball point or hard tipped pen as this may cause damage to the recorded side Never use a stabilizer Using commercially available CD stabilizers with this unit will damage the mechanisms and cause them...

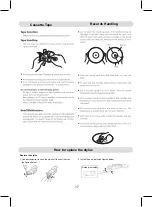
Page 17: ...Tape Records Handling How to replace the stylus 1 Use a screwdriver to push the stylus off then pull it out as the figures below Replace the stylus 2 Install the new stylus as figures below 17 Guide pins inside ...

Page 18: ... completely Do not use thinner benzine or alcohol as of the unit to dry completely before using Maintenance 18 use a diluted mild liquid soap Be sure to remove any excess unit Allow the surface CD Player Not playing The Function selector is in wrong position turn to CD position Load the disc with the label side face up If the disc is dirty clean the surface of the disc Try again wth another disc T...

Page 19: ...Adapter 1 x 45 rpm Adaptor 1 x AUX IN Cable Motor Drive System Speed Wow and Flutter Cartrige Type Stylus Track System Tape Speed Wow and Flutter Frequency Response Signal to Noise Ratio For service assistance and product information please call 1 800 968 9853 Curtis International Ltd 7045 BECKETT DRIVE UNIT 15 MISSISSAUGA ON L5S 2A3 www curtisint com 19 about 32 feet Bluetooth Working range SPECI...

Page 20: ... household use or subjected to any voltage and waveform other than as on the specified rating on the label e g 120V 60Hz We exclude all claims for special incidental and consequential damages caused by breach of express or implied warranty All liability is limited to the amount of the purchase price Every implied warranty including any statutory warranty or condition of merchantability or fitness ...

Reviews: