background image

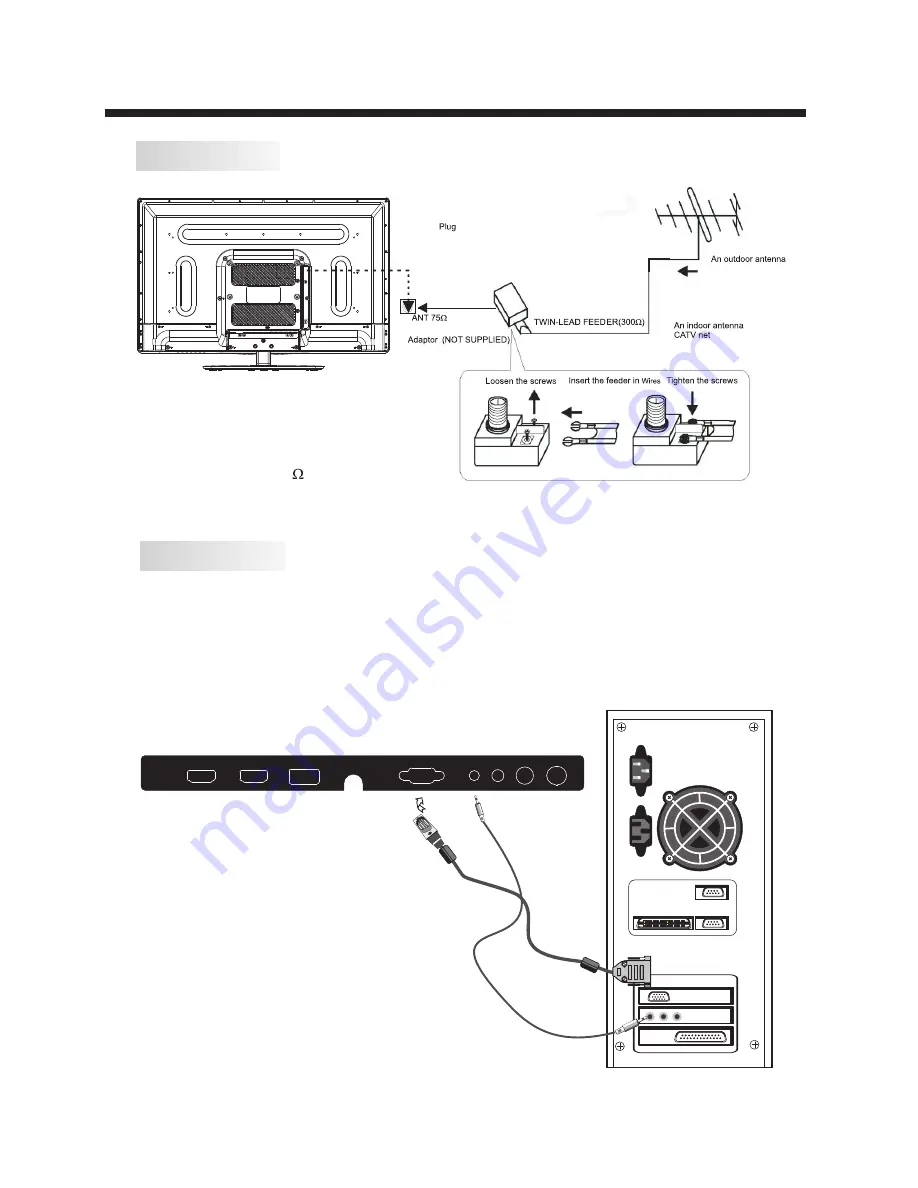
ANTENNA

INSTALLATION

Note:
Aerial connections: IEC (female).
Input impendance:75     unbalanced.

-8-

STEPS:

PC

It is recommended that the TV and computer are off before making any of the connections.
1.Connect the VGA  and audio cable.
2.Connect the power cord.
3.Power on the TV, switch  to PC mode.
4.Power on the PC.

HDMI1

HDMI2

USB

VGA

HEADPHONE

RF

PC AUDIO

COAXIAL

Summary of Contents for PLDED3257A

Page 1: ...32 LED TV PLDED3257A ...

Page 2: ... 1 Contents Safety and warnings 2 3 Introduction 4 Stand installation guide 5 6 Installation 7 10 Remote Control 11 Operation 12 14 Trouble Shooting 15 Wall Mount ...

Page 3: ...nect device shall remain readily operable 15 The ventilation should not be impeded by covering the ventilation openings with items such as newspapers table cloth curtains etc 16 No naked flame sources such as lighted candles should be placed on the Television 17 Attention should be drawn to the environmental aspects of battery disposal 18 The use of Television in moderate climate 19 The Television...

Page 4: ...ould pay special attention to children Serious injury may result if it falls Do not place your television on an unstable cart stand shelf or table Serious injury to an individual and damage to the television may result if it falls or When the television receiver is not used for an extended period of time it is advisable to disconnect the AC power cord from the AC outlet Avoid exposing the televisi...

Page 5: ...SC Analog system Headphone Output x 1 x 1 Coaxial Output x 1 USB Input Aspect Ratio Viewing Picture Size diagonal Power consumption Audio Output Power THD 7 YCb Pb Cr Pr Input Composite Video Input Analog RGB VGA Input 1366x768 32 inches 75W 2x8W Main parameter Integrated ATSC TV tuner for HDTV broadcast reception High brightness provides a vivid and brilliant picture High dynamic contrast ratio f...

Page 6: ...lay side down on a flat surface Use a cloth to protect the display Position the base stand onto the bottom of the neck of the stand 2 Attach the base stand to the neck of the stand by firmly tightening the supplied screws Screws x 3pcs 4x22PWM Screws x 3pcs 4x10PWB ...

Page 7: ... Do not mount your PROSCAN TV at more than a 15 degree tilt Always use two people to mount the TV to a wall Do not install your Wall Mount Kit while your TV is turned on It may result in personal injury due to electric shock 4 pcs of type M4 screws are required for installing the wall mount bracket to your PROSCAN TV Do not use screws that are longer than 10 mm Screws that are too long may cause d...

Page 8: ... unit ON from STANDBY mode Press it again to turn the set back to STANDBY Panel keys 3 1 2 REAR Connections SIDE Connections All the terminals are from left to right HDMI1 HDMI2 USB VGA PC AUDIO HEADPHONE COAXIAL RF Note When HDMI has an input signal coming from a DVI source then the audio input signal must be connected to the PC audio input All the terminals are from left to right POWER SOCKET AV...

Page 9: ...75 unbalanced 8 STEPS PC It is recommended that the TV and computer are off before making any of the connections 1 Connect the VGA and audio cable 2 Connect the power cord 3 Power on the TV switch to PC mode 4 Power on the PC HDMI1 HDMI2 USB VGA HEADPHONE RF PC AUDIO COAXIAL ...

Page 10: ...0 720 400 640 480 640 480 800 600 800 600 1024 768 1024 768 1024 768 1280 1024 1280 1024 70 60 75 60 75 60 70 75 60 75 31 47 31 47 37 50 37 88 46 88 48 36 56 48 60 02 63 98 80 00 RESOLUTION V Freq Hz H Freq KHz AC INPUT 100 240V 50 60Hz Y Pb Pr AV L R ...

Page 11: ...QUIPMENT with YPbPr W R G B R W R W R TO AUDIO OUTPUTS VIDEO EQUIPMENT TO VIDEO OUTPUTS The television s inputs can be connected to the following types of equipment VCR DVD player camcorder video game or stereo system etc YPbPr can support these video formats 480i 576i 480p 576p 720p 1080i HDMI1 HDMI2 USB VGA HEADPHONE RF PC AUDIO COAXIAL AC INPUT 100 240V 50 60Hz Y Pb Pr AV L R ...

Page 12: ...gram information Press to change the channel Press to change the picture aspect ratio Normal Wide Zoom Cinema Press to display the channel list Press to display the channel guide Press to access the favorite channels list Press to directly switch to HDMI mode Press to directly switch to AV mode Press to display the digital TV signal strength Press to directly switch to TV mode Press to directly sw...

Page 13: ...t here Press to select press OK to adjust In this menu you can adjust the sleep timer time zone etc Press to select press OK to adjust Note 1 Time zone DST and the clock are available in ATSC programming only and the Clock can t be adjust 4 OPTION menu In this menu you can ajust the Menu language Close Caption Restore Default etc Press to select press OK to adjust 4 1 Closed Caption Time Zone Paci...

Page 14: ...ut may be encoded in the data of order movies 1 Canada English Switching the English rating control level EXEMPT C C8 G PG 14 18 5 LOCK MENU In this menu you can change the password and adjust the vchip setting Enter the password it will go into the lock menu Factory default password is 6666 5 1 Change Password 1 Old password Input the old password 2 New password Input the new password 3 Confirm p...

Page 15: ...he French rating control level E G 8ANS 13 ANS 16ANS 18ANS Rating Description Age E Exempt programming G General All ages and children contains minimal direct violence but may be integrated into the plot in a humorous or unrealistic manner 8ans General but inadvisable for young children May be viewed by a wide public audience but could contain scenes disturbing to children under 8 who cannot disti...

Page 16: ...up Press standby key on the remote control for inspecting No color Normal audio Color control Picture breaking up Normal audio or weak Retune channel No color Noise TVsystem Normal audio antenna position direction or connection TROUBLE SHOOTING Trouble phenomenon Symptom Ghost 15 The LCD TV panel is built with very high precision technology giving you fine picture details in vibrant color Occasion...

Page 17: ......

Reviews: