ProScan PDVD1034 Instruction Manual Download Page 9

Remote Control

1. 

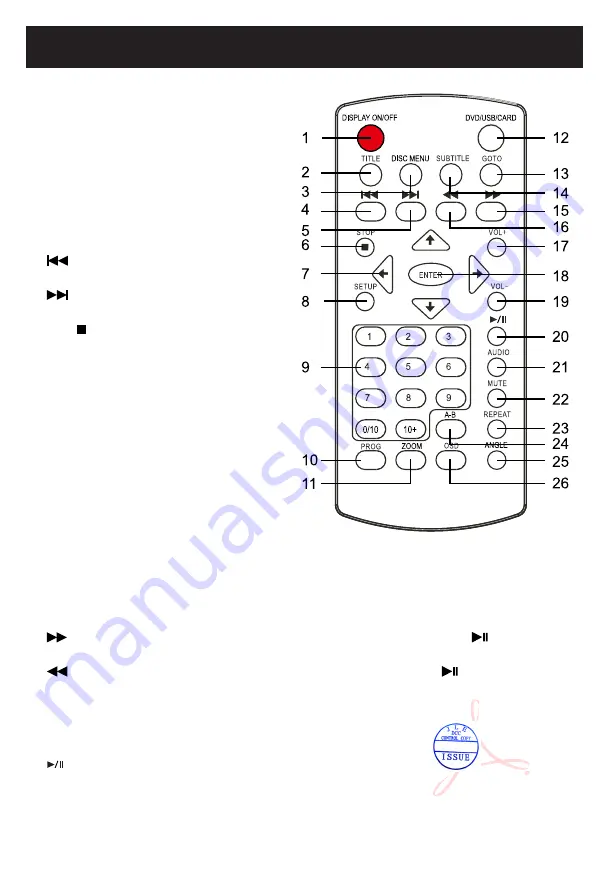
DISPLAY ON/OFF: To turn ON or OFF the 

screen.

2. 

TITLE: To display the title menu of 

current disc. Use the Direction and 

ENTER buttons to select and play the 

desired title. 

3.  

DISC MENU: To display the menu of 

current disc. Using the Direction and 

ENTER buttons to select and play the 

desired chapter or track. 

4. 


Previous:

 Press repeatedly to skip 

backward. 

5. 


Next: 

Press repeatedly to skip 

forward. 

6. 

Stop   : 

Press to stop. 

7. 

Direction buttons: 

Press to highlight 

the options within the setting menu. 

8. 

SETUP: Press to enter or exit setup menu. 

9. 

Numberic buttons: 

Press numeric 

buttons to enter numbers. 

10. 

PROG (Program) button: 

Press to 

display program setting menu. Use 

the Numeric/Direction and ENTER 

buttons to set the program as on screen 
instructions. 

11. 

ZOOM: Press repeatedly to zoom in/out 

the picture. 

12. 

DVD/USB/CARD: 

When USB device and/

or SD Card was inserted, press repeatedly to select the playback source as desired. 

13. 

GOTO: Press to enter GOTO menu. Use the Numeric/Direction and ENTER buttons to select the 

desired track to play. 

14. 

SUBTITLE: 

Press repeatedly to select the subtitle languages available in the disc. 

15. 

 (Fast Forward): 

Press repeatedly to search for the desired section. Press 

 button to 

resume normal playback. 

16. 


(Reverse): 

Press repeatedly to search for the desired section. Press 

 button to resume 

normal playback. 

17. 

VOL+ (Volume): 

Press to increase the volume level. 

18. 

ENTER: Press to confirm the selection(settings). 

19. 

VOL- (Volume): 

Press to decrease the volume level. 

20. 


(Play/Pause): 

Press to play or pause playback. 

21. 

AUDIO: 

Press repeatedly to select the audio channels. 

22. 

MUTE: 

Press to turn off the sound. Press again to resume the sound. 

9

2015.0
9.25
08:29:
47
+08'00'

Summary of Contents for PDVD1034

Page 1: ...2015 09 2 5 08 11 14 08 00 2015 0 9 25 08 28 5 3 08 00...

Page 2: ...on If this equipment does cause harmful interference to radio or television reception which can be determined by turning the equipment off and on the user is encouraged to try to correct the interfere...

Page 3: ...wide blade or the third prong are provided for your safety If the provided plug does not fit into your outlet consult an electrician for replacement of the obsolete outlet 10 Protect the power cord f...

Page 4: ...safety checks to determine that the product is in proper operating condition 23 Wall or ceiling mounting The product should be mounted to a wall or ceiling only as recommended by the manufacturer 24...

Page 5: ...yer Please read the following carefully Moisture condensation occurs for example when you pour a cold drink into a glass on a warm day Drops of water form on the outside of the glass In the same way m...

Page 6: ...set the TV system to NTSC as specified Notes on Copyright It is forbidden by law to copy broadcast show broadcast on cable play in public and rent copyrighted material without permission DVD video dis...

Page 7: ...ndicator Green indicator will turn on when the unit is powered on and turn off if the unit is powered off 9 DISPLAY ON OFF Press to turn the display ON or OFF 10 MUTE Press to turn the sound OFF Press...

Page 8: ...C IN DC in jack connect to the DC out jack on main unit by the supplied DC connection cable 21 AV IN Audio video in jack connect to the AV OUT Jack on the main unit by the supplied AV connection cable...

Page 9: ...n instructions 11 ZOOM Press repeatedly to zoom in out the picture 12 DVD USB CARD When USB device and or SD Card was inserted press repeatedly to select the playback source as desired 13 GOTO Press t...

Page 10: ...he batteries in the device are consumed or the device is not used for a long period of time remove the batteries to prevent damage or injury from possible battery leakage Do not try to recharge non re...

Page 11: ...r than 24 hours Excessive charging or discharging may shorten the battery s life Battery life naturally shortens slowly over time Charging by the supplied Car Adapter 1 Connect to the cigarette lighte...

Page 12: ...nection cable Connected to the TV Audio Video Cable included Video input jack Yellow Audio left channel input jack White Audio right channel input jack Red Making Connections PHONE AV OUT USB SD MMC C...

Page 13: ...DC cable included 3 5mm audio video cable included Note The secondary unit must be connected to the main unit it can not be operated independantly SECONDARY UNIT MAIN UNIT PHONE AV OUT USB SD MMC CARD...

Page 14: ...NIT 1 Connect the secondary unit to the main unit by the supplied DC and AV connection cables as previous procedures 2 Slide the POWER ON OFF switch on the right side of unit to the ON position to pow...

Page 15: ...cks you want of the CD or DVD 3 Use the direction buttons to move to the next input Repeat step 2 until programming is completed Note Press to go to next page for programming track 11 to 20 4 Highligh...

Page 16: ...the disc starts to play Press DVD USB CARD button to select the desired playback source Wait until the folder file list appears on the screen Use the direction buttons to select the desired file then...

Page 17: ...s selected use the Direction and buttons to set the OSD language as desired 4 If Captions is selected use the Direction and buttons to set it On or Off If set to On when multi language are available i...

Page 18: ...on left speaker the rear right channel will play on right speaker IN DOLBY DIGITAL SETUP PAGE 1 If Dual Mono is selected use the Direction and button to set it to Stereo L Mono Play Left channel on al...

Page 19: ...the color saturation level on a scale of 9 to 9 2 If Picture Quality is selected use the Direction and buttons to set the Sharpness Brightness Contrast Gamma Hue or Saturation of the video input signa...

Page 20: ...on to enter the rating level list will appear Press the or button to select the desired level Press the button to enter password enter window will pop up Enter the digit password default password is 1...

Page 21: ...menu will appear Enter the four digit old password The Column of New Password will be highlighted Enter the new four digit password The Column of Confirm Pwd will be highlighted Enter the new password...

Page 22: ...o the outer edge of the disc Never wipe in circular motions Discs should be stored in their cases after each use to avoid damage Do not expose discs to direct sunlight high temperatures or dust etc Pr...

Page 23: ...ies Disc compatibility DVD VCD SVCD DVCD CD CD R CD RW DVD R DVD RW Power consumption 18W Max Battery charging time Approximately 8 hours Battery life full charge Approximately 3 hours Specifications...

Page 24: ...ve figure The straps will not be fastened securely and can be pulled out horizontally causing 3 4 Correct Wrong the DVD player to drop dangerously Fasten the player to the headrest of the seat in the...

Reviews: