


FRONT
REAR
B
A
A
B
U
11
12
CLOUD RIDER™ HD 2.0 WARNING:
The Cloud Rider™ HD 2.0 is designed for OUTDOOR use only. The Cloud Rider™ HD 2.0 blades revolve at
high speed and can cause damage to the user, spectators and animals. Stand away from the Cloud Rider™
HD 2.0 to reduce the risk of getting into the flight path. Warn spectators that you will be flying your Cloud
Rider™ HD 2.0 so that they are aware of its position. Before flight, inspect the rotor blades to make certain
that the blades are securely fastened to the Cloud Rider™ HD 2.0.
WARNING!
• Choking/Cutting Hazard. Small Parts/Sharp Rotor Blades.
• Keep hands, hair and loose clothing away from the propeller when the power switch is turned to the
ON position.
• Turn off the transmitter and take out the battery from the Cloud Rider™ HD 2.0 when not in use.
• The included charger is built specifically for the Cloud Rider™ HD 2.0 Li-Poly battery. Do not use it to
charge any other battery.
• New alkaline batteries are recommended for maximum performance.
• Parental supervision recommended when flying Cloud Rider™ HD 2.0.
BATTERY WARNINGS
RECHARGEABLE BATTERY:
This Cloud Rider™ HD 2.0 uses a Li-Poly rechargeable battery. If battery can no longer be charged, dispose
it battery properly according to the local law.
CONTROLLER BATTERIES:
Remote control requires 6 “AA” batteries (not included). Please read the important battery safety warning
below.
• Do not mix alkaline, standard (carbon-zinc) and rechargeable batteries (Nickel Metal Hydride).
• Do not mix old and new batteries.
• Non-rechargeable batteries are not to be recharged.
• Rechargeable batteries are to be removed from the item before being charged (if removable).
• Rechargeable batteries are only to be charged under adult supervision.
• Exhausted batteries should be removed immediately and must be recycled or disposed of properly
according to state or local government ordinances and regulations.
• The supply terminals are not to be short-circuited.
• Only batteries of the same or equivalent type as recommended are to be used.
• Batteries are to be inserted with the correct polarity (see inside booklet for diagram).
• Do not dispose batteries in a fire - batteries may leak or explode.
CARE AND MAINTENANCE
• Always remove the batteries from the wireless remote control when it is not being used for an
extended period of time.
• To clean, gently wipe the remote control and Cloud Rider™ HD 2.0 with a clean damp cloth.
• Keep away from direct heat or sunlight.
• Do not submerge into water. This can damage the unit beyond repair.
• Parental guidance recommended when installing or replacing the batteries.
REPLACING THE PROPELLER BLADES
NOTE : Always disconnect the battery before replacing the propeller blades.
Your Cloud Rider™ HD 2.0 propeller system is a precision instrument that may need repair or replacement
from time to time for optimal flight function. Crash landing from high-speed aerial flights may cause
damage to your Cloud Rider™ HD 2.0 propellers.
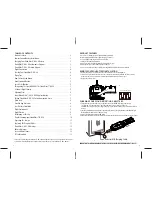
The Cloud Rider™ HD 2.0 has four propeller blades, two on the front and two on the back. Each one of these
propellers is marked with either A or B on the underside.
1. When replacing the propeller blades, carefully unscrew the broken propeller from the rotor shaft.
2. Replace the damaged blade with the correct new blade. Ensure that the identification letter on the
broken blade and on the new blade are the same before screwing back on (See diagram U).
NOTE : The Color of the blade does not matter. What matters is the identification letter on the
bottom of blade. All “A” blades would perform the same ir-respective of color and the same
would apply for “B” .
T
T1
T2
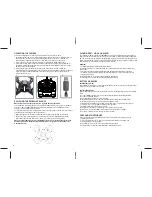
Camera Button
OPERATING THE CAMERA
You can take in-flight photos or video with your Cloud Rider™ HD 2.0 on board camera.
1. Ensure that the camera module is securely attached and locked onto the copter. carefully insert a micro
SDHC card with a speed class of 6 or higher (included) into the the slot on the rear of the camera
module. Push in gently until you hear and feel a click. Now you are ready to use the camera.
2.To take still pictures, short press the camera button.The indicating LED light will flash 3 times.
3.To take video footage, hold down the camera button on the remote for a few seconds(see diagram T1).
You will hear a long beep and the camera indicating LED lights will start flashing. To stop video footage
simply short press the button again.
4.After turning the Power Off on the copter, you may now remove the mircoSDHC card from the
Cloud Rider™ HD 2.0 by gently pushing on the back of the card with your thumb until you hear and feel a
slight click. You may use the included USB card reader to connect it to a computer and retrieve your
pictures and video footage.


