PROMULTIS contourkiosk User Manual Download Page 10

For more exciting multitouch products visit

www.promultis.info

or call +44 (0) 239 251 2794

MULTITOUCH SOLUTIONS

contour kiosk

10

J.   Advanced tab: advanced configuration tools.


J1. Optimization: establishes a balance between Touch speed 


and Touch precision.


J2. Number of touches: limits the number of touches reported by the Touch  


Controller (Skin Ultra: between 1 to 100 touches; Skin Fit: 1 to 40 touches; Skin  


Dualtouch: 1 or 2 touches). This feature is available depending on the Touch  


Controller version and firmware you are using.


J3. Load settings file: allows loading previously saved configuration files. The user   


must wait 10 seconds after changing settings, before changing to other settings,


in order to correctly save them into the controller.


J4. Save current settings to file: Allows saving the current settings to be used in    


other configurations. This feature should be used with equivalent setups, i.e. same  


LCD, glass thickness and size, sensor size and air gap. Note that there may  


be other sources of electromagnetic interferences on each setup, and the  


settings may have to be adjusted.


J5. Load firmware: allows to load a firmware file to the Touch Controller. 


This feature can be used when there is no internet access onsite, if you have  


internet access you do not need to use this feature.


J6. Factory reset: sets the Touch Controller to its default settings.
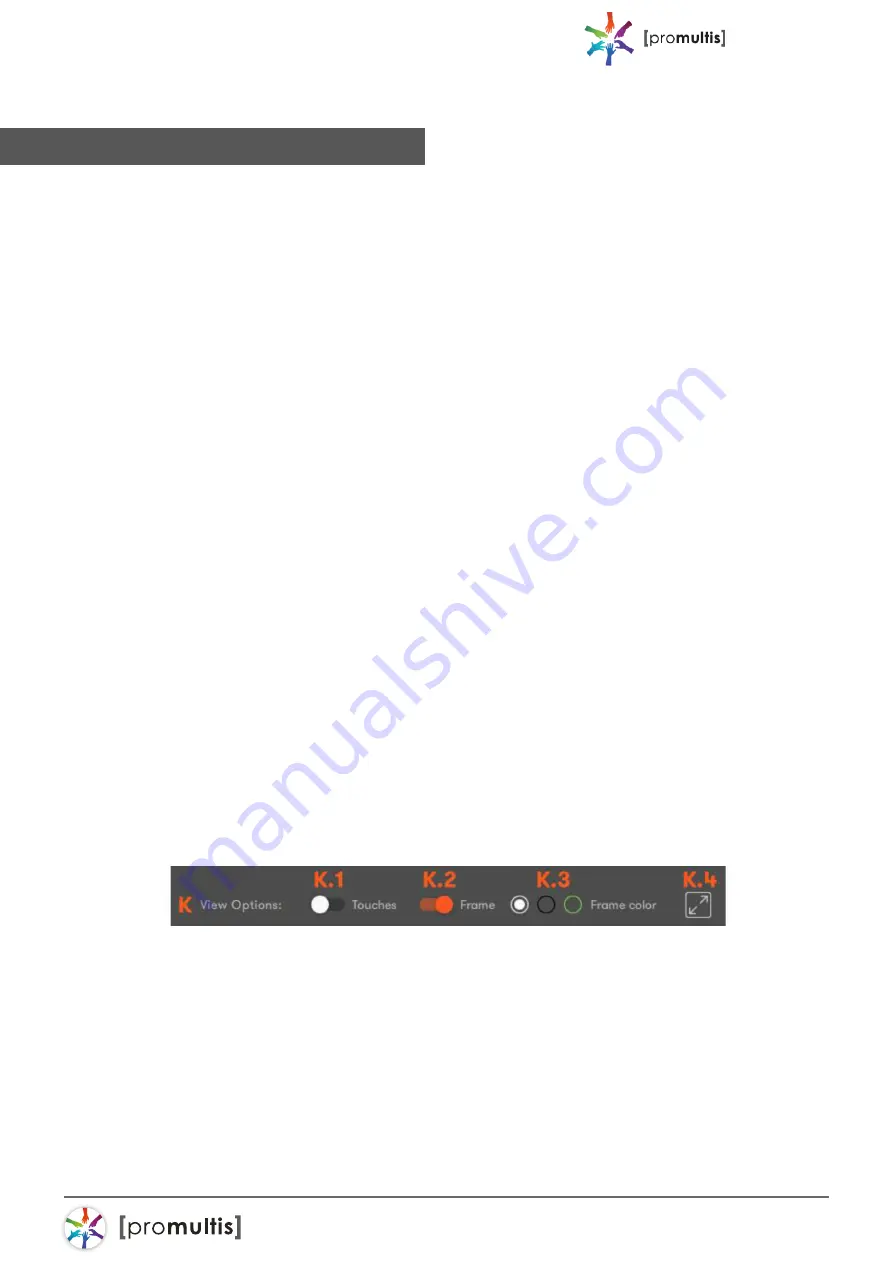
View options

K.  View options:


K1. Touches: enables and disables touch recognition.


K2. Frame: represents electromagnetic interferences over the touch sensor.


K3. Frame color: choose between, a white, black or green frame. 


K4. Full screen: expand the view of the touch sensor active area.

Advanced

Summary of Contents for contourkiosk

Page 1: ...es detailed usage instructions for your product Please read this manual thoroughly Figures and illustrations in this User Manual are provided for reference only and may differ from actual equipment appearance Equipment design and specifications may be changed without notice Due to the processes required for manufacturing a large format Projected Capacitive product Promultis will only accept warran...

Page 2: ...l 44 0 239 251 2794 MULTITOUCH SOLUTIONS contour kiosk 2 USB Memory Stick with Promultis User Manual pdf Warranty Card Displax Driver Remote Control Promultis Manual HDMI Cable AC Power Supply USB Cable Getting started The following items are included in your product box ...

Page 3: ...ce 1 Check the plug is switched on at the wall socket 2 When the power is turned on the screen should power up 3 After a few seconds if the screen is still blank take the TV remote contron BACK PANEL Lower back panel can be unlocked and removed for access to monitor cables and power cables A PC can be connected to the monitor via HDMI cable ...

Page 4: ...mat USB Menu Control Buttons Controls media playback POWER Turns the monitor on or off MONITOR ON Turns the monitor on MONITOR OFF Turns the monitor off ENERGY SAVING Reduces power consumption by adjusting peak screen brightness INPUT Selects the input mode 3D Used for viewing 3D videos This model does not support this 1 a A Togglesbetweennumericalandalphabetical Depending upon the model this feat...

Page 5: ...ngle Should any liquid be dropped on the screen when it is in the horizontal position this should be mopped up with a liquid absorbent cloth prior to cleaning Operation Guidance When using the screen the gesture functions are similar to using your smartphone or tablet but on a much larger scale The way Projected Capacitive touch technology works is by fixing a sensor grid between a layer of cover ...

Page 6: ... way if you want to adjust a setting you will be able to do it without the touch being active When you close DISPLAX Connect the touch injection will be automatically re enabled and the STAND BY status will change to ON This stand by status is only active when DISPLAX Connect is open B Product designation C Firmware version D Product serial number E Label you can attribute a label to the touch con...

Page 7: ... the Touch Controller on the Touch Sensor thicker glasses and bigger Touch Sensors may require a stronger signal higher GAIN values Gain values range between 0 and 7 H2 Threshold adjusts the threshold level of what is considered a touch Values vary between 0 and 50 starting on firmware version 1 5 0 0 to 15 on firmware version equal or previous to 1 4 0 H3 Shield electromagnetic shielding reduces ...

Page 8: ...ITOUCH SOLUTIONS contour kiosk 8 H5 3 Rectangular eraser Allows the selection of areas to be reactivated H5 4 Draw selection With the draw selection you can select parts of the active area to be disabled H5 5 Draw eraser With the draw eraser you can select parts of the active area to be enabled ...

Page 9: ...splay where you want to perform the geometric calibration I2 Calibrate Click the button to start the geometric calibration For most scenarios 4 calibration points are more than enough I3 Advanced geometric calibration I4 Calibration points Number of points used to perform the geometric calibration Please refer to the advanced calibration chapter I5 Drag mode Calibration of a touch sensor smaller t...

Page 10: ...m into the controller J4 Save current settings to file Allows saving the current settings to be used in other configurations This feature should be used with equivalent setups i e same LCD glass thickness and size sensor size and air gap Note that there may be other sources of electromagnetic interferences on each setup and the settings may have to be adjusted J5 Load firmware allows to load a fir...

Reviews: