


Step 8:
Cable the CMA(s).
a. Unlatch the elbow side of the arm(s) by pressing the blue button
labeled “push,” and then swing the arm(s) open.
b. Gather the SAS, power, and Ethernet cables for installation. Be-
fore cabling, note the following routing patterns for best results:
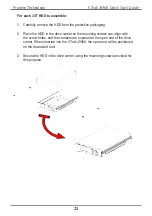
Step 9 :
Now that the chassis is installed, test the installation by sliding the
enclosure in and out of the rack a minimum of three times. If the enclosure binds,
catches, or displays any incorrect motion or behavior repeat the installation.
Step 10 :
Grasp both handles at the front of the enclosure and pull with even
pressure to extend the chassis out of the rack until it is stopped by the safety latches.
The safety latches will prevent the enclosure from coming out of the rack completely
and the cover will remain in the rack attached to the rear alignment brackets.
Step 11 :
Perform this same action two more times without the drives loaded to
make sure the rail kits are installed properly.
18
Promise Technology
VTrak J5960 Quick Start Guide