background image

WARNING!
Danger from hazardous substances!
Possible consequence: Fatal or very serious inju‐

ries.
Please ensure when handling hazardous sub‐

stances that you have read the latest safety data

sheets provided by the manufacture of the haz‐

ardous substance. The actions required are

described in the safety data sheet. Check the

safety data sheet regularly and replace, if neces‐

sary, as the hazard potential of a substance can be

re-evaluated at any time based on new findings.
The system operator is responsible for ensuring

that these safety data sheets are available and that

they are kept up to date, as well as for producing

an associated hazard assessment for the worksta‐

tions affected.

1.

Stop metering operation by pressing the Start/Stop key.

2.

Use a suitable flushing medium to flush the pump, referring

to the material safety data sheet for the feed chemical.

3.

Use an on-site depressurisation option to depressurise the

pump.

Pr

o

M

i

nen

t

R

S TOP

S TART

P

Pr

o

M

i

nen

t

R

S TOP

S TART

P

A2564

1

4

3

2

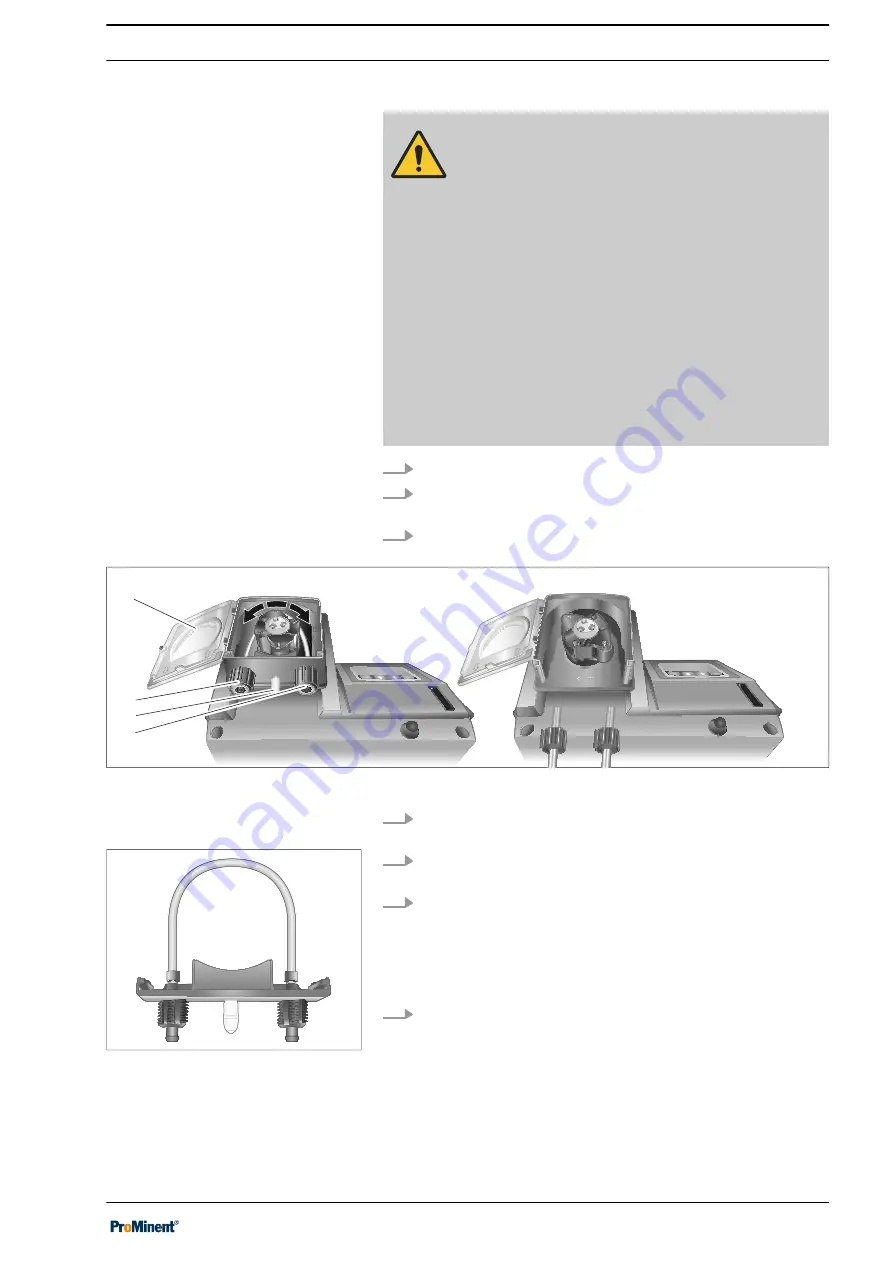
Fig. 21: Replacing the pump hose

4.

Loosen the suction line (3), the discharge line (1) and, if

fitted, the leakage line (2) from the pump connectors.

5.

Loosen the fixing bolt on the transparent cover (4) and

remove the transparent cover.

6.

Pull the hose bearing (= plug-in lower part of the liquid end)

together with the hose forwards out of the liquid end.
Press both 

[arrow keys] simultaneously when the rotor is

turning.

ð

The motor supports the rotor.

7.

Slide the new hose bearing with the new pump hose into the

liquid end.

Replacing the pump hose

A2561

Fig. 22: Hose bracket (= plug-in lower

part of the liquid end)

Maintenance


51

Summary of Contents for DULCOflex DF4a

Page 1: ...ctions 2006 42 EC Part no 986513 Version BA DX 034 10 21 EN Please carefully read these operating instructions before use Do not discard The operator shall be liable for any damage caused by installat...

Page 2: ...des detailed descriptions of the haz ardous situation see Chapter 3 1 Labelling of Warning Informa tion on page 10 The following symbols are used to highlight instructions links lists results and othe...

Page 3: ...4 3 Additional connections 22 5 4 4 Close the housing 25 6 Commissioning 26 7 Setting 28 7 1 Control unit 28 7 1 1 LCD display 28 7 1 2 LED 29 7 1 3 Control keys 29 7 2 Continuous displays 31 7 2 1 C...

Page 4: ...data 57 12 2 Precision 57 12 3 Dimensions and weights 57 12 4 Material specifications 58 12 5 Ambient conditions 58 12 6 Degree of protection and safety requirements 59 12 7 Electrical data 59 12 8 So...

Page 5: ...the hose No valves are needed for this which ensures gentle handling of the feed chemical A2537 Fig 1 DULCO flex DF4a Typical applications include processes where only a low feed pres sure is required...

Page 6: ...The lower part contains the PCBs for the motor control The upper part of the housing accommodates the motor and display PCB with dis play and keys The liquid end is mounted at the front and is sealed...

Page 7: ...ctional plug for Level socket 1 Rotor 2 Control keys 3 LCD display 4 Housing lower part 5 Housing upper part 6 Liquid end 7 Transparent cover 8 Pressure connector 9 Level socket if required with funct...

Page 8: ...02120 2 0 12 00 Hose material P PharMed Hydraulic connector 0 Standard 9 Special connection 10x4 discharge side Operating voltage U 100 240 VAC 50 60 Hz Cable and plug 0 without cable 1 with cable 2...

Page 9: ...ion 8 manual external contact and analogue 0 4 20 mA 0 10 V C as 8 and CANopen D as 8 and CANopen and CAN connector Additional inputs 1 Pause 2 stage level AUX_1 2 Pause 1 stage level AUX_1 AUX_2 Paus...

Page 10: ...will result in fatal or very serious injuries WARNING Nature and source of the danger Possible consequence Fatal or very serious inju ries Measure to be taken to avoid this danger Denotes a possibly...

Page 11: ...tion Hints on use and additional information Source of the information Additional measures Denotes hints on use and other useful informa tion It does not indicate a hazardous or dam aging situation Sa...

Page 12: ...authorised distribution partner Trained qualified per sonnel A trained qualified employee is deemed to be a person who is able to assess the tasks assigned to him and recognize possible hazards based...

Page 13: ...ed due to pressure in the liquid end and adjacent parts of the system Depressurise drain and flush the hydraulic section prior to undertaking work on the system n The pump is not designed to meter gas...

Page 14: ...micals n Only use the system in accordance with the technical data and specifications outlined in the operating instructions n Only use the pump if it has been correctly installed and started up n All...

Page 15: ...conditions No dust no direct sunlight 4 2 Transport The sensor should be transported in its original packaging and in compliance with the permissible environmental conditions No fur ther special condi...

Page 16: ...Carry out mechanical and hydraulic assembly work before commencing the electrical installation Outdoors The unit is resistant to normal atmospheres in plant rooms Always use a housing or weatherproof...

Page 17: ...5 1 Dimensional drawing P_DX_0037_SW 226 59 125 4 29 162 165 Fig 5 Dimensional drawing of DF4a dimensions in mm not true to scale Assembly and installation 17...

Page 18: ...awlplugs supplied see Fig 6 3 Screw a cheese head screw into the upper drill hole The screw head should then have an approx 5 2 mm gap from the wall 4 Suspend the top of the unit into the screw head C...

Page 19: ...ied personnel Chapter 3 2 User qualification on page 12 CAUTION Warning of escaping feed chemical Feed chemical can escape in the event that the hose lines are incorrectly installed Only use original...

Page 20: ...hose end over the hose connector 4 as far as the stop 6 Tighten the union nuts 7 If you are only using a hose line and not a suction lance Shorten the free end of the suction line so that the end of...

Page 21: ...nstalled Chapter 5 4 1 Opening the housing on page 21 5 4 1 Opening the housing 1 Allow the equipment to cool down before working on it 2 Loosen the 4 screws on the upper part of the housing Fig 7 3 S...

Page 22: ...X_0035_SW 1 2 Fig 10 Preparing the mains connection 1 Break out drill holes 2 Terminal block XP1 5 4 3 Additional connections Additional units can be connected to the metering pump s terminal blocks s...

Page 23: ...be removed when wiring the unit A suction lance with a ProMinent round plug can be inserted directly into the Level socket 5 4 3 1 Wiring diagram P_DX_0036_SW_2 Fig 11 Wiring diagram for DF4a A Limit...

Page 24: ...ectly into the Level socket Use a single stage suction lance with round plug A suction lance with a ProMinent round plug can be inserted directly into the Level socket Dismantle the Level socket on th...

Page 25: ...ly tighten the 4 screws approx 3 5 Nm WARNING Danger of electric shock IP 65 degree of protection cannot be ensured if the seal is not properly fitted Close the housing leak tight after all work Check...

Page 26: ...orksta tions affected CAUTION Crushed fingers The rotating rotor can crush fingers Only operate the pump with the transparent cover fixed in place Only operate the pump once it has been properly insta...

Page 27: ...the circulating pump as a ref erence variable The reference variable is controlled by the external input Metering of chemicals e g floccu lants active carbon CONTACT Contact signals are provided by t...

Page 28: ...ightness of the LCD display can be adjusted see chapter entitled Adjusting the LCD contrast Tab 2 The displayed symbols have the following meanings Symbol Meaning P is active Press the key to move to...

Page 29: ...The control LED right shows the following information signals as soon as the unit is connected to the mains power supply LED Information green short red 1 second off System OK 7 1 3 Control keys Retur...

Page 30: ...Function of the control keys in a menu item of a sub menu Key Functions DOWN Lower change the set value UP Increase change the set value Accept the set value and move to the next menu item of the sub...

Page 31: ...entration activated calibrated Display in START mode calibrated Fig 14 Overview of continuous displays Continuous display Manual operating mode Contact operating mode Analogue operating mode Metering...

Page 32: ...de Display in START mode Display in START mode Fig 16 Overview of continuous displays Continuous display Manual operating mode Contact operating mode Analogue operating mode Capacity Operating mode Vo...

Page 33: ...ion capacity FLOW the capacity DOS and MANUAL in MANUAL operating mode MANUAL specifies the value of the capacity DOS in The metering concentration CONC and the capacity DOS must be set in ANALOG oper...

Page 34: ...tion MEMORY has been switched on and there are contacts in the memory for processing The metered volume per contact can be set here in ml per contact This value is re calculated in the event that the...

Page 35: ...Tab 10 The operating menu comprises the following menus depending of the unit ordered and settings 1 MODE 2 SET 3 CONFIG 4 SERVICE 5 INFO 6 SECURITY 7 CALIBRATION Setting 35...

Page 36: ...7 3 1 Operating menu overview Fig 18 Overview of DF4a operating menu Setting 36...

Page 37: ...2 2 2 0 Fig 19 Overview of DF4a operating menu 1 when MODE ANALOG 2 when LEVEL MODE LEVEL 1ST 3 when MODE CONTACT 4 with application ACTIVE CARBON 5 In the event of blocked access Setting 37...

Page 38: ...y of the peristaltic pump with the active carbon and flocculant pump 7 3 3 Changing parameters SET menu 7 3 3 1 Settings for ANALOG operating mode ANALOG sub menu If ANALOG operating mode is set Chapt...

Page 39: ...by changing the operating mode A maximum of 100 000 contact signals can be stored If more con tact signals are pending an error message EXTERN LIMIT appears and the pump stops 7 3 3 2 4 Special behavi...

Page 40: ...d at a manual capacity of 10 Contact operating mode At 10 capacity the metering pump needs at least 1 minute for 2 5 ml This means that the metering pump needs at least 20 minutes for 50 ml Special be...

Page 41: ...20 0 5 8 3 16 7 25 0 6 10 20 30 1 16 6 33 3 50 2 33 3 66 7 100 3 50 100 100 4 66 7 100 100 5 83 3 100 100 6 100 100 100 10 100 100 100 Example 7 3 3 2 5 Other settings Prerequisite Metering operation...

Page 42: ...an 100 The changed capacity appears on the LCD display while the capacity change is being switched If both capacity changes are activated switched then only the capacity change with the lower value is...

Page 43: ...to control a solenoid valve for back flushing The alarm is triggered when a certain event has occurred at the alarm relay The alarm is switched by a relay The alarm relay is set by default as normally...

Page 44: ...n be controlled by the relay output to open the backflushing line configured as MV RELAY It is possible to manually backflush in the REVERSE TIME sub menu If you have set a backflushing time of 0 seco...

Page 45: ...cement is pending on the LCD display 7 3 5 4 Setting the LCD contrast LCD CONTRAST sub menu In the LCD CONTRAST sub menu you can use the arrow keys to change the contrast of the LCD display 7 3 6 Read...

Page 46: ...t functions are protected by which access level Access level Priming Start Stop Continuous dis plays Operating menu SECURITY sub menu LOCK ALL X X ONLY MENU X NONE X In other words the access code is...

Page 47: ...enter or change an access code in this sub menu The factory setting for the access code is 1111 Once you have set an access code the access code then limits access to operation You can input entries...

Page 48: ...t intend to carry out calibra tion use the arrow keys to select NO 6 Press P The CALIB RUNS sub menu appears and the pump starts pumping 7 After the pump has achieved a sufficient number of rotations...

Page 49: ...ndings The system operator is responsible for ensuring that these safety data sheets are available and that they are kept up to date as well as for producing an associated hazard assessment for the wo...

Page 50: ...pump hose The service lives of the different types of hose also differ The pri mary factor is the speed of the peristaltic pump as the number of squeezes automatically determines the service life of t...

Page 51: ...on by pressing the Start Stop key 2 Use a suitable flushing medium to flush the pump referring to the material safety data sheet for the feed chemical 3 Use an on site depressurisation option to depre...

Page 52: ...ose is moved into the correct position under the rollers At the same time the DF4a resets the internal operating hours counter 12 Press P for approx 3 seconds The MAIN input page appears 13 Close the...

Page 53: ...and dry the contacts n Replace the pump hose Replacing the pump hose on page 51 n Use Start Stop to start the pump ANALOG ERROR Impermissible analogue signal value 25 mA Check the analogue signal EXTE...

Page 54: ...on page 51 MIN WARNING Set metering volume 0 5 Check the setting parameters MAX WARNING Set metering volume 100 Check the setting parameters SPEED WARNING The actual capacity exceeds the set metering...

Page 55: ...uated at any time based on new findings The system operator is responsible for ensuring that these safety data sheets are available and that they are kept up to date as well as for producing an associ...

Page 56: ...safety data sheets are available and that they are kept up to date as well as for producing an associated hazard assessment for the worksta tions affected NOTICE The used part can only be accepted wi...

Page 57: ...20 1 5 12 00 85 4 8 x 8 0 6x4 10x4 4 3 0 5 depends on the back pressure determined with water at 20 C 12 2 Precision Precision of pump capacity 10 with a new pump hose 12 3 Dimensions and weights Dime...

Page 58: ...r Permissible ambient temperature 10 45 C Permissible medium temperature 10 45 C Permissible storage temperature of the fully drained pump 10 55 C Specification Parameter Relative humidity non condens...

Page 59: ...use value 1 0 slow blow Type Schurter series SPT A unit fuse short circuit protection is fitted Type Micro step control 16 micro steps per step Specification Parameter Switching on duration 100 Nomina...

Page 60: ...ut resistance 15 k against 5 V Filter time constants 2 seconds 0 20 mA input Input resistance 120 against GND Filter time constants 1 second Tab 17 Level input prewarning AUX_2 Input Specification Val...

Page 61: ...19 Pump hoses for DF4a Type Material Colour Order no 04004 PharMed black 1034997 04015 PharMed blue 1030722 03060 PharMed orange 1030723 02120 PharMed white 1030774 Tab 20 Other parts Product Order no...

Page 62: ...will invalidate this declaration Tab 21 Extract from the EC Declaration of Conformity Designation of the product Peristaltic pump DULCOflex Product type DF4a Serial number see nameplate on the device...

Page 63: ...ROR Level shut off NORM OPEN NORM CLOSE dependent on identity code LIMIT WARN Level warning NORM OPEN NORM CLOSE dependent on identity code RELAY Relay output NORM OPEN NORM CLOSE dependent on identit...

Page 64: ...MASS PERCENT Mass percent 0 1 100 0 100 0 DENSITY Density 0 50 2 00 kg l 1 0 kg l FACTOR Pulse interval factor 0 001 1000 l p 1 000 l p VOLUME PULS Metering volume per con tact 0 001 9999 ml p 0 040...

Page 65: ...evel operating mode LEVEL 1 ST LEVEL 2 ST LEVEL 2 ST LIMIT ERROR Level shut off NORM OPEN NORM CLOSE dependent on identity code LIMIT WARN Level warning NORM OPEN NORM CLOSE dependent on identity code...

Page 66: ...identity code TUBE TYPE Hose dimensions 0 5 l h 1 5 l h 6 0 l h 12 0 l h dependent on identity code CONCENTRAT Concentration 0 01 ppm 9999 ppm 40 0 ppm MASS PERCENT Mass percent 0 1 100 0 100 0 DENSIT...

Page 67: ...42 Construction 6 CONTACT 34 Continuous displays 31 Control elements 7 Control keys 29 Control unit 28 Counter 44 COUNTER 44 D Date nameplate 6 Decommissioning 55 Decontamination declaration 56 Degre...

Page 68: ...g 49 Protective equipment 13 Pulse interval 34 Pump hose 45 R Recycling 15 Regulations governing the disposal of used parts 56 Relay 43 60 RELAY 43 Relevant EC directives 62 Replacing the feed chemica...

Page 69: ...69...

Page 70: ...70...

Page 71: ...71...

Page 72: ...986513 3 en_GB 2021 ProMinent GmbH Im Schuhmachergewann 5 11 69123 Heidelberg Germany Germany Telephone 49 6221 842 0 Fax 49 6221 842 419 Email info prominent com Internet www prominent com...

Reviews: