background image

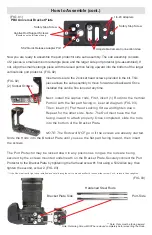
The #A10 Snag Protector (included), can be installed 
quickly in a number of locations on the Port Protector. 
Locate any (2) 1/4-20 holes and insert (1) of the 
#A10 threaded screws with mount attached. Leave 
a bit loose and weave your cable through the snag 
protector. Attach the second screw and lightly tighten 
the snag protector to grab and protect the cable. Do 
not CRUSH your cable.

Configurations

Additional Configurations

The #BP2 Cable Port Protector is also compatible with our #HB70QR Left Side and #HB1 
Right Side, Quick Release Padded Leather Handle! The handles attach to the side of the 

#BP2 on hardened steel rails and lock in 
with a thumb wheel screw. Adding handles 
transforms the #BP2 into an awesome video 
rig allowing loads of additional versatility!

#BP2 Shown with optional accessories:
(1) #A12 Magic Arm 
(1) #CS2 Cold Shoe
(1) Small HD Screen (not included)
(1) Canon EOS R (not included)

Summary of Contents for BP2

Page 1: ...ickly mount to your camera and create a protective barrier for your valuable side ports The BP2 also allows for various accessories to be added such as A10 Cable Snag Protectors included CS2 Low Profile Cold Shoe optional and much more BP2 L Cage and Port Protector Manufactured in the USA Universal Fit ...

Page 2: ... using the supplied 1 4 20 mounting screw Select the channel on the plate that best fits the body of your camera and install the screw Align the rubber gaskets face up and press against the bottom of your camera body Remember when your camera is facing forward the 2 large screw holes on the bottom of your PBX3 will face toward the left port side The ProMediaGear Logo should be on the back of the c...

Page 3: ...nderneath on the Bracket Plate Securely connect the Port Protector to the Bracket Plate by tightening the flat head screw 1 first using a 5 32 Allen key then tighten the second screw 2 FIG 03 If the Rods feel really tight once installed and not allowing the unit to move back forth loosen either screw 3 or 4 reinsert then retighten Insert and secure the 2 socket head screws provided in the kit This...

Page 4: ...igured forward to allow for screen articulation FIG 04 2 Socket Screws To adjust remove the 2 Socket Screws place where you want the unit to be positioned and reinstall the screws Many configurations possible The BP2 also features 9 1 4 20 adapter slots for accessories such as our A10 Snag Protector included CS2 cold shoe A12 Friction Arm and so much more A12 A10 included Optional Accessory ...

Page 5: ...ect the cable Do not CRUSH your cable Configurations Additional Configurations The BP2 Cable Port Protector is also compatible with our HB70QR Left Side and HB1 Right Side Quick Release Padded Leather Handle The handles attach to the side of the BP2 on hardened steel rails and lock in with a thumb wheel screw Adding handles transforms the BP2 into an awesome video rig allowing loads of additional ...

Page 6: ...Operation Check periodically for loose screws and tighten with the hardware that is included with the Port Protector Before using the bracket make sure it s attached to your camera correctly and tightened securely ...

Page 7: ...Customer Service If you have any questions please call us at 1 708 263 4443 or Toll Free 1 888 413 3332 or email info ProMediaGear com www ProMediaGear com ...

Page 8: ...H1 Studio Ball Head CS2 Low Profile Cold Shoe HB70 Handle for Bracket Plates BBX Boomerang Flash Bracket C60 Arca Type Clamp PM501 Manfrotto Style Plate w Arca Clamp PXM1 Manfrotto RC2 to Arca Hybrid Plate PMG DUO SLIDER S VS24 VS32 VS36 VS368 VS48 VRH1 Adjustable NATO Rail Handle VRNR4 NATO Rail w Cold Shoe SS2P1 Quick Release Strap Adapter Rev 10 18 ...

Reviews: