


7
I n s t a l l a t i o n G u i d e l i n e s
Battery Operating Time
Operating time of your inverter is determined by the size and type of battery you use,
but more specifically it is determined by how much power you will draw. Follow the
below steps to calculate roughly the battery ampere-hour capacity you may require.
1. Establish how many watts each piece of equipment you will use consumes. This
usually can be found on the label of your power products. If only current draw is given,
you can estimate the watt consumption by multiplying current draw by 115.
2. Estimate the time in hours you will be running each power product between charging
your battery source
3. Calculate the total watt hours of energy consumption (power x operating time) using
the average power consumption and the total estimated running hours. (Power x
Operating hours = Watt Hours)
4. Now Divide the Watt Hours by 10 to determine how many 12volt ampere-hours will
be used. You need to have a battery or a bank of batteries with same ampere-hours you
demand.
If the user has TruePower running off the start battery of your vehicle, we recommend
the user to start the vehicles engine very 30 minutes to recharge the battery. This will
help prevent any automatic shutdown of the inverter due to low battery voltage and help
ensure enough battery capacity to start the vehicle’s engine. The inverter’s low battery
alarm will sound when the battery drops to 10.5 volts and shut down at 10v.
The TruePower inverter can be used with or without the vehicle’s engine running. The
inverter may not be able to operate while the engine is starting as battery voltage drops
substantially during engine cranking. The best battery setup we can recommend for
providing sufficient inverter capacity while protecting the engine start battery from being
overdrawn is to have a separate battery for starting the vehicle and to have a deep
discharge type battery or several batteries in parallel for powering the inverter if you
plan on running electrical products for extended periods of time on a frequent basis.
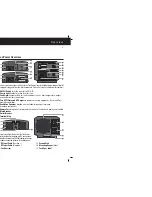
DC Wiring Options
Figure 1)
This wiring setup
displays an inverter
connected directly to
the engine battery for
light-duty applications.
*For an ABYC E-11 compliant installation,
customer supplied fuse, 7" from battery
TruePower
*fuse
POS
NEG
Boat/ Vehicle Battery
12
O p e r a t i o n / O p t i o n a l R e m o t e I n s t a l l a t i o n
Operation Continued
Resetting the Inverter:
To reset the TruePower Inverter, turn the ON/Off switch to Off and then back to ON.
Resetting the Ground Fault Circuit Interrupter (GFCI):
Function- The GFCI receptacle protects the receptacle output against a ground fault.
Correcting a Ground - When a ground fault condition is detected, the Reset button on the
GFCI receptacle Fault will trip and the power to an appliance is interrupted. To resume
normal operation, determine and correct the ground fault, then press the Reset button.
Monthly Testing- Once a month, with the TruePower turned ON, press the Test button
on the GFCI receptacle. The Rest button should pop out. Press it to reset the GFCI and
to continue with normal operation. If the Rest button does not trip, the GFCI may have
failed. Contact Customer Service to have a qualified technician inspect the unit.
Resetting as the Result of an Overload:
The TruePower has a high surge capacity of double the stated model power rating for
5 seconds. If the appliance(s) connected to the unit try to draw excess power for more
than 5 seconds, the TruePower will shut down and the Red Fault light will illuminate.
After removing the overload condition, the TruePower will cycle through a 15 second
self check and automatically reset to operating levels.
Operating Several Appliances at the Same Time:
If you are going to operate several appliances at the same time, turn them on
independently, after you have powered up the inverter. This action ensures that the
TruePower does not have to deliver the starting current for all of the appliances at
once. The TruePower can accommodate several appliances at once as long as they
do not exceed more than a combined total of the stated wattage of the inverter.
Recharging Your Batteries:
We recommend you recharge your batteries before they are fully discharged. This will
provide a much longer life cycle than recharging them when they are almost completely
discharged. It is recommended to use a Remote Battery Status indicator to monitor
the battery levels and determine optimum recharge times and cycles.
Optional Installation of Deluxe Remote
The Deluxe Remote may be removed from the inverter and mounted elsewhere in your vehicle.
Follow the steps below to mount the Deluxe Remote in the most convenient location for you.
Step 1- Locate display in a visible location that allows for access to the On / Off button. (We
recommend the area should be out of direct exposure to the sun, rain or spray if possible
to increase the life of the remote. The console/helm of your boat is a good example)
Step 2 - Remove Deluxe Remote from Inverter by slipping off the 2 mounting ear
covers and removing the 4 screws. Unplug cable from remote, and reattach this
cable into the remote backing plate found included with this inverter. Fasten remote
plate on the inverter with the 4 screws.


