ProHD DT-X16H User Manual Download Page 9


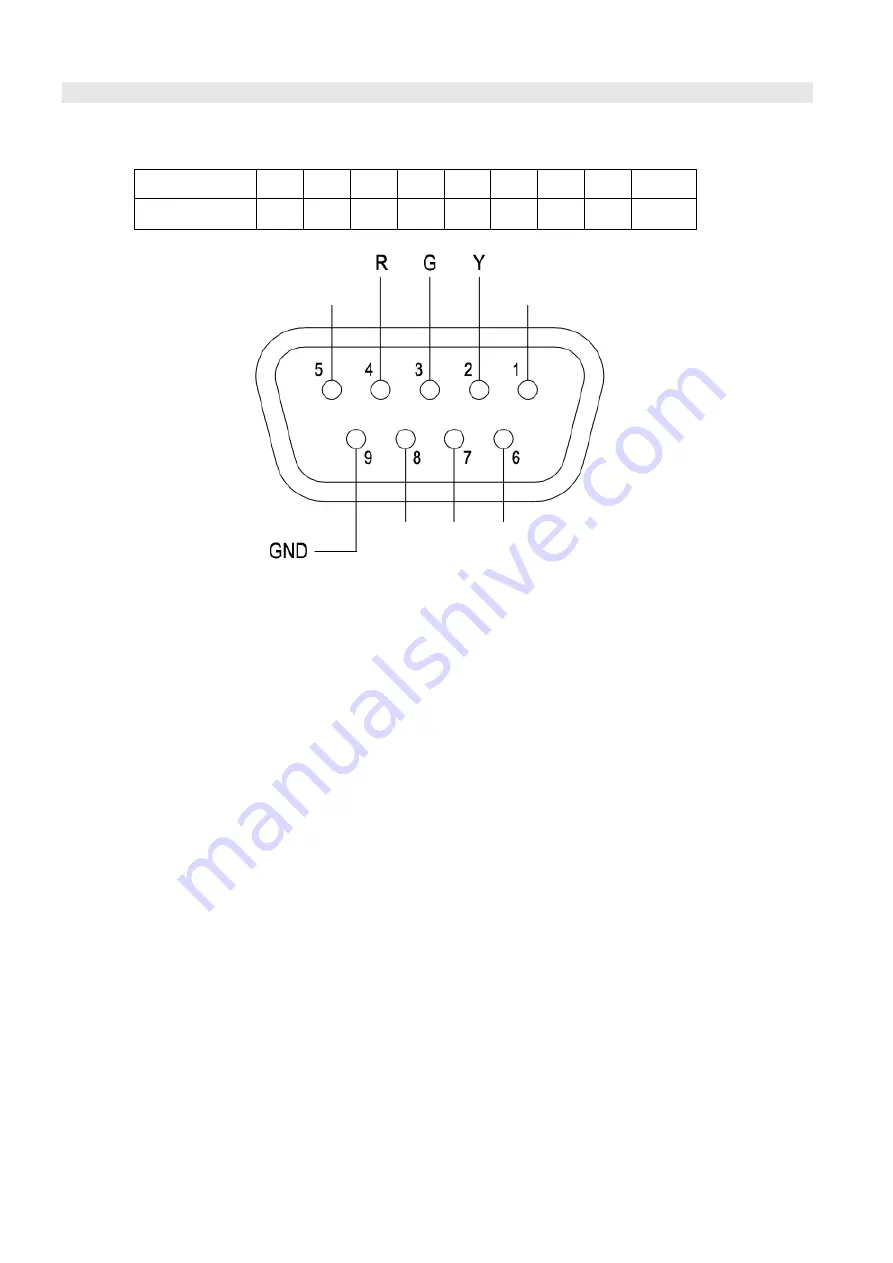
4. TALLY Light Operation 

The front TALLY light can display 3 colors: RED, GREEN and YELLOW. The TALLY light controlling port is 

the DB-9 socket at the rear panel, and terminal description is as follows: 


The RED light is on when connecting the terminal “R” with “GND”, and goes out when disconnecting. 

The GREEN light is on when connecting the terminal “G” with “GND”, and goes out when disconnecting. 

The YELLOW light is on when connecting the terminal “Y” with “GND”, and goes out when disconnecting. 

Terminal 

Description 


GND 

Summary of Contents for DT-X16H

Page 1: ...Model DT X16H 15 6 Broadcast Studio LCD Monitor User Manual Ver V2 0V05 Please read this User Manual throughout before using ...

Page 2: ...out prior notice 4 The warranty period of this product is 2 years and does not cover the following 1 Physical damage to the surface of the products including scratches cracks or other damage to the LCD screen or other externally exposed parts 2 Misuse abuse or negligent operation to the product 3 The product is disassembled by anyone other than an authorized service center It is considered normal ...

Page 3: ...commended by the manufacturer in order to avoid damage For a third party power adapter please make sure the voltage range supplied power and polarity of power lead are fit Please disconnect the power cable or take off the battery under the following situations 1 If you do not operate this monitor for a period of time 2 If the power cable or power adaptor is damaged 3 If the monitor housing is brok...

Page 4: ...ck if the image is over exposed or not by showing black and white lines on the monitor It is considered over exposed when luminance value exceeds 90 Blue Only Under Blue Only Mode only blue pixels are used to generate the image because hue and saturation can be adjusted quicker and more accurately Safe Area Adjustable You can select the scale of safe area frame from 80 85 90 and 95 in the menu sys...

Page 5: ...lve ENTER to adjust settings and press to apply and out of menu system directly revolve ENTER to adjust volume BRIGHT Revolve BRIGHT to adjust brightness value from 0 100 Default value is 50 CONTRAST Revolve CONTRAST to adjust contrast value from 0 100 Default value is 50 SATURATION Revolve SATURATION to adjust saturation value from 0 100 Default value is 50 POWER Power on off Connect with power c...

Page 6: ...uts the SDI IN2 signal and when SDI IN1 or other input sources are displayed the SDI LOOP outputs the SDI IN1 signal SDI IN1 3G HD SD SDI input BNC connector HDMI LOOP HDMI loop through output AUDIO IN Analog stereo audio input 3 5mm HDMI IN HDMI input SDI IN2 3G HD SD SDI input BNC connector CVBS IN Composite video input BNC connector Handle Input formats Input Supported formats CVBS PAL NTSC HDM...

Page 7: ...NDERSCAN OVERSCAN NATIVE selection ZOOM OFF ZOOM1 and ZOOM2 selection FLIP Select ON to flip the picture by 180 RESET Select YES to recover all to factory setting 3 3 OSD submenu The OSD submenu includes LANGUAGE Menu language selection H POSITION Menu horizontal position 0 100 adjustment real time preview and default value 50 V POSITION Menu vertical position 0 100 adjustment real time preview an...

Page 8: ...Picture Zoom in 04 B W Color Black white switch 05 BLUE ONLY Blue only mode switch on off 06 ZEBRA Zebra over exposure switch on off 07 TIMECODE SDI timecode display switch on off 08 AUDIO BAR Audio meter display switch on off 09 FOCUS Peaking focus assist switch on off 10 FLIP Image flip 11 COLOR TEMP Adjust color temperature 12 KEY LED Keyboard backlight switch on off 3 7 COLOR submenu The color...

Page 9: ...terminal description is as follows The RED light is on when connecting the terminal R with GND and goes out when disconnecting The GREEN light is on when connecting the terminal G with GND and goes out when disconnecting The YELLOW light is on when connecting the terminal Y with GND and goes out when disconnecting Terminal 1 2 3 4 5 6 7 8 9 Description Y G R GND ...

Page 10: ...3 98 SMPTE RP211 1080psf 30 29 97 25 24 23 98 SMPTE 296M 720p 60 59 94 50 SMPTE 125M 480i 59 94 ITU R BT 656 576i 50 HDMI 480I 576I 480P 576P 720p 60 59 94 50 1080i 60 59 94 50 1080psf 30 29 97 25 24 23 98 1080p 60 59 94 50 30 29 97 25 24 23 98 General Working voltage DC battery 11V 17V Power consumption Max 30W Working temperature 0 40 Working humidity 10 90 Storage temperature 15 60 Storage humi...

Page 11: ...le desktop stand with VESA installation A RK16 19 inch rack install bracket 7 1 Battery plate Installation 1 Take off the rub cover on the rear panel see Fig 1 2 Insert the DC cable of S 7004S A into the hole and plug onto the power socket inside the hole see Fig 2 3 Fix the battery plate onto the rear panel by the supplied screws see Fig 3 S 7004S S 7004A 1 2 3 ...

Page 12: ...c glass The A PG16 organic glass has left and right magnetic stripes and can be fixed on front of the LCD panel to protect the LCD during transport or stock 6 A PG16 7 3 Rotatable desktop stand 10x10cm VESA A VS16 Rear View ...

Page 13: ...bracket Installation 1 Fix the brackets onto the left and right sides of S 1161H monitor see Fig 1 and Fig 2 2 Install the monitor with brackets onto the 19 inch rack see Fig 3 3 The installed monitor is as Fig 4 A RK16 1 2 3 4 ...

Page 14: ...8 Installation Dimension 8 1 The main body in mm 8 2 With desktop stand feet in mm ...

Page 15: ...8 3 With rotatable VESA desktop stand in mm 8 4 With 19 inch rack install bracket in mm 488 47 60 115 ...

Page 16: ...istributed in North America by JVC Professional Video Products To obtain service or for further information please contact SWIT Electronics USA LLC Address 4300 Stevens Creek Blvd Suite 230 San Jose CA 95129 Toll free 1 866 986 SWIT 7948 Tel 408 260 8258 Fax 408 228 8438 Email info swit us Website www swit us ...

Reviews: