background image


 B) SMART PHONE CONTROL SETUP


P2667 - Smart Ceiling Fan WIFI Control              


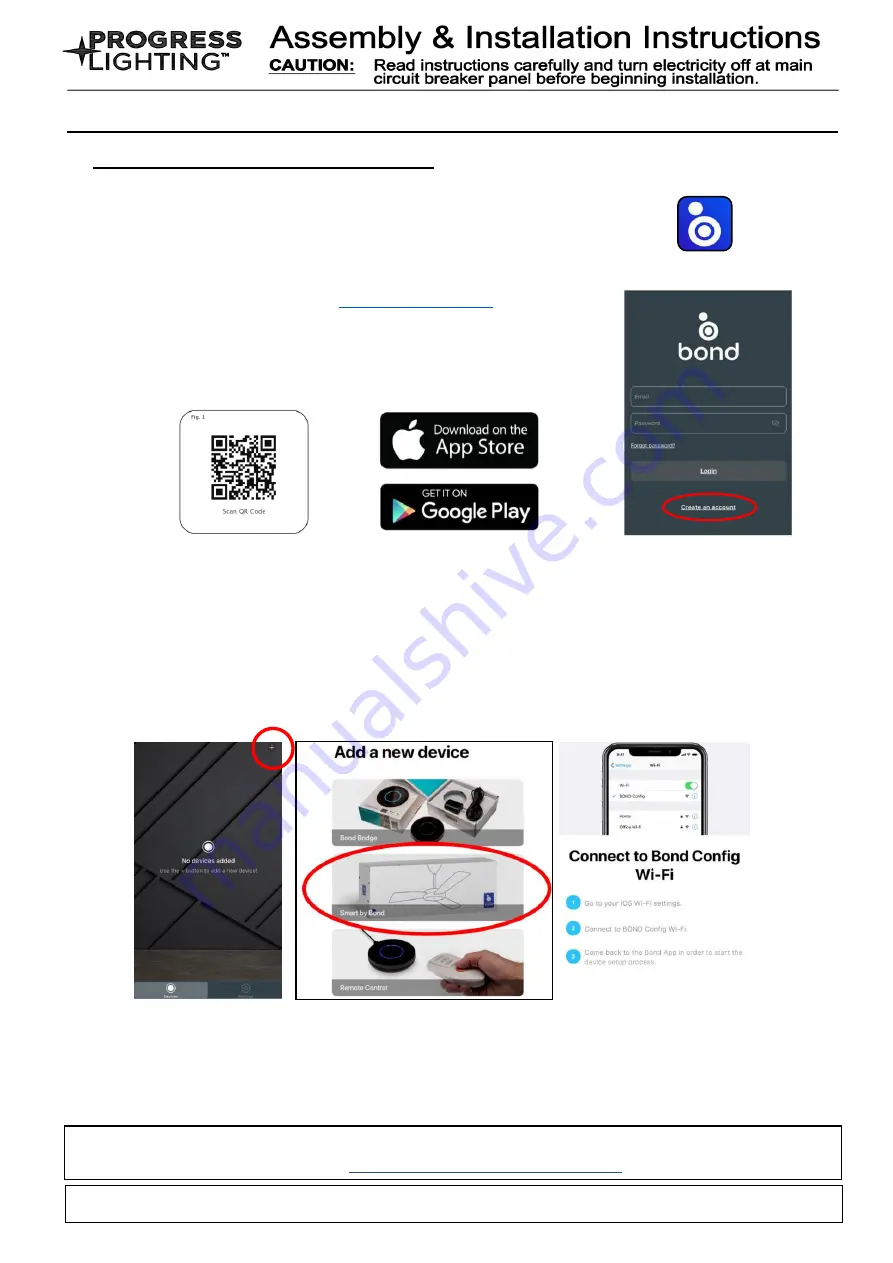
1. Install the BOND HOME app 

1.1   To enjoy all the potential of your new device, you will need to download the  

      BOND HOME app (available on the Google Play Store and Apple App Store)   

1.2  Use the QR code shown below to download the app, or you can  

  download the app using this link:  

http://bondhome.io/app


     1.3 After you download the app, create an account.  

NOTE: Keep your account credential information. You will  

use this information when you connect with your smart speaker. 


2. Pair the Device to the WIFI 


2.1 After you log into the main page, select 

the ”

” symbol  

           (IOS: top right corner of the screen) (Android: bottom center of screen). 

     2.2 Next you will see the 

“Add a new device” screen.  Choose the Smart by Bond option in the 

           middle of the screen. Then follow 

“Connect to Bond Config Wi-Fi” steps to continue pairing. 

     2.3 After the paring process with Wi-Fi receiver, then you can control the fan speed, light. 

   functions on the app.  

3. Re-pairing the device (New router or moving the ceiling fan control) 

   3.1 Within 60 seconds of turning the power on, press and hold the Fan Off (Stop) button for at least 5 

seconds. The light will flicker to confirm. 

       3.2 Follow the steps from step 2.1 to re-pair the device  

For setup support, access the Help Center in the BondHome App Settings section 


Bond Home 

For the latest and most complete instructions visit the resources section of the P2667 product 

page at 

www.hubbell.com/progresslighting


93100817_A 

Summary of Contents for P2667

Page 1: ...the Receiver Fig 2b Step 3 Receiver to House Supply Wires Electrical Connections Connect the WHITE wire Neutral from the outlet box to the WHITE wire marked AC in N from the receiver Connect the BLACK...

Page 2: ...the screen Android bottom center of screen 2 2 Next you will see the Add a new device screen Choose the Smart by Bond option in the middle of the screen Then follow Connect to Bond Config Wi Fi steps...

Page 3: ...ices AmazonAlexa Setting up and Using Google Home 1 In the Google Home app click on the Home icon from the bottom left corner of the screen and select the symbol in the top left corner of the screen 2...

Page 4: ...2b tape 3 Connexions lectriques du r cepteur aux fils d alimentation de la maison Connectez le fil BLANC Neutre de la bo te de sortie au fil BLANC marqu AC in N du r cepteur Connectez le fil NOIR chau...

Page 5: ...ran Add a new device Choisissez l option Smart by Bond dans le milieu de l cran Suivez ensuite les tapes Connect to Bond Config Wi Fi pour continuer le couplage 2 3 Apr s le processus d appariement av...

Page 6: ...le coin inf rieur gauche de l cran et s lectionnez le symbole dans le coin sup rieur gauche de l cran 3 S lectionnez Set up Device S lectionnez ensuite Works with Google 4 S lectionnez Bond Home dans...

Page 7: ...del Receptor Fig 2b Paso 3 Receptor de cables de suministro de la casa Conexiones el ctricas Conecte el cable BLANCO Neutro de la caja de salida al cable BLANCO marcado AC in N desde el receptor Cone...

Page 8: ...regar un nuevo dispositivo Elija la opci n Smart by Bond en el Medio de la pantalla Luego siga los pasos de Conectar a Wi Fi de configuraci n de enlace para continuar el emparejamiento 2 3 Despu s del...

Page 9: ...en la esquina inferior izquierda de la pantalla y seleccione el s mbolo en la esquina superior izquierda de la pantalla 2 Seleccione Set up Device Luego seleccione Works with Google 3 Seleccione Bond...

Reviews: