


!
!
WARNING
A hammer or mallet may be needed during assembly.
Figure1
Figure 3
Figure 4
Figure2
U6
U4
U3
U4
assembled
U1
U2
A
U3
Playing
Court
Front side
Back
side
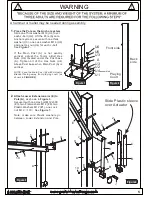
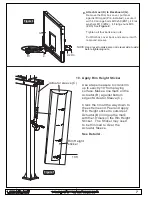
Place the Pole on the Anchor system.
Slide one Thick washer M16 (U3) over
each J-bolt (U2). Lift the Pole (A) onto
Anchor system, secure with one thick
washer (U3), one Lock washer M16 (U6)
and one Hex nut (U4) for each J-bolt.
See
Figure 1
.
If the Main Post (A) is not exactly
vertical, adjust the 16mm J-Bolt Hex
Nuts (U4) located under the Post base
(A). Tighten all of the Hex Nuts (U4)
Above Post base when Main Post (A) is
vertical.
NOTE: Face the Main Post (A) with Actuator
Bracket facing away from playing court (as
shown in
).
FIGURE 2
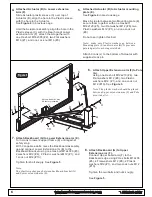
1.
Attach Lower Extension arm (E) to
Pole (A),
Figure 3
as shown in
.
Secure it with one Hex bolt M12x300
(#3), two Flat washers M12 (#8), two
Plastic Washers M12 (#1), one Lock
nut M12
10
See
(#
).
Figure 7.
Note
make sure Plastic washers go
:
between Lower Extension and Pole
.
2.
A
E
3
8
1
8
10
Slide Plastic sleeve
over Actuator
A
C
C
2
7
8
8
5
1
10
7
9
B
B
E
J
5


