background image

13

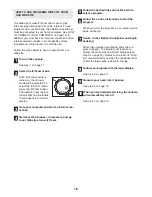
Each Smart program will automatically change the

resistance of the pedals and prompt you to increase or

decrease your pace as it guides you through an effec-

tive workout. Programs 1 and 2 are weight loss pro-

grams, programs 3 and 4 are aerobic programs, and

programs 5 and 6 are high-performance programs.

Follow the steps below to use a Smart program. 

Turn on the console.

See step 1 on page 11.

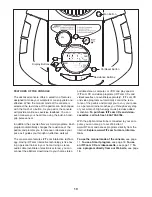
Select one of the Smart programs.

Each time the console is

turned on, the manual

mode will be selected. To

select a Smart program,

press the Program button

repeatedly until the num-

ber 1, 2, 3, 4, 5, or 6

appears in the small dis-

play. 

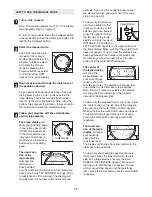
Begin pedaling to start the program.

To start the program, simply begin pedaling. Each

Smart program consists of 20 or 30 one-minute

periods. One resistance level and one target pace

are programmed for each period. (The same

resistance level and/or target pace may be pro-

grammed for two or more consecutive periods.)

At the end of each period of the program, the

resistance of the pedals will automatically change

if a different resistance level is programmed for

the next period. Note: If the resistance level is too

high or too low, you can change it by pressing the

+ and – buttons below the large display. However,

when the current period is completed, the resis-

tance of the pedals will automatically change if a

different resistance level is programmed for the

next period.

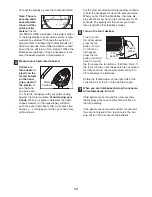
The target pace

for the current

period will be

shown by the

arrows in the

small display. To

pedal at the target

pace, simply

increase or decrease your pace until there is one

arrow pointing to each segment of the indicator

bar (see the drawing above). At the end of each

period, the number of arrows will change if a dif-

ferent target pace is programmed for the next

period. When the number of arrows changes,

change your pace until there is again one arrow

pointing to each segment of the indicator bar.

Important: The target pace is intended only to

provide a goal. Your actual pace may be slow-

er than the target pace, especially during the

first few months of your exercise program.

Make sure to pedal at a pace that is comfort-

able for you. 

During the program, the center of the large dis-

play will show the time remaining in the program.

If you stop pedaling for a few seconds, the dis-

plays will pause and the time will flash. If you

continue pedaling after the program is completed,

the displays will continue to show exercise feed-

back. 

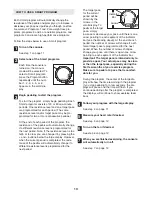
Follow your progress with the large display.

See step 4 on page 11.

Measure your heart rate if desired.

See step 5 on page 12.

Turn on the fan if desired.

See step 6 on page 12.

When you are finished exercising, the console

will automatically turn off.

See step 7 on page 12.

7

6

5

4

3

2

1

HOW TO USE A SMART PROGRAM

Arrows

Indicator

Bar

Summary of Contents for CardioCross Trainer PFEL39032

Page 1: ...oform com new products prizes fitness tips and much more QUESTIONS If you have questions or if there are missing parts we will guar antee complete satisfaction through direct assistance from our facto...

Page 2: ...EMBLY 5 HOW TO USE THE ELLIPTICAL CROSSTRAINER 9 MAINTENANCE AND TROUBLESHOOTING 19 CONDITIONING GUIDELINES 20 PART LIST 22 EXPLODED DRAWING 23 HOW TO ORDER REPLACEMENT PARTS Back Cover LIMITED WARRAN...

Page 3: ...l crosstrainer Always wear athletic shoes for foot protection while exer cising 9 Hold the handgrip pulse sensor or the han dlebars when mounting dismounting or using the elliptical crosstrainer 10 Th...

Page 4: ...eading this manual call our Customer Service Department toll free at 1 888 533 1333 Monday through Friday 6 a m until 6 p m Mountain Time excluding holidays To help us assist you please note the produ...

Page 5: ...e number in parenthesis below each drawing refers to the key number of the part from the PART LIST on page 22 The second number refers to the quantity needed for assembly Note Some small parts may hav...

Page 6: ...er end of the Upper Wire Harness insert the Upright into the Frame 1 Do not pinch the Wire Harnesses Slide an M10 Split Washer 70 and a Frame Spacer 83 onto an M10 x 88mm Button Screw 63 Insert the Bu...

Page 7: ...ease to the Pivot Axle 97 and to the two M8 5 Washers 53 Next insert the Pivot Axle into the Upright 2 and centre it Reapply grease to both ends of the Pivot Axle Slide a Handlebar Spacer 25 onto the...

Page 8: ...ical crosstrainer 8 20 15 38 14 13 70 8 Identify the Left Pedal 13 Attach the Left Pedal to the left Flex Bar 14 with an M10 x 35mm Carriage Bolt 20 an M10 Washer 38 an M10 Split Washer 70 and a Pedal...

Page 9: ...trainer wait until the pedals come to a complete stop Note The elliptical crosstrainer does not have a free wheel the ped als will continue to move until the flywheel stops When the pedals are station...

Page 10: ...vailable at electronics stores you can connect the elliptical crosstrainer to your home stereo portable stereo computer or VCR and play special iFIT com CD and video programs iFIT com CDs and videocas...

Page 11: ...step 5 on page 12 To view only the distance you have pedaled or the number of calories or fat calories you have burned press the upper button on the left side of the large display until only the word...

Page 12: ...and then your heart rate will be shown For the most accurate heart rate reading continue to hold the handgrips for about 30 seconds Note When you first hold the handgrips the large dis play will show...

Page 13: ...tance of the pedals will automatically change if a different resistance level is programmed for the next period The target pace for the current period will be shown by the arrows in the small display...

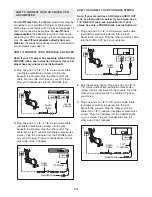
Page 14: ...nes into the other side of the Y adapter HOW TO CONNECT YOUR PORTABLE STEREO Note If your stereo has an RCA type AUDIO OUT jack see instruction A below If your stereo has a 1 8 LINE OUT jack see instr...

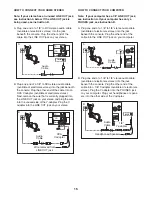
Page 15: ...W TO CONNECT YOUR COMPUTER Note If your computer has a 1 8 LINE OUT jack see instruction A If your computer has only a PHONES jack see instruction B A Plug one end of a 1 8 to 1 8 stereo audio cable a...

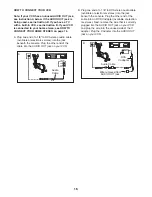
Page 16: ...your VCR B Plug one end of a 1 8 to RCA stereo audio cable available at electronics stores into the jack beneath the console Plug the other end of the cable into an RCA Y adapter available at electron...

Page 17: ...yer or VCR A moment after the play button is pressed your personal trainer will begin guiding you through your workout Simply follow your personal trainer s instructions The program will function in a...

Page 18: ...display Go to your computer and start an internet con nection Start your Web browser if necessary and go to our Web site at www iFIT com Follow the desired links on our Web site to select a program F...

Page 19: ...location where it will be used make sure that the ends of both stabilizers are touching the floor If the ellipti cal crosstrainer rocks slightly during use turn one or both of the level ing feet under...

Page 20: ...strengthen your cardiovascular sys tem your exercise must be aerobic Aerobic exer cise is activity that requires large amounts of oxygen for prolonged periods of time This increases the demand on the...

Page 21: ...les Stretch With one leg in front of the other reach forward and place your hands against a wall Keep your back leg straight and your back foot flat on the floor Bend your front leg lean forward and m...

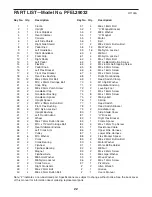
Page 22: ...4 1 Flywheel Axle 45 4 M8 5mm Washer 46 7 M8 Nylon Locknut 47 2 Crank Screw 48 1 Right Crank Arm 49 1 M6 x 25mm Bolt 50 4 M8 x 45mm Button Bolt 51 4 M6 x 18mm Bolt 52 1 C Magnet Bracket 53 2 M8 5 Wash...

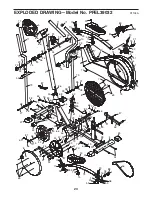
Page 23: ...32 32 33 34 35 35 34 29 29 29 29 48 36 37 21 39 40 40 21 41 42 42 43 44 46 45 47 47 46 54 55 56 57 57 45 45 61 61 62 63 64 64 65 65 65 74 67 74 85 38 38 38 38 70 74 67 81 78 69 66 77 73 76 72 72 80 8...

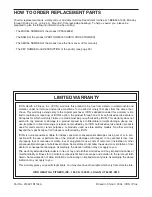
Page 24: ...caused by or attributable to freight damage abuse mis use improper or abnormal usage or repairs not provided by an ICON authorized service center products used for commercial or rental purposes or pro...

Reviews: