background image

13

HOW TO USE PERSONAL TRAINER PROGRAMS

Insert the key fully into the console.

See HOW TO TURN ON THE POWER on page 11.

Put on the chest pulse sensor if desired.

See HOW TO USE THE CHEST PULSE SENSOR
on page 8. 

Select one of the six personal trainer programs.

When the key is
inserted, the
manual mode
will be selected
and the manual
indicator will
light. To select
one of the personal trainer programs, press the
Mode button repeatedly until one of the six per-
sonal trainer program indicators lights. 

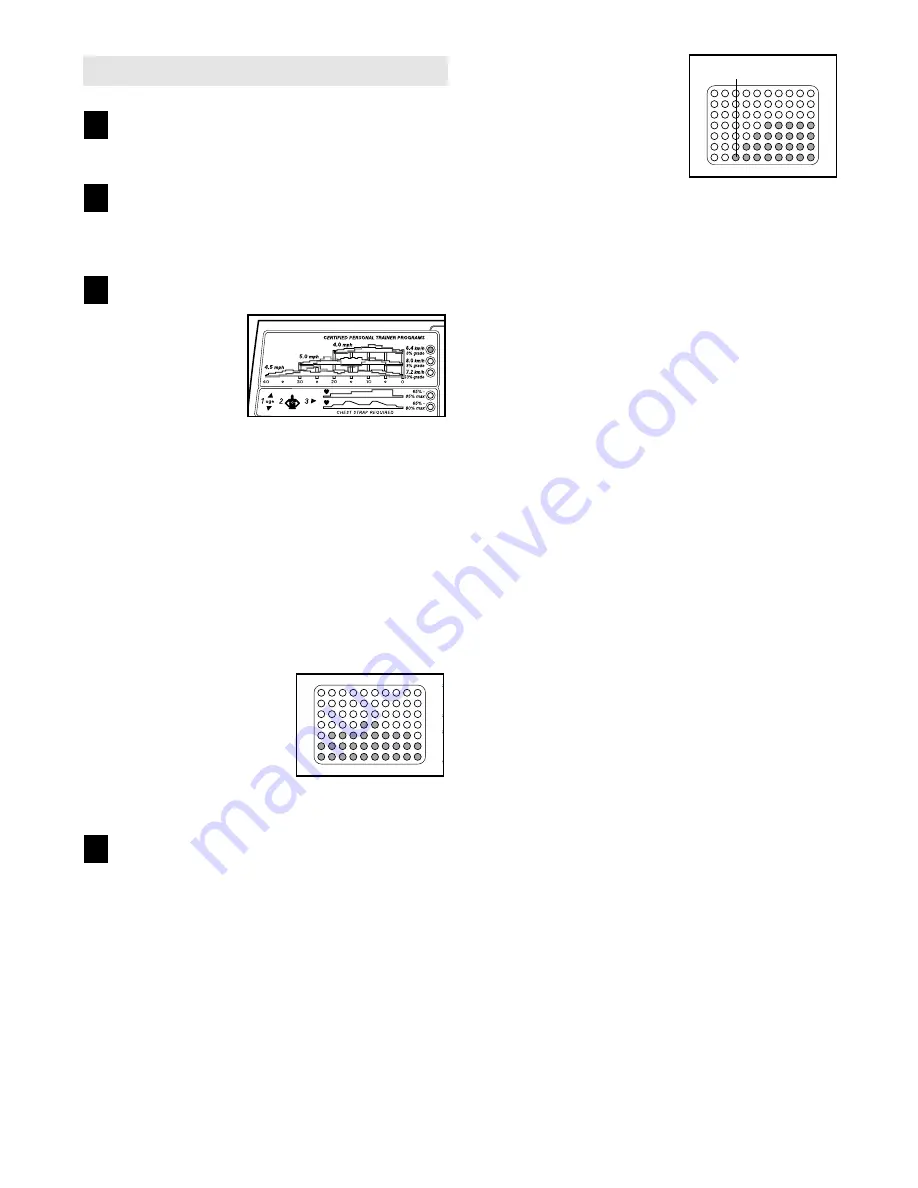
The profiles on the console show how the speed
and incline of the treadmill will change during the
programs. The numbers beside the profiles show
the maximum speed and incline settings for the
programs. For example, the upper left profile
shows that the treadmill will reach a maximum
speed of 4 mph and a maximum incline of 8% dur-
ing the first program.

The LED display will
show a simplified pro-
file of the program you
have selected. The
Time/Segment Time
display will show how
long the program will
last.

Press the Start button or the Speed 

▲ 

button to

start the program.

A moment after the button is pressed, the tread-
mill will automatically adjust to the first speed and
incline settings for the program. Hold the handrails
and begin walking. 

Each program is divided into several time seg-
ments of different lengths. The Time/Segment
Time display will show both the time remaining in
the program and the time remaining in the current
segment. One speed setting and one incline set-

ting are programmed for
each segment. The
speed setting for the
first segment will be
shown in the flashing
Current Segment col-
umn of the LED display.
(The incline settings are
not shown in the LED display.) The speed settings
for the next seven segments will be shown in the
seven columns to the right.

When only three seconds remain in the first seg-
ment of the program, both the Current Segment
column and the column to the right will flash, a se-
ries of tones will sound, and all speed settings will
move one column to the left. The speed setting for
the second segment will then be shown in the
flashing Current Segment column and the tread-
mill will automatically adjust to the speed and in-
cline settings for the second segment. 

The program will continue in this way until the
speed setting for the last segment is shown in the
Current Segment column and no time remains in
the Time/Segment Time display. The walking belt
will then slow to a stop.

Note: Each time a segment ends and the speed
settings move one column to the left, if all of the 
indicators in the Current Segment column are lit,
the speed settings will move downward so that only
the highest indicators in the columns will appear in
the LED display. When the speed settings move to
the left again and not all of the indicators in the
Current Segment column are lit, the speed settings
will move back up.

If the speed or incline setting for the current 
segment is too high or too low, you can manually
override the setting by pressing the Speed or
Incline buttons on the console. Every few times
one of the Speed buttons is pressed, an additional
indicator will light or darken in the Current Segment
column. If any of the columns to the right of the
Current Segment column have the same number
of lit indicators as the Current Segment column,
an additional indicator may light or darken in those
columns as well. Note: If you manually adjust the
speed setting so that all of the indicators in the
Current Segment column are lit, the speed settings
in the LED display will not move downward as de-
scribed above. When the current segment of the
program ends, the treadmill will automatically
adjust to the speed and incline settings for the
next segment.

4

3

2

1

Current Segment

Summary of Contents for 635

Page 1: ...mber in the space above for reference www proform com Visit our website at QUESTIONS As a manufacturer we are committed to providing complete customer satisfaction If you have questions or if there are missing parts we will guarantee complete satisfaction through our Customer Service Department Please CALL 08457 089009 Or WRITE ICON Health Fitness Ltd Unit 4 Revie Road Industrial Estate Revie Road...

Page 2: ...treadmill 4 When choosing a location for the treadmill make sure that the location and position permit access to an electrical plug 5 Keep the treadmill indoors away from mois ture and dust Do not put the treadmill in a garage or covered patio or near water 6 Do not operate the treadmill where aerosol products are used or where oxygen is being administered 7 Keep children under the age of 12 and p...

Page 3: ...he storage latch is fully closed 22 When using iFIT com CD s and videos an electronic chirping sound will alert you when the speed and or incline of the treadmill is about to change Always listen for the chirp and be prepared for speed and or in cline changes In some instances the speed and or incline may change before the per sonal trainer describes the change 23 When using iFIT com CD s and vide...

Page 4: ...ow have been placed on your treadmill If a decal is missing or illegible please call our Customer Service Department to order a free replacement decal see the front cover of this manual Apply the decal in the location shown Note This decal is shown at 20 of actual size ...

Page 5: ...stomer Service Department at 08457 089009 To help us assist you please note the product model number and serial number before call ing The model number of the treadmill is PETL63510 The serial number can be found on a decal attached to the treadmill see the front cover of this manual for the location Before reading further please review the drawing below and familiarise yourself with the parts tha...

Page 6: ...sion Legs 103 into the treadmill as shown Make sure that the Extension Leg is turned so the Thick Base Pad 11 is on the bottom Next tip the treadmill to the other side and insert the other Extension Leg not shown in the same way Lower the side of the treadmill so that both Extension Legs 103 are resting flat on the floor 2 With the help of a second person carefully lower the treadmill frame and th...

Page 7: ...t 59 and the Rear Foot Spacer 120 from the treadmill Reattach the right Rear Foot without the Rear Foot Spacer Hold the treadmill with both hands and lower the treadmill as described on page 22 Check the left Rear Foot 59 see drawing 6a If the left Rear Foot is still off the floor raise the treadmill and re move the left Rear Foot Snap the Rear Foot Spacer 120 onto the left Rear Foot and reattach ...

Page 8: ...than nec essary draining the battery prematurely Store the chest pulse sensor in a warm dry place Do not store the chest pulse sensor in a plastic bag or other container that may trap moisture Do not expose the chest pulse sensor to direct sunlight for extended periods of time Do not expose the chest pulse sensor to tempera tures above 122 Fahrenheit 50 Celsius or below 14 Fahrenheit 10 Celsius Do...

Page 9: ... end of the power cord into the socket on the treadmill Refer to drawing 2 Plug the power cord into an appropriate outlet that is properly in stalled and earthed in accordance with all local codes and ordi nances Note In Italy an adapter not included must be used between the power cord and the outlet Important The tread mill is not compatible with GFCI equipped outlets Use only a power cord type H...

Page 10: ...sic provides added motivation Each CD features two programs designed by certified per sonal trainers In addition you can connect the treadmill to your VCR and TV and play iFIT com video programs videocas settes are available separately Video programs offer the same benefits as iFIT com CD programs but add the excitement of working out with a class and an instructor the hottest new trend at health ...

Page 11: ...d buttons Each time a but ton is pressed the speed setting will change by 0 1 mph if a button is held down the speed set ting will change in increments of 0 5 mph To change the speed setting quickly press the Quick Speed buttons The speed range is 0 5 mph to 10 mph To stop the walking belt press the Stop button The Time Segment Time display will begin to flash To restart the walking belt press the...

Page 12: ...esired unit of measurement is selected remove the key and then reinsert it Note For simplicity all instructions in this manual refer to miles To reset the displays press the Stop button re move the key and then reinsert the key Use the thumb pulse sensor if desired When you are not using the chest pulse sensor you can check your heart rate using the thumb pulse sensor Before using the thumb pulse ...

Page 13: ...n columns to the right When only three seconds remain in the first seg ment of the program both the Current Segment column and the column to the right will flash a se ries of tones will sound and all speed settings will move one column to the left The speed setting for the second segment will then be shown in the flashing Current Segment column and the tread mill will automatically adjust to the s...

Page 14: ...See HOW TO USE THE CHEST PULSE SENSOR on page 8 Note A pulse program can be started without a heart rate reading however the speed and or incline of the treadmill will automatically decrease if your heart rate is not detected during the program Select one of the pulse programs When the key is inserted the manual mode will be selected and the manual indi cator will light To select one of the pulse ...

Page 15: ...t If your heart rate is not detected during the pro gram the Calories Watts Pulse display will be blank See HEART RATE MONITOR TROUBLE SHOOTING on page 8 The speed and or incline of the treadmill may also decrease until your heart rate is detected The program will continue until the heart rate set ting for the last segment is shown in the Current Segment column and the Time Segment Time display co...

Page 16: ...r end of the cable into the splitter Plug the split ter into the PHONES jack on your CD player Plug your headphones into the other side of the splitter HOW TO CONNECT YOUR PORTABLE STEREO Note If your stereo has an RCA type AUDIO OUT jack see instruction A below If your stereo has a 3 5mm LINE OUT jack see instruction B If your stereo has only a PHONES jack see instruction C A Plug one end of the ...

Page 17: ...used side of the RCA adapter Plug the RCA adapter into the LINE OUT jack on your stereo HOW TO CONNECT YOUR COMPUTER Note If your computer has a 3 5mm LINE OUT jack see instruction A If your computer has only a PHONES jack see instruction B A Plug one end of the audio cable into the jack on the front of the treadmill near the power cord Plug the other end of the cable into the LINE OUT jack on you...

Page 18: ... below to use an iFIT com CD or video program Insert the key into the console See HOW TO TURN ON THE POWER on page 11 Select the iFIT com mode When the key is in serted the manual mode will be selected and the manual indica tor will light To use iFIT com CD s or video cassettes press the Mode button repeatedly until the iFIT com indicator lights Insert the iFIT com CD or videocassette If you are u...

Page 19: ...rogram press the Stop button or re move the key and go to step 1 on page 18 Note If the speed or incline of the treadmill does not change when a chirp is heard Make sure that the iFIT com indicator is lit and that the Time Segment Time display is not flashing If the Time Segment Time display is flashing press the Start button or the Speed button on the console Adjust the volume of your CD player o...

Page 20: ...belt will begin to move Hold the handrails step onto the walking belt and begin walking During the program an electronic chirping sound will alert you when the speed and or incline of the treadmill is about to change CAUTION Always listen for the chirp and be prepared for speed and or incline changes If the speed or incline settings are too high or too low you can manually override the settings at...

Page 21: ...ppear in the Speed Min Mile display Press the Speed button to change the unit of measurement IMPORTANT The Calories Watts Pulse display should be blank If a d ap pears in the display the con sole is in the demo mode This mode is intended to be used only when a treadmill is displayed in a store When the console is in the demo mode the power cord can be plugged in the key can be removed from the con...

Page 22: ...not leave the treadmill in the stor age position in temperatures above 30 C 85 F HOW TO MOVE THE TREADMILL Before moving the treadmill convert the treadmill to the stor age position as described above Make sure that the latch pin is fully inserted into the catch 1 Hold the handrails as shown and place one foot against a wheel 2 Tilt the treadmill back until it rolls freely on the wheels Carefully ...

Page 23: ... power turns off during use SOLUTION a Check the circuit breaker located on the treadmill frame near the power cord see c above If the circuit breaker has tripped wait for five minutes and then press the switch back in b Make sure that the power cord is plugged in c Remove the key from the console Reinsert the key fully into the console d Make sure that the on off switch is in the on position e If...

Page 24: ...t clockwise and the right bolt counterclockwise 1 4 of a turn each Be careful not to overtighten the walking belt Plug in the power cord insert the key and run the tread mill for a few minutes Repeat until the walking belt is centred b If the walking belt has shifted to the right first re move the key and UNPLUG THE POWER CORD Using the allen wrench turn the left rear roller adjust ment bolt count...

Page 25: ... SOLUTION a If the chest pulse sensor does not function properly refer to CHEST PULSE SENSOR TROUBLE SHOOTING on page 8 b If the chest pulse sensor still does not function properly the battery should be changed To replace the battery locate the battery cover on the back of the sensor unit Insert a coin into the slot in the cover and turn the cover counterclockwise to the open position Remove the c...

Page 26: ...ivity that requires large amounts of oxygen for prolonged periods of time This increases the demand on the heart to pump blood to the muscles and on the lungs to oxygenate the blood For aerobic exercise adjust the speed and incline of the treadmill until your heart rate is near the highest number in your training zone WORKOUT GUIDELINES Each workout should include the following three parts A Warm ...

Page 27: ...atch Decal 68 4 Platform Screw 69 6 Electronics Screw 70 1 Latch Catch 71 1 Walking Platform 72 5 8 Cable Tie 73 1 Jack 74 1 Motor Tension Bolt 75 2 Foot Rail Insert 76 14 Short Screw 77 1 Console 78 1 Choke 79 4 Long Screw 80 1 10 iFIT com Wire 81 4 Motor Bushing 82 1 Upright 83 2 Incline Leg Pivot Bolt 84 1 Motor Mount Isolator 85 2 Handrail Extension 86 2 Wheel Bolt 87 1 Console Base 88 1 Motor...

Page 28: ...ease be prepared to give the following information The MODEL NUMBER OF THE PRODUCT PETL63510 The NAME OF THE PRODUCT PROFORM 635 treadmill The SERIAL NUMBER OF THE PRODUCT see the front cover of this manual The KEY NUMBER OF THE PART S see the PART LIST on page 27 and the EXPLODED DRAWING attached in the centre of this manual The DESCRIPTION OF THE PART S see the PART LIST on page 27 and the EXPLO...

Page 29: ... 15 15 76 18 119 22 21 3 1 3 4 2 39 40 92 33 43 42 32 68 44 45 46 41 71 55 68 44 101 47 45 46 47 47 62 53 54 59 60 62 61 64 65 60 59 47 63 57 67 51 66 36 65 36 68 68 12 75 75 37 74 37 81 23 98 93 88 101 101 120 37 25 69 48 62 119 27 28 84 112 114 114 111 6 101 58 EXPLODED DRAWING Model No PETL63510 R0601A ...

Page 30: ...22 85 76 76 95 103 95 106 106 104 104 11 101 11 101 13 110 85 76 76 76 76 89 83 119 11 101 96 11 101 83 82 16 16 16 94 101 91 99 127 72 101 105 101 16 34 56 80 73 20 108 107 46 46 90 121 79 79 118 124 123 123 97 97 10 28 14 126 102 EXPLODED DRAWING Model No PETL63510 R0601A ...

Reviews: