50
8
38
7
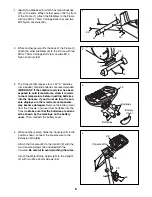
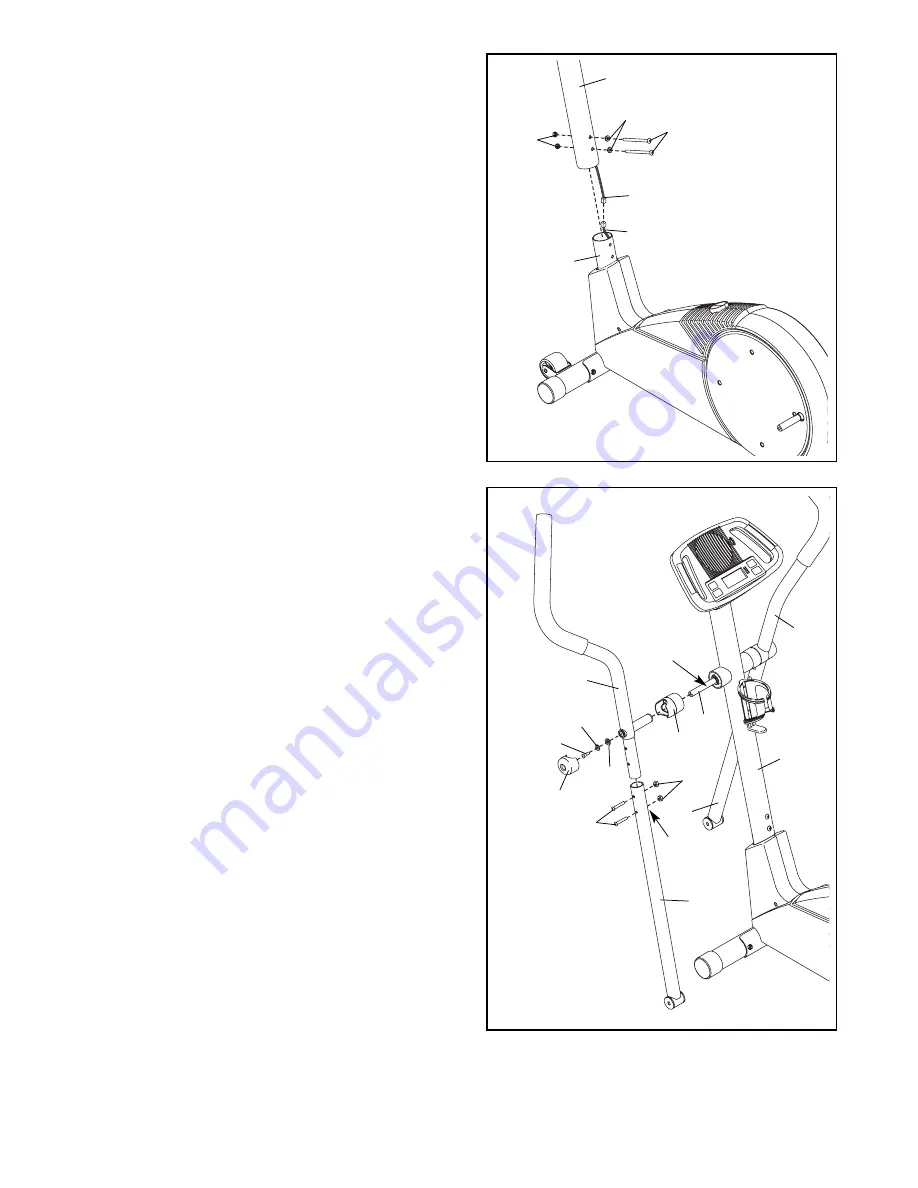
6. Identify the Left Handlebar (6), which is marked with
a sticker. Insert the Left Handlebar into one of the
Handlebar Legs (5);
make sure that the Handlebar
Leg is turned so the hexagonal holes are on the
indicated side
. Attach the Left Handlebar to the
Handlebar Leg with two M8 x 45mm Button Bolts
(50) and two M8 Nylon Locknuts (38).
Make sure
that the Nylon Locknuts are inside of the hexag-
onal holes. Do not tighten the Button Bolts yet.
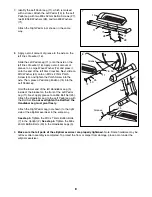
Insert the Pivot Axle (26) into the Upright (2), and
center the Pivot Axle. Apply a generous amount of
the included grease to both ends of the Pivot Axle.
Turn a Handlebar Spacer (47) so that the small arrow
on the Handlebar Spacer is pointing toward the floor,
and slide the Handlebar Spacer onto the post on the
Left Handlebar (6). Next, slide the Left Handlebar
onto the Pivot Axle (26).
Slide a Handlebar Washer (55) and a Wave Washer
(69) onto an M8 x 25mm Patch Screw (56), and tight-
en the Patch Screw into the Pivot Axle (26). Then,
press the tabs on a Handlebar Cap (46) into the
Handlebar Spacer (47).
Assemble the Right Handlebar (8) and the other
Handlebar Leg (5) in the same way.
Grease
6
47
5
2
5
55
46
26
56
69
6
Hexagonal
Holes
5
1
2
33
Avoid pinching
the wires during
this step
73
68
7
45
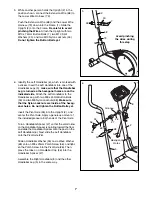
5. While another person holds the Upright (2) in the
position shown, connect the Extension Wire (68) to
the Lower Wire Harness (73).
Push the Extension Wire (68) and the Lower Wire
Harness (73) down into the Frame (1). Slide the
Upright (2) onto the Frame.
Be careful to avoid
pinching the Wires.
Attach the Upright with two
M10 x 74mm Button Bolts (7), two M10 Split
Washers (45), and two M10 Nylon Locknuts (33).
Do not tighten the Button Bolts yet.


